RCA HD50LPW165 User Guide & Warranty - Page 78
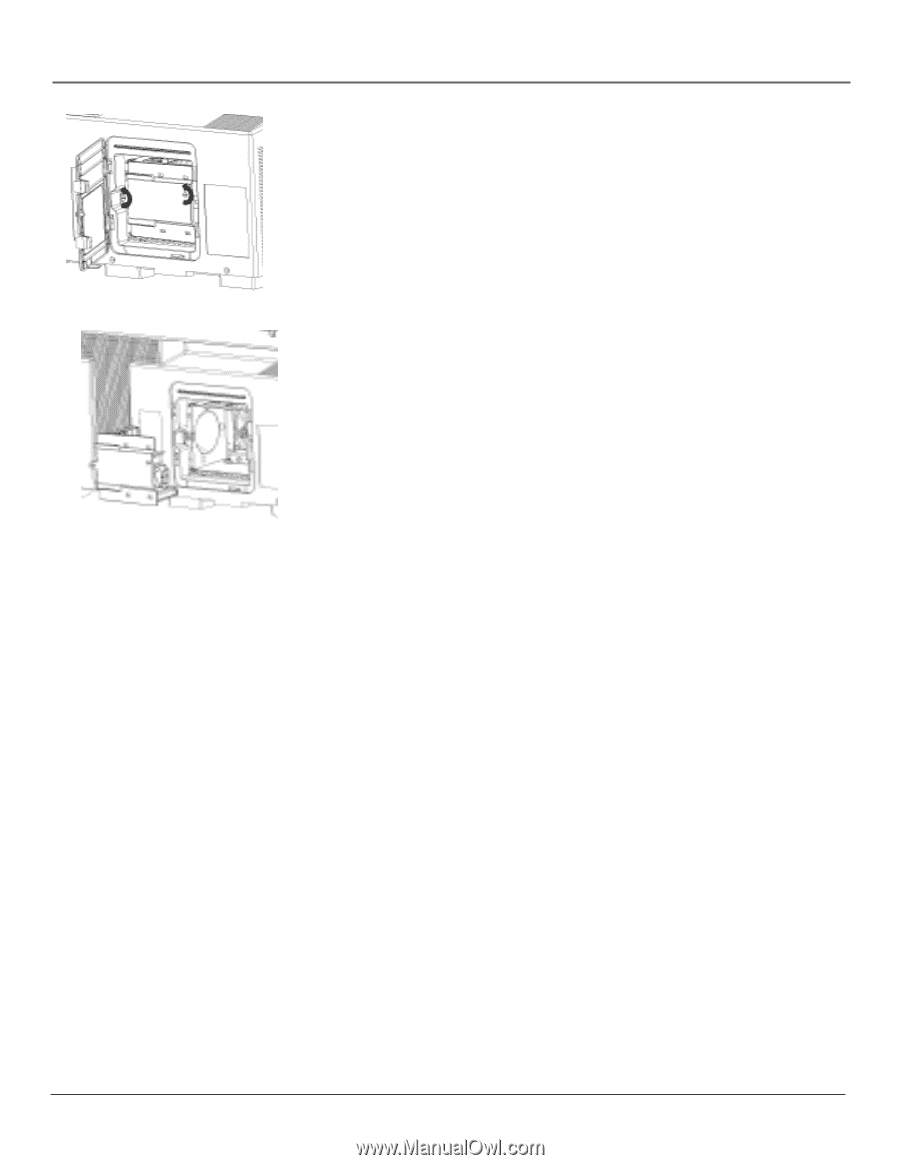
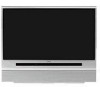
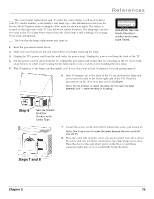
Step 10, Step 9
 |
View all RCA HD50LPW165 manuals
Add to My Manuals
Save this manual to your list of manuals |
Page 78 highlights
References 9. Loosen the two screws on the lamp unit inside the TV (the screws stay with the unit so just loosen them, don't remove them). Step 9 10. As you remove the lamp, pay attention to how the lamp fits so that you can use the proper orientation when you're installing the new lamp. To remove the lamp unit: • grasp the handles and pull straight back to remove the entire lamp assembly unit from the TV. • place the old unit out of the way where it won't get broken or dropped. Step 10 11. Remove the new lamp assembly unit from its packaging. 12. Make sure the lamp unit is oriented in the correct position, and gently slide it into the lamp access opening as far as it can go (it fits snugly). 13. Tighten the two screws on the new lamp unit. 14. Put the old lamp unit into the box in which the new lamp unit was packaged. 15. Replace the lamp access door (the TV won't turn on unless this door is in place and properly attached). a. Insert the catch tabs (also called latches) into the slots on the left side of the lamp access compartment first. Then put the rest of the door in place by rotating the door until it is fully closed and the latches are engaged. b. Tighten the screw. 16. Plug the power cord into the back of the TV first and then back into the wall outlet strip. 17. Turn on the TV. 18. After the TV warms up (up to 60 seconds), you should see a picture. If you don't see a picture, check the following: • Make sure TV is plugged in. • Make sure you've tuned the TV to a valid channel. • Try turning on the TV both ways: with the remote control, and then with the power button on the front of the TV. • Make sure the lamp unit access door is properly and completely closed. • Make sure the screws are completely tightened. • Unplug the power cord from the TV and from the power outlet. Return to step 7 and make sure the lamp unit is fully seated in the housing. • If the TV still doesn't come on, you need to have the unit professionally serviced. See your warranty. 76 Chapter 5
-
 1
1 -
2
-
3
-
4
-
5
-
6
-
7
-
8
-
9
-
10
-
11
-
12
-
13
-
14
-
15
-
16
-
17
-
18
-
19
-
20
-
21
-
22
-
23
-
24
-
25
-
26
-
27
-
28
-
29
-
30
-
31
-
32
-
33
-
34
-
35
-
36
-
37
-
38
-
39
-
40
-
41
-
42
-
43
-
44
-
45
-
46
-
47
-
48
-
49
-
50
-
51
-
52
-
53
-
54
-
55
-
56
-
57
-
58
-
59
-
60
-
61
-
62
-
63
-
64
-
65
-
66
-
67
-
68
-
69
-
70
-
71
-
72
-
 73
73 -
 74
74 -
 75
75 -
 76
76 -
 77
77 -
 78
78 -
 79
79 -
 80
80 -
 81
81 -
 82
82 -
 83
83 -
84
-
85
-
86
-
87
-
88
-
89
-
90
-
91
-
92
-
93
-
94
-
95
-
96
 |
 |