RCA HD56W66 User Manual - Page 20
Plug in the TV, Put batteries in the remote, How to Use the Remote Control to, Complete the Initial - replacement tv screen
 |
View all RCA HD56W66 manuals
Add to My Manuals
Save this manual to your list of manuals |
Page 20 highlights
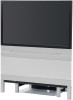
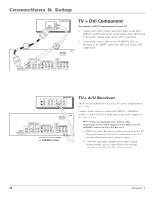
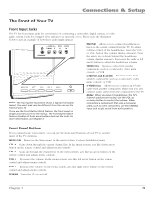
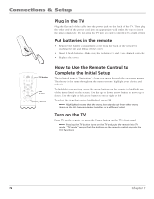
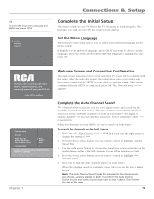
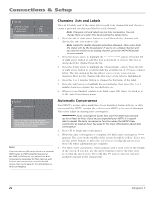
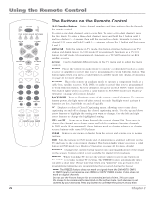
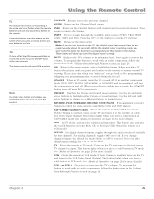
Connections & Setup Plug in the TV Plug the flat end of the cable into the power jack on the back of the TV. Then plug the other end of the power cord into an appropriate wall outlet. Be sure to insert the plug completely. Do not plug the TV into an outlet controlled by a light switch. Put batteries in the remote • Remove the battery compartment cover from the back of the remote by pushing the tab and lifting off the cover. • Insert 2 fresh batteries. Make sure the polarities (+ and -) are aligned correctly. • Replace the cover. VCR ON•OFF TV DVD AUDIO AUX•HD SAT•CABLE MUTE FORMAT CH + TV button VOL VOL CH - BACKLIGHT SKIP GUIDE GO BACK INFO OK OK button MENU CLEAR Arrows How to Use the Remote Control to Complete the Initial Setup The technical term is "Navigation" - how you move through the on-screen menus. The theory is the same throughout the menu screens: highlight your choice and select it. To highlight a menu item, press the arrow buttons on the remote to highlight one of the items listed on the screen. Use the up or down arrow button to move up or down. Use the right or left arrow button to move right or left. To select the item that you've highlighted, press OK. Note: Highlighted means that the menu item stands out from other menu items on the list (appears darker, brighter, or a different color). Turn on the TV Press TV on the remote, or press the Power button on the TV's front panel. Note: Pressing the TV button turns on the TV and puts the remote into TV mode. "TV mode" means that the buttons on the remote control operate the TV's functions. 18 Chapter 1
-
 1
1 -
2
-
3
-
4
-
5
-
6
-
7
-
8
-
9
-
10
-
11
-
12
-
13
-
14
-
 15
15 -
 16
16 -
 17
17 -
 18
18 -
 19
19 -
 20
20 -
 21
21 -
 22
22 -
 23
23 -
 24
24 -
 25
25 -
26
-
27
-
28
-
29
-
30
-
31
-
32
-
33
-
34
-
35
-
36
-
37
-
38
-
39
-
40
-
41
-
42
-
43
-
44
-
45
-
46
-
47
-
48
-
49
-
50
-
51
-
52
-
53
-
54
-
55
-
56
-
57
-
58
-
59
-
60
-
61
-
62
-
63
-
64
 |
 |