RCA HD56W66 User Manual - Page 24
The Buttons on the Remote Control - won t turn on now
 |
View all RCA HD56W66 manuals
Add to My Manuals
Save this manual to your list of manuals |
Page 24 highlights
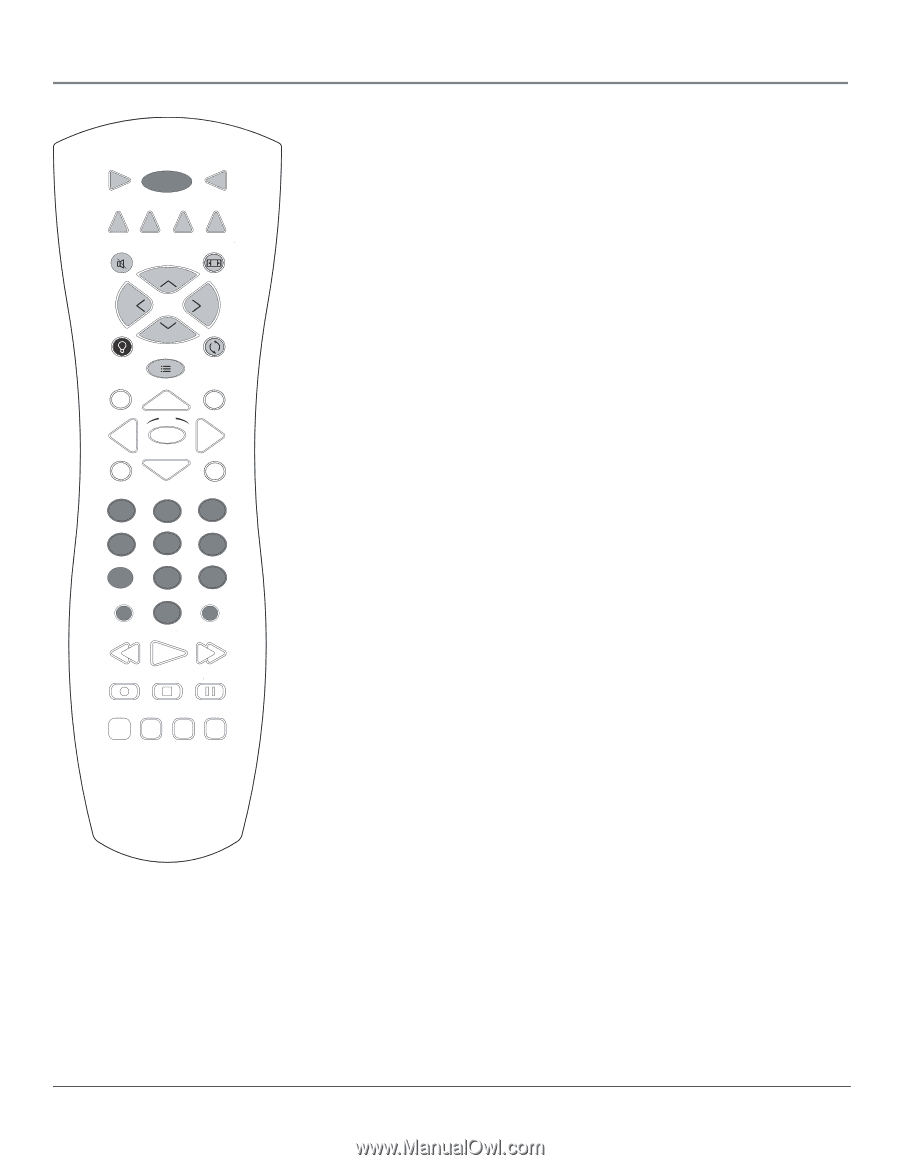
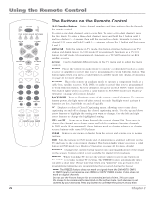
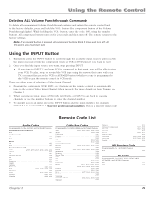
Using the Remote Control VCR ON•OFF TV DVD AUDIO AUX•HD SAT•CABLE MUTE FORMAT CH + VOL VOL CH - BACKLIGHT SKIP GUIDE GO BACK INFO OK MENU 1 2 CLEAR 3 4 5 6 7 8 INPUT 0 9 ANT•CAB REVERSE PLAY FORWARD RECORD STOP PAUSE CC PRESETS SOUND FREEZE 22 The Buttons on the Remote Control (0-9) Number Buttons Enter channel numbers and time settings directly through the remote control. To enter a one-digit channel, enter a zero first. To enter a two-digit channel, press the two digits. To enter a three-digit channel, press and hold the 1 button until 1 and two dashes (- -) appear, then add the second two digits. Example: to tune to channel 123, press and hold 1 until 1- - appears, release the 1 button and then press 2 and 3. ANT•CAB With the remote in TV mode, this button switches between your TV's analog and digital tuners. In VCR mode (if programmed), functions as a TV/VCR button. In SAT mode (if programmed), functions as a TV/SAT button for an RCA satellite receiver. Arrows Used to highlight different items in the TV menu and to adjust the menu controls. AUDIO Places the remote in audio mode to operate a component (such as a audio receiver or amplifier receiver) that you've programmed to work with this button. This button lights when you press a valid button in AUDIO mode (see Modes of Operation on page 26 for more details). AUX•HD Places the remote in auxiliary mode to operate a component (such as a cable box, satellite receiver, VCR, DVD, or audio receiver) that you've programmed to work with this button. AUX by default is set up for an RCA HDTV Tuner receiver. This button lights when you press a valid button in AUX•HD mode (see Modes of Operation on page 26 for more details). BACKLIGHT Press to illuminate some of the remote control's buttons. To conserve battery power, the light turns off after several seconds. Backlight won't activate if batteries are low, but blinks on and off quickly. CC Displays a reduced Closed Captioning menu, allowing you to turn closed captioning on and off or change the closed captioning mode. Use the up and down arrow buttons to highlight the setting you want to change. Use the left and right arrow buttons to change the highlighted setting. CH + or CH - Scans up or down through the current channel list. Press once to change the channel up or down; press and hold to continue changing channels. In DVD mode (if programmed), these buttons work as chapter advance or chapter reverse buttons with some DVD players. CLEAR Removes any menu or display from the screen and returns you to normal viewing. DVD Puts the remote in DVD mode and, if Autotuning is enabled, will turn on the TV and tune to the correct input channel. This button lights when you press a valid button in DVD mode (see Modes of Operation on page 26 for more details). FORMAT Changes the current format (aspect ratio and magnification) of the image on the screen. Format control is not available for digital 16:9 broadcasts. FREEZE When watching TV, freezes the picture until you press any button on the remote to resume normal TV viewing. The FREEZE feature automatically times out after a short time. Please note that when you "unfreeze" you go back to live programming (skipping any programming that occurred during the freeze). Note: The FREEZE feature does not work on signals from the DVI-HDTV, CMP1, or CMP2 inputs in progressive scan (480p) or HDTV (1080i) modes. It also does not work on digital channels. Do not use the Freeze feature for an extended period of time. This can cause the image to be permanently imprinted on the picture tube. Such damage is not covered by your warranty. Press any button to unfreeze the picture at any time. Chapter 2
-
 1
1 -
2
-
3
-
4
-
5
-
6
-
7
-
8
-
9
-
10
-
11
-
12
-
13
-
14
-
15
-
16
-
17
-
18
-
 19
19 -
 20
20 -
 21
21 -
 22
22 -
 23
23 -
 24
24 -
 25
25 -
 26
26 -
 27
27 -
 28
28 -
 29
29 -
30
-
31
-
32
-
33
-
34
-
35
-
36
-
37
-
38
-
39
-
40
-
41
-
42
-
43
-
44
-
45
-
46
-
47
-
48
-
49
-
50
-
51
-
52
-
53
-
54
-
55
-
56
-
57
-
58
-
59
-
60
-
61
-
62
-
63
-
64
 |
 |