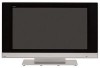
RCA L26WD14 User Manual
RCA L26WD14 Manual
 |
View all RCA L26WD14 manuals
Add to My Manuals
Save this manual to your list of manuals |
RCA L26WD14 manual content summary:
- RCA L26WD14 | User Manual - Page 1
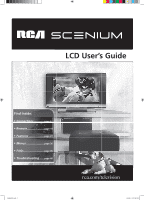
LCD User's Guide Find Inside: • Connections page 6 • Remote page 19 • Features page 27 • Menus page 36 • FAQs page 45 • Troubleshooting ..... page 46 1668591B.indb 1 rca.com/television 6/5/06 3:27:28 PM - RCA L26WD14 | User Manual - Page 2
, such as vases, shall be placed on the apparatus. WARNING The TV is unstable if it is not properly attached to the base or mounted to the wall. Please follow the base or wall mounting instructions provided in the User's Guide to ensure your safety. This symbol indicates that this product contains - RCA L26WD14 | User Manual - Page 3
combination to avoid injury from tip-over. 13. Unplug this apparatus during lightning storms or when unused for long periods of time. 14. Refer all servicing to qualified service personnel. Servicing is required when the apparatus has been damaged in any way, such as power-supply cord or plug is - RCA L26WD14 | User Manual - Page 4
.......... 8 HDMI/DVI Connection 10 USB Connection 12 VGA Connection 13 Plug in the TV 14 Put Batteries in the Remote 14 Turn on the TV 14 How to Use the Remote Control to Complete the Initial Setup 14 Complete the Initial Setup 15 Set the Menu Language 15 Complete Channel Setup 15 What To - RCA L26WD14 | User Manual - Page 5
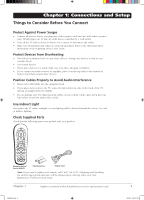
or indirect lighting. Check Supplied Parts Check that the following parts were packed with your product. ON•OFF TV PIP SAT•AUX DVD GO BACK VOL CH MENU MUTE INFO + CH CTRL ZOOMCLEAR PRESETS ZOOM+ GUIDE INPUT SUB CH Remote control Part # R301C1 2 AA batteries Power cord Note: If you - RCA L26WD14 | User Manual - Page 6
Picture The first part of connecting your TV is to get the picture, also known as the signal. The back panel of your TV allows you to receive ("rabbit ears") or outdoor antenna with coaxial cable OR • Coaxial cable with cable service A. Do you have an indoor or outdoor antenna? If not, go to step - RCA L26WD14 | User Manual - Page 7
while using your RCA product, please visit www.rca.com/customersupport. There are several ways to connect your TV. Please use the + HDMI/DVI adapter + Audio page 10-11 USB USB page 12 VGA VGA AUDIO Audio VGA VIDEO VGA Audio page 13 HDMI, the HDMI logo, and High-Definition Multimedia - RCA L26WD14 | User Manual - Page 8
a connection using the Component Video jacks. Go to the middle of page 9 for specific instructions. Don't forget: If necessary, connect antenna or cable to get a picture. Go to page 6 for instructions. 8 1668591B.indb 8 1 Y Pb/Cb COMPONENT INPUT (CMP1) Pr/Cr L AUDIO R 2 3 OUTPUT COMPONENT VIDEO - RCA L26WD14 | User Manual - Page 9
Video (Advanced) Connection instead. See instructions below. Using the example of TV PIP SAT•AUX DVD GO BACK VOL CH MENU ZOOMCLEAR MUTE INFO + CH CTRL PRESETS ZOOM+ GUIDE TV and the device you want to view, for example a DVD player. 3. Repeatedly press the INPUT button on the remote control - RCA L26WD14 | User Manual - Page 10
of a connection using the HDMI/DVI jack. * *Don't forget: If necessary, connect antenna or cable to get a picture. Go to page 6 for instructions. L DVI/ AUDIO R HDMI1 /DVI C A Device with HDMI Y Pb Pr Video Out R L Audio Out HDMI Out OR B DVI Out R L Audio Out Device with - RCA L26WD14 | User Manual - Page 11
INPUT button on the remote control until you see HDMI1 displayed at the bottom of the TV's screen. To go back to viewing TV channels, use the number devices to your TV, go to page 14 to complete the Initial Setup. • If you experience HDMI problems, go to the HDMI Troubleshooting section on page - RCA L26WD14 | User Manual - Page 12
USB device and the other end to the USB jack on the TV. ON•OFF button Viewing the Connected Device ON•OFF TV PIP SAT•AUX DVD GO BACK VOL CH MENU ZOOMCLEAR MUTE INFO + CH CTRL PRESETS ZOOM+ GUIDE 1. Plug in the TV and the USB device, if they aren't already plugged in. 2. Turn - RCA L26WD14 | User Manual - Page 13
VGA jacks. 1 VGA AUDIO Don't forget: If necessary, VGA VIDEO connect antenna or cable to get a picture. Go to page 6 for instructions TV and the PC. 3. Repeatedly press the INPUT button on the remote control until you see VGA displayed at the bottom of the TV's screen. To go back to viewing TV - RCA L26WD14 | User Manual - Page 14
. Turn on the TV Turn on your TV by pressing the Power button on the front of the TV or ON•OFF on the remote control. ON•OFF TV PIP SAT•AUX DVD GO BACK VOL CH MENU ZOOMCLEAR MUTE INFO + CH CTRL PRESETS ZOOM+ GUIDE OK button Arrows How to Use the Remote Control to Complete the Initial - RCA L26WD14 | User Manual - Page 15
Connections and Setup Complete the Initial Setup The menu system in your TV allows the TV's features to work properly. The first time you turn on your TV, the language screen appears. English Français Español Set the Menu Language The first part of the setup allows you to select your preferred - RCA L26WD14 | User Manual - Page 16
screen to see if you're watching an analog channel. What To Expect Watching TV • Remember: Look for an A at the bottom of the screen to see if watching an analog channel. Analog video is sent in a 4/3 format, which your TV displays these channels in a 16/9 format. Press the ZOOM+/- button to view - RCA L26WD14 | User Manual - Page 17
a device, such as a digital cable box, with an HDMI output. SPDIF OUT Use a digital coaxial cable to connect your TV to a compatible audio receiver. VGA Connect your computer, or other device with a VGA output, to this jack using a 15 pin D-sub cable. Go to page 34 for more information about how to - RCA L26WD14 | User Manual - Page 18
acts like the down arrow button on the remote control and adjusts menu controls. CH Scans up through the channel list. In the TV menu system, acts like the up arrow button on the remote control and adjusts menu controls. (Power indicator) Turns the TV on and off. > > 18 1668591B.indb 18 Chapter - RCA L26WD14 | User Manual - Page 19
Chapter 2: Using the Remote Control ON•OFF TV PIP SAT•AUX DVD GO BACK VOL CH MENU MUTE INFO + CH CTRL ZOOMCLEAR PRESETS ZOOM+ GUIDE INPUT SUB CH Remote control part number R301C1 Note: If you need to replace your remote, call 1-800-338-0376. A shipping and handling fee, and the - RCA L26WD14 | User Manual - Page 20
the channel. ON•OFF TV PIP SAT•AUX DVD GO BACK VOL CH MENU ZOOMCLEAR MUTE INFO + CH CTRL PRESETS ZOOM+ GUIDE INPUT SUB CH The darkened operate some RCA devices. Notes: The TV button can't be programmed on this remote to control any device; it controls only this TV. The remote may not - RCA L26WD14 | User Manual - Page 21
Automatic Code Search. If you have recently purchased the device you want to control or if the device has many codes, you might want to try the manual code search first. MENU ZOOMCLEAR MUTE INFO + CH CTRL PRESETS ZOOM+ GUIDE INPUT SUB CH Using Direct Entry 1. Turn on the device you want to - RCA L26WD14 | User Manual - Page 22
). Volume Punchthrough Feature You may find this feature helpful if you've connected your devices to an audio system, and you want to use the TV's remote control to operate the volume for a device that is connected to the audio system. An example follows: Let's say you've connected your DVD player to - RCA L26WD14 | User Manual - Page 23
Volume Punchthrough feature, whenever the TV remote is in DVD mode (press the DVD button) and you want to adjust the volume, you only have to press the VOL +/- or MUTE buttons. Follow the instructions below to set up Volume Punchthrough. 1. On your remote control, simultaneously press and hold the - RCA L26WD14 | User Manual - Page 24
Using the Remote Control Remote Code List Note: The codes are programmable to any of the device buttons (SAT•AUX or DVD) on the remote. Audio 505 534 PIONEER 478 506 493 494 PULSAR 486 RADIO SHACK 505 534 525 RCA 460 471 507 REALISTIC 469 REGAL 482 REGENCY 477 REMBRANDT 463 ROGERS 506 - RCA L26WD14 | User Manual - Page 25
Using the Remote Control HARMAN KARDON 427 HITACHI 404 407 419 428 HITEKER 445 655 647 EXPRESSVU 647 655 FORTEC STAR 569 555 556 HUGHES NETWORK 621 580 RCA 653 PHILIPS 621 PROSCAN 653 SAMSUNG 583 SONY 657 659 ULTIMATE TV 653 659 ZENITH 656 Home Theatre in a Box Where the code is listed - RCA L26WD14 | User Manual - Page 26
Remote Control SHARP 604 SKY NETWORK 614 615 646 SIERRA I II III 561 SONY 623 657 659 602 STARCHOICE 640 645 627 STAR SIGHT 633 STAR TRAK 608 STS 568 570 571 SUPER GUIDE 609 SYLVANIA 581 TOSHIBA .... 641 632 638 629 630 607 572 624 625 631 ULTIMATE TV 245 RANDEX 245 RCA ...[225] 245 - RCA L26WD14 | User Manual - Page 27
(the MAIN MENU appears). 2. Highlight Setup and press OK on your remote control. 3. Highlight Autotuning and press OK. 4. Choose which device button you would like to set: Set VCR Channel If the DVD or SAT•AUX button is programmed to your VCR, lets you set up the channel the TV tunes to when you - RCA L26WD14 | User Manual - Page 28
CABLE jack on the back of the TV, and you want the TV to tune to channel 3 when you press the corresponding button on the remote. Reminder: make sure the device's device button. VGA Device is connected to the VGA jack on the back of the TV and you want the TV to tune to the VGA input channel when - RCA L26WD14 | User Manual - Page 29
software inside your TV is turned off or unlocked. For instructions to lock V-Chip, see below. Note: Parental control settings are not available the TV. Simultaneously press and hold VOL- on the front panel and CLEAR on the remote for 10 seconds. Next time you enter the Parental control menu enter - RCA L26WD14 | User Manual - Page 30
limits to take effect. Note: If you forget your password, turn off the TV. Simultaneously press and hold VOL- on the front panel and CLEAR on the remote for 10 seconds. Next time you enter the Parental control menu enter a new password. To view age-based ratings after you've locked them, follow - RCA L26WD14 | User Manual - Page 31
Violence TV ratings Go back TV-MA TV-14 TV-PG TV-G TV-Y7 TV-Y Status D L S V FV View View View View View View Using the TV's English and French program ratings: 1. Select Canada V-Chip from the Parental control menu. 2. Highlight English ratings or French ratings and press OK. 3. Determine - RCA L26WD14 | User Manual - Page 32
rating limits by blocking movies rated above a specified level. To access the Movie Rating Limit menu: 1. Press MENU on the remote control (the TV's Main Menu appears). 2. Select Parental control. 3. Select US V-Chip. 4. Select Movie ratings. Blocking Movie Ratings Once you are in the Movie ratings - RCA L26WD14 | User Manual - Page 33
You might notice an option in your Parental control menu that wasn't there before. This is because broadcasters have the capability to Controls. These features can be found in other menus. Screen Formats Screen format is the way the picture is displayed on your TV. Press the ZOOM +/- button on your remote - RCA L26WD14 | User Manual - Page 34
VGA, COMPONENT INPUTS, HDMI1/DVI, and HDMI2 can't be displayed in the smaller window. PIP Buttons ON•OFF TV PIP SAT•AUX DVD PIP button There are certain remote buttons that control the way the PIP window works: VOL MENU ZOOMCLEAR GO BACK CH MUTE INFO + CH CTRL PRESETS ZOOM+ GUIDE CH - RCA L26WD14 | User Manual - Page 35
CTRL button. 4. Press the PRESETS button on the remote control and go to PC Sound source. Choose PC if you want to hear sound from the device connected via the VGA jack. Choose PIP/POP if you want to hear sound from the main window. PIP Problems? • If you are channel surfing or - RCA L26WD14 | User Manual - Page 36
Headphone settings Advanced settings ... Stereo... Normal... Medium... ... ... Using the Menu System This section explores the menus of your TV. Each menu is outlined and detailed to help you get the most from your TV. The Parental control menu is discussed in the Features chapter. To access the - RCA L26WD14 | User Manual - Page 37
program that is broadcast in stereo. Note: Sound type and its menu choices are only available with components programmed to the SAT•AUX button device connected to the Audio Output jacks on the back of the TV and you want to control the sound by the device instead, uncheck the box. Headphone settings - RCA L26WD14 | User Manual - Page 38
menu contains menus and controls to configure how the picture looks. The Picture menu options apply to the video for the main TV and video input selections. All picture options can be applied to each input- VID1, VID2, CMP1 or CMP2, HDMI1 or HDM2, VGA, and USB. Picture preset (not available on VGA - RCA L26WD14 | User Manual - Page 39
settings Go back Film mode Noise Reduction Advanced... Using the TV's Menu System Color Warmth Displays a choice list that lets you set . To return to the Picture menu, press the up or down arrow button. Advanced picture settings (not available on VGA) Film mode (3:2 Pulldown) Automatically - RCA L26WD14 | User Manual - Page 40
Upper Left, Bottom Left, Upper Right, or Bottom Right. Setup Menu The Setup menu lets you configure the TV to fit its surroundings and your preferences. To access the Setup menu, press MENU on the remote, and then select Setup from the Main Menu. Channel setup Signal type Choose the type of signal you - RCA L26WD14 | User Manual - Page 41
opacity Solid... Dig. CC Back. color Black... Using the TV's Menu System Closed captioning is not available on all channels at all area. Digital CC type If available, lets you select a closed caption service mode (1-6) for digital channels. Digital CC preset If available, lets 6/5/06 3:28:26 PM - RCA L26WD14 | User Manual - Page 42
Power Save Mode If no signal is detected from the VGA input jack for 5 minutes, puts the TV in power save mode. Message Set a message that appears at the bottom of the TV you're done entering text for a line. Parental Control Menu The Parental control menu was explained in Chapter 3. Go to page 29 - RCA L26WD14 | User Manual - Page 43
TV set the time for you. Wait about one minute for the time to be set. Time If you didn't set the time reference channel, enter the current time manually you have .mp3 audio files on your USB device connected to your TV, this menu allows you to play files individually by pressing the up/down arrow - RCA L26WD14 | User Manual - Page 44
1668591B.indb 44 This page left intentionally blank. 6/5/06 3:28:28 PM - RCA L26WD14 | User Manual - Page 45
don't carry programming, such as videoon-demand. When channels are unavailable, your TV's screen is blank or appears like snow. You probably want to get rid no longer appear in your channel list. Remove these in the Channel List menu. Go to page 40 for more information. Why does the first channel - RCA L26WD14 | User Manual - Page 46
troubleshooting list. TV Problems TV won't turn on • Make sure the TV is plugged in. • Check the wall receptacle (or extension cord) to make sure it is "live" by plugging in something else. • The front panel controls may be locked (disabled). Use the remote control 38 for more instructions. No sound, - RCA L26WD14 | User Manual - Page 47
a menu option allowing you to change the picture quality output that will fix this. Choose either 720p or 1080i. • 480i signals aren't supported by the HDMI1/DVI or HDMI2 input. The Remote Control Doesn't Work • Something might be between the remote and the remote light sensor on the front of the TV - RCA L26WD14 | User Manual - Page 48
minutes. Then plug the TV back in, turn on the TV, and see if the problem is fixed. If the problem remains, then please visit www.rca.com/television for updated FAQs or contact RCA Customer Support at the support number provided in your Warranty under How To Get Service. 48 1668591B.indb 48 Chapter - RCA L26WD14 | User Manual - Page 49
to the Wall Caution: The wall mount must bear a minimum of five times the TV's net weight without causing damage. To mount your TV to the wall you need to purchase a VESA wall mount. For model L26WD14, purchase a VESA MIS-F, 400, 200, 4 (400, 200 means the mounting measurements are 400mm horizontally - RCA L26WD14 | User Manual - Page 50
dialogue (D) or situations (S), no strong language (L), and little or no violence (V). TV-Y7 (Directed to Children 7 years and older) Designed for children ages 7 fically for children, it is understood younger viewers may be part of the audience. Violence Guidelines: Will contain very little violence - RCA L26WD14 | User Manual - Page 51
Other Information C8+ (Children 8 and Older) Programming generally considered acceptable for children 8 years and over to watch on their own. Violence Guidelines: Violence will not be portrayed as the preferred, acceptable, or only way to resolve conflict or encourage children to imitate dangerous - RCA L26WD14 | User Manual - Page 52
by TTE Technology, Inc.. • Customer Instruction. (Your Owner's Manual describes how to install, adjust, and operate your unit. Any additional information should be obtained from your dealer.) How you get service: • Take your RCA television to any Authorized RCA Television Service Center and pick up - RCA L26WD14 | User Manual - Page 53
which do not involve defective materials or workmanship are not covered by this warranty. Costs of such service calls are the sole responsibility of the purchaser. Care and Cleaning CAUTION: Turn OFF your TV before cleaning. You can clean the TV as required, using a soft lint-free cloth. Be sure to - RCA L26WD14 | User Manual - Page 54
1668591B.indb 54 This page left intentionally blank. 6/5/06 3:28:32 PM - RCA L26WD14 | User Manual - Page 55
1668591B.indb 55 This page left intentionally blank. 6/5/06 3:28:32 PM - RCA L26WD14 | User Manual - Page 56
Part instructions the user is TV technician for help. This Class B digital apparatus complies with Canadian ICES-003. Visit the RCA website at www.rca.com/television Please do not send any products to the Indianapolis address listed in this manual or on the carton. This will only add delays in service
-
 1
1 -
 2
2 -
 3
3 -
 4
4 -
 5
5 -
 6
6 -
 7
7 -
8
-
9
-
10
-
11
-
12
-
13
-
14
-
15
-
16
-
17
-
18
-
19
-
20
-
21
-
22
-
23
-
24
-
25
-
26
-
27
-
28
-
29
-
30
-
31
-
32
-
33
-
34
-
35
-
36
-
37
-
38
-
39
-
40
-
41
-
42
-
43
-
44
-
45
-
46
-
47
-
48
-
49
-
50
-
51
-
52
-
53
-
54
-
55
-
56
 |
 |

rca.com/television
Find Inside:
•
Connections
...........
page 6
•
Remote
...................
page 19
•
Features
.................
page 27
•
Menus
....................
page 36
•
FAQs
.......................
page 45
•
Troubleshooting
.....
page 46
LCD User’s Guide
1668591B.indb 1
1668591B.indb
1
6/5/06 3:27:28 PM
6/5/06
3:27:28 PM