RCA MAF15BKR Owner/User Manual
RCA MAF15BKR Manual
 |
View all RCA MAF15BKR manuals
Add to My Manuals
Save this manual to your list of manuals |
RCA MAF15BKR manual content summary:
- RCA MAF15BKR | Owner/User Manual - Page 1
The wall or mounting surface must be capable of supporting the combined weight of the mount and the display . Keep your sales receipt to obtain warranty parts and service and for proof of purchase. Attach it here and (x2) Safety Bar (x1) Instruction Manual (x1) Hardware Kit (x1) Para obtener instrucciones en - RCA MAF15BKR | Owner/User Manual - Page 2
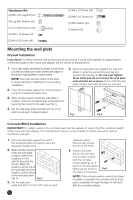
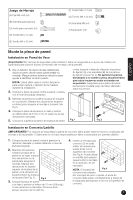
(x4) (I) Spacer (x4) Mounting the wall plate Drywall Installation Important! For safety reasons, this mount must be secured to a wood stud capable of supporting the combined weight of the mount and display. Do not mount to drywall alone. 1. Use a high quality stud finder to locate a stud where - RCA MAF15BKR | Owner/User Manual - Page 3
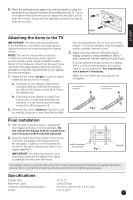
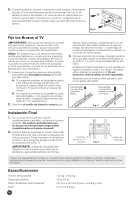
5. Place the wall plate back against the wall and attach it using the lag bolts (A) and lag bolt washers (B) provided (see Fig. 5). Do not over-tighten these bolts and do not release the wall plate until all bolts are in place. Ensure that the wall plate remains level after all bolts are secured. - RCA MAF15BKR | Owner/User Manual - Page 4
yeso Contenido del Paquete Placa de pared (x1) Brazo de montaje (x2) Barra de seguridad (x1) Manual de instrucciones (x1) Juego de herraje (x1) For English instructions, see page 1. Pour des instructions en français, se reporter à la page 7. Broca para ladrillo de 10 mm (3/8") para instalación de - RCA MAF15BKR | Owner/User Manual - Page 5
Juego de Herraje (A) Pija M8 x 63 (x3) (B) Arandela para pija (x3) (C) Ancla para concreto (x3) (D) Tornillo M4 x 12 (x4) (E) Tornillo M4 x 20 (x4) (F) Tornillo M6 x 12 (x4) (G) Tornillo M6 x 20 (x4) (H) Arandela M6 (x4) (I) Espaciador (x4) Español Monte la placa de pared Instalación en Pared de - RCA MAF15BKR | Owner/User Manual - Page 6
5. Coloque la placa de la pared nuevamente contra la pared y fíjela usando las pijas (A) y las arandelas para pija (B) suministradas (Ver Fig. 5). No apriete los pernos demasiado y no suelte la placa de pared hasta que todos los pernos estén colocados en su posición. Asegúrese que la placa de pared - RCA MAF15BKR | Owner/User Manual - Page 7
èces de cet emballage et lire attentivement les instructions d'installation. AVERTISSEMENT : Toute utilisation de ce support avec un téléviseur d'un poids supérieur la facture comme preuve d'achat et pour obtenir des pièces et du service sous garantie. L'attacher ici et y noter le numéro de modèle - RCA MAF15BKR | Owner/User Manual - Page 8
fois les boulons fixés. Fig.1 Fig.2 Installation sur béton/briques IMPORTANT! Pour des raisons de sécurité, le béton doit être capable de supporter le poids total du support et de l'écran. Le fabricant décline toute responsabilité pour les défaillances provoquées par le manque de solidité des murs - RCA MAF15BKR | Owner/User Manual - Page 9
des bras sur le téléviseur IMPORTANT! Prendre soin de bien suivre les instructions présentées dans cette partie de l'installation. Si possible, é nécessaire d'utiliser l'ensemble du jeu de vis pour procéder au montage du support. Si vous ne trouvez pas la taille de vis appropriée dans la trousse - RCA MAF15BKR | Owner/User Manual - Page 10
prepaid, to the Company at the address shown below. Do not return this product to the Retailer. This Warranty does not cover product purchased, serviced or used outside the United States or Canada. This Warranty is not transferable and does not extend to costs incurred for installation, removal or - RCA MAF15BKR | Owner/User Manual - Page 11
Garantía Limitada Durante la Vida Útil del Producto Audiovox Accessories Corporation (la "Compañía") le garantiza a usted, el comprador original de este producto que si, bajo condiciones y uso normales, se encontrara que presenta defectos materiales o de mano de obra durante su vida útil mientras - RCA MAF15BKR | Owner/User Manual - Page 12
© 2012 Audiovox Accessories Corporation Trademark(s) Registered, Marques Déposées, Marcas Registradas. All other brands and product names are trademarks or registered trademarks of their respective owners. / Toutes les autres marques et tous les autres noms de produits sont des marques de commerce
-
 1
1 -
 2
2 -
 3
3 -
 4
4 -
 5
5 -
 6
6 -
 7
7 -
8
-
9
-
10
-
11
-
12
 |
 |

English
1
1
flat panel
solutions
LCD TV Wall Mount
Installation Manual
MAF15BKR
Fits TVs 15”- 32”
Maximum Load
Capacity – 55 lb (25 kg)
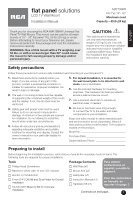
Thank you for choosing the RCA MAF15BKR Universal Flat
Panel TV Wall Mount. This mount can be used for all major
brands of 15" - 32" flat panel TVs, 55 lbs (25 kg) or under.
Before attempting to mount your television set, please
remove all parts from this package and read the installation
instructions carefully.
WARNING: Use of this mount with a TV weighing over
55 lbs. or with a screen larger than 32" could cause
the mount to fail causing property damage and/or
personal injury.
1.
Read these instructions carefully before you
begin. If you are unsure of any part of the
process, contact a professional contractor or
installer for assistance. Improper installation can
result in injury or damage.
2.
The wall or mounting surface must be capable
of supporting the combined weight of the mount
and the display; if not, the structure must be
reinforced.
3.
Safety gear and proper tools must be used.
Failure to do so can result in injury and/or
damage. A minimum of two people are required
for installation. Do not attempt to install this
mount alone under any circumstances.
4.
Follow all instructions and recommendations
regarding adequate ventilation and suitable
locations for mounting your display. Consult the
owner‘s manual for your particular display for
more information.
5.
For drywall installation, it is essential for
the wall mount plate to be attached to wall
studs.
(Use a stud finder.)
6.
Use the included hardware for mounting
purposes. This hardware has been provided to
ensure a safe and secure mount.
7.
Hire a licensed electrician to relocate an
electrical outlet, if needed.
8.
Be sure to purchase wires long enough
to connect the TV to the audio and video
components in your installation.
Keep your sales receipt to obtain warranty parts
and service and for proof of purchase. Attach it
here and record the model number. This number is
located on the product.
Model No. ___________________________________
Purchase Date: _______________________________
Dealer/Address/Phone ________________________
Safety precautions
Follow these precautions to ensure safe installation and mounting of your flat panel TV.
Tools
Phillips Head Screwdriver
Ratchet or Driver with 13 mm (1/2”) Socket
Electric or Portable Drill
6 mm (1/4”) Drill Bit and Stud Finder for Drywall
Installation
10 mm (3/8”) Masonry Bit for Concrete
Installation
Package Contents
Wall Plate (x1)
Mount Arm (x2)
Safety Bar (x1)
Instruction Manual (x1)
Hardware Kit (x1)
Preparing to install
Before beginning the installation process, verify that you have all the necessary tools on hand. The
following tools are required for proper installation:
Continues on next page...
Para obtener
instrucciones en
español, consulte la
página 4.
Pour des instructions
en français, se
reporter à la page 7.
CAUTION:
This wall mount is intended for
use only with the maximum
weight of 25 kg/55 bls. Use with
heavier than the maximum weights
indicated may result in instability
causing possible injury. Follow
the installation and operation
instructions carefully.