RCA VH126N Owner/User Manual - Page 3

Using the Programmable, Antenna Rotator - manual

Page 3 highlights

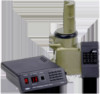
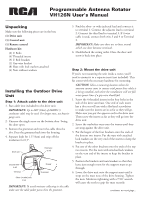
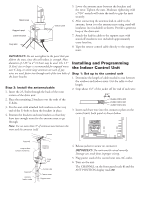
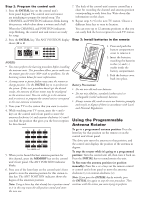
Step 2: Program the control unit 1. Press the INITIAL key on the control unit's front panel keypad. The control unit and rotator are initializing to prepare for initial setup. The CHANNEL and POSITION indicators blink during this process, which takes about a minute and a half. 7. The back of the control unit's remote control has a chart for recording the channel and antenna position corresponding to each letter key. Write down this information on this chart. 8. Repeat steps 3-7 for the next TV station. Choose a different letter key to store its location. When the CHANNEL and POSITION indicators stops blinking, the control unit and rotator are ready for setup. 2. Press the INITIAL key. The ANT POSITION display shows 36 to 0. CHANNEL ANT POSITION SENSOR DEG. X10 SEC. ABCD E F GH I J UL INITIAL MEMORY LEARN NOTES: • You must perform the learning procedure before installing the antenna mast. This procedure allows you to make sure the rotator goes the entire 360º with no problems. See the Learning section below for more information. • A strong storm or power failure may cause the rotator to change position. Use the INITIAL key to re-synchronize the system. If this reset procedure doesn't get the desired results, the antenna of driver motor may be misaligned on the antenna mast. You can either go to the antenna and re-orient it or program the control unit to correspond to the new antenna orientation. 3. Tune your TV to the station that you want to receive. 4. While watching your TV screen, press the < and > keys on the control unit's front panel to move the antenna clockwise (>) and counter-clockwise ( or < keys on the remote control or control unit's front panel to move the antenna clockwise (>) or counter-clockwise (

  • 1
  • 2
  • 3
  • 4
  • 5

Step 2: Program the control unit
1. Press the
INITIAL
key on the control unit’s
front panel keypad. The control unit and rotator
are initializing to prepare for initial setup. The
CHANNEL and POSITION indicators blink during
this process, which takes about a minute and a half.
When the CHANNEL and POSITION indicators
stops blinking, the control unit and rotator are ready
for setup.
2. Press the
INITIAL
key. The ANT POSITION display
shows
36
to
0
.
A
B
C
D
E
F
G
H
I
J
U
L
LEARN
MEMORY
INITIAL
CHANNEL
ANT POSITION
SENSOR
DEG. X10
SEC.
NOTES:
You must perform the learning procedure before installing
the antenna mast. This procedure allows you to make sure
the rotator goes the entire 360º with no problems. See the
Learning section below for more information.
A strong storm or power failure may cause the rotator to
change position. Use the
INITIAL
key to re-synchronize
the system. If this reset procedure doesn’t get the desired
results, the antenna of driver motor may be misaligned
on the antenna mast. You can either go to the antenna
and re-orient it or program the control unit to correspond
to the new antenna orientation.
3. Tune your TV to the station that you want to receive.
4. While watching your TV screen, press the
<
and
>
keys on the control unit’s front panel to move the
antenna clockwise (
>
) and counter-clockwise (
<
) until
you find the position that gives you the best reception
for this channel.
A
B
C
D
E
F
G
H
I
J
U
L
LEARN
MEMORY
INITIAL
7. The back of the control unit’s remote control has a
chart for recording the channel and antenna position
corresponding to each letter key. Write down this
information on this chart.
8. Repeat steps 3-7 for the next TV station. Choose a
different letter key to store its location.
You can store up to 12 antenna positions so that you
can easily find the best reception for each TV station.
5. When you’ve found the best antenna position for
this channel, press the
MEMORY
key on the control
unit’s front panel. The ANT POSITION indicator
blinks.
6. Press one of the letter keys on the control unit’s front
panel to store the antenna position for this station to
that key. The ANT POSITION indicator shows the
degree of the antenna’s position.
Note:
Using a letter key that already has a position stored
to it in this step erases the old position stored and stores
the new one.
Step 3: Install batteries in the remote
1. Press and push the
battery compartment
cover to remove it.
2. Insert the batteries,
matching the batteries
to the (+) and (–)
marks inside the
battery compartment.
3. Push the battery cover
back into place.
Battery Precautions:
Do not mix old and new batteries.
Do not mix alkaline, standard (carbon-zinc) or
rechargeable (nickel cadmium) batteries.
Always remove old, weak or worn-out batteries promptly
and recycle or dispose of them in accordance with Local
and National Regulations.
Using the Programmable
Antenna Rotator
To go to a programmed antenna position:
Press the
letter key for that position on the remote or on the
control unit’s front panel.
The drive unit turns the antenna to that position, and
the control unit displays the position of the antenna in
degrees.
To stop the rotator while it’s going to a programmed
position:
Turn the control unit off, then turn it back on.
Press the
INITIAL
key to resynchronize the unit.
To fine-tune the antenna position (or position
manually):
Press the
>
or
<
keys on the remote control
or control unit’s front panel to move the antenna
clockwise (
>
) or counter-clockwise (
<
).
Note:
If you press the
INITIAL
key by mistake, press
the
INITIAL
key again to stop the reset procedure. Then
continue with the action you were trying to perform.