Radio Shack 63-1007 Owner's Manual
Radio Shack 63-1007 - Ultrasonic Parking Alert System Manual
 |
UPC - 040293148218
View all Radio Shack 63-1007 manuals
Add to My Manuals
Save this manual to your list of manuals |
Radio Shack 63-1007 manual content summary:
- Radio Shack 63-1007 | Owner's Manual - Page 1
23, 2000 11:34 AM Ultrasonic Parking Alert System OWNER'S MANUAL - Please read before using this equipment. Your RadioShack Ultrasonic power the system from a standard AC outlet. Power ON/OFF Switch - allows you to manually turn the system on or off at any time. Sound HI/LO/OFF - lets you - Radio Shack 63-1007 | Owner's Manual - Page 2
63-1007rc.fm Page 2 Monday, October 23, 2000 11:34 AM 2. Thread the two supplied gold screws into the holes until the heads extend about 1/8 inch from the wall. 3. Align the base's keyhole slots with the screw heads and slide the base down to secure it. Base Line Cord Power/ Low Battery Indicator - Radio Shack 63-1007 | Owner's Manual - Page 3
63-1007rc.fm Page 3 Monday, October 23, 2000 11:34 AM 3. When your vehicle comes within about 10 feet of the sensor, the base's green indicator flashes and the buzzer sounds (if the sound is on). The flashing rate and buzzer cycle speed up the closer your vehicle gets to the base. Warnings: • Do - Radio Shack 63-1007 | Owner's Manual - Page 4
parts and products may be used in the performance of warranty service. Repaired or replaced parts and products are warranted for the remainder accident, misuse, improper or abnormal usage, failure to follow instructions, improper installation or maintenance, alteration, lightning or other incidence
-
 1
1 -
 2
2 -
 3
3 -
 4
4
 |
 |

OWNER’S MANUAL — Please read before using this equipment.
©
2000 RadioShack Corporation. All Rights Reserved.
RadioShack and RadioShack.com are trademarks
used by RadioShack Corporation.
Ultrasonic Parking Alert System
Your RadioShack Ultrasonic Parking Alert
System eliminates the guesswork from park-
ing. You can set the system to alert you
when your vehicle is parked the desired dis-
tance from the base.
Memory
— lets you set the desired parking
distance.
Power/Low Battery Indicator
— indicates
that the power is on, or that the battery pow-
er is low.
Supplied AC Adapter
— lets you power the
system from a standard AC outlet.
Power ON/OFF Switch
— allows you to
manually turn the system on or off at any
time.
Sound HI/LO/OFF
— lets you select an alert
volume that best suits your needs.
INSTALLING THE BASE’S
BATTERIES
The base needs four AA batteries (not sup-
plied) for back-up power in case AC power
fails. For the best performance and longest
life, we recommend RadioShack alkaline
batteries.
Cautions:
•
Use only fresh batteries of the required
size and recommended type.
•
Do not mix old and new batteries or dif-
ferent types of batteries (standard, alka-
line, or rechargeable).
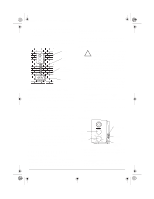
1. Lift up the
battery com-
partment
cover on the
back of the
base
and
remove it.
2. Place the batteries in the compartment
as indicated by the polarity symbols (+
and –) marked inside.
3.
Replace the cover.
The Power/Low Battery Indicator flashes
about once every 5 seconds when the AC
power cord is plugged in, or if the power cord
is unplugged and the batteries have enough
power. The Power/Low Battery Indicator
flashes more rapidly if the power cord is un-
plugged and the batteries are low. When this
happens, replace the batteries.
Warning:
Dispose of old batteries promptly
and properly. Do not burn or bury them.
Caution:
If you do not plan to use the sys-
tem for two weeks or longer, remove the bat-
teries. Batteries can leak chemicals that can
destroy electronic parts.
MOUNTING THE BASE
Mount the base at a height where the driver
can easily see it from the vehicle. For the
best performance, we recommend that you
mount the base about 3 to 6 feet from the
floor of the garage.
1.
Drill two vertical holes into the mounting
surface 3
5
/
16
inches apart.
63-1007rc.fm
Page 1
Monday, October 23, 2000
11:34 AM