Reebok 1710 Treadmill User Manual
Reebok 1710 Treadmill Manual
 |
View all Reebok 1710 Treadmill manuals
Add to My Manuals
Save this manual to your list of manuals |
Reebok 1710 Treadmill manual content summary:
- Reebok 1710 Treadmill | User Manual - Page 1
today, contact Customer Service. CUSTOMER SERVICE Call toll-free 1-888-936-4266 Mon.-Fri. 7:30 a.m.-4:30 p.m. ET (excluding holidays) or email us at [email protected] Please do not contact the store. CAUTION Read all precautions and instructions in this manual before using this equipment - Reebok 1710 Treadmill | User Manual - Page 2
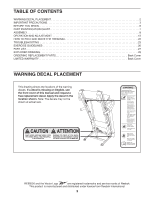
IDENTIFICATION CHART 7 ASSEMBLY 8 OPERATION AND ADJUSTMENT 15 HOW TO FOLD AND MOVE THE TREADMILL 22 TROUBLESHOOTING 23 EXERCISE GUIDELINES 26 PART LIST 27 EXPLODED DRAWING 28 ORDERING REPLACEMENT PARTS Back Cover LIMITED WARRANTY Back Cover WARNING DECAL PLACEMENT This drawing shows the - Reebok 1710 Treadmill | User Manual - Page 3
all important precautions and instructions in this manual and all warnings on your treadmill before using your treadmill. ICON assumes no responsibility treadmill if the power cord or plug is damaged, or if the treadmill is not working properly. (See TROUBLESHOOTING on page 23 if the treadmill is - Reebok 1710 Treadmill | User Manual - Page 4
before clean- ing the treadmill, and before performing the maintenance and adjustment procedures described in this manual. Never remove the motor hood unless instructed to do so by an authorized service representative. Servicing other than the procedures in this manual should be performed by - Reebok 1710 Treadmill | User Manual - Page 5
5 - Reebok 1710 Treadmill | User Manual - Page 6
Thank you for selecting the new REEBOK® 1710 treadmill. The 1710 treadmill provides an impressive selection of features designed to make your workouts at home more effective and enjoyable. For your benefit, read this manual carefully before you use the treadmill. If you have questions after reading - Reebok 1710 Treadmill | User Manual - Page 7
assembly. The number in parentheses below each drawing is the key number of the part, from the PART LIST near the end of this manual. The number following the key number is the quantity used for assembly. Note: If a part is not in the hardware kit, check to see if it is preattached. Extra - Reebok 1710 Treadmill | User Manual - Page 8
treadmill, wipe it off with a soft cloth and a mild, non-abrasive cleaner. • Left parts are marked "L" or "Left" and right parts are marked "R" or "Right." • To identify small parts damaging parts, do not use power tools. 1. Call or email Customer Service (see the front cover of this manual) today - Reebok 1710 Treadmill | User Manual - Page 9
3. Identify the Left Upright (75). Have a second person hold the Left Upright near the Base (80). 3 See the inset drawing. Tie the wire tie in the Left Upright (75) securely around the end of the Upright Wire (70). Then, insert the Upright Wire into the lower end of the Left Upright as you pull - Reebok 1710 Treadmill | User Manual - Page 10
5. Identify the Left and Right Base Covers (73, 74). Slide the Left and Right Base Covers onto the 5 Left and Right Uprights (75, 76) as shown. 75 76 74 73 6. Identify the Left Handrail (71). If there is a wire in the Left Handrail, remove and discard it. 6 9 Hold the Left Handrail (71) - Reebok 1710 Treadmill | User Manual - Page 11
7. Attach the Right Handrail (72) to the Right Upright (76) with two 3/8" x 3 1/2" Screws (9) 7 and two 3/8" Star Washers (5). Start both Screws, but do not tighten them yet. 9 5 72 76 8. Insert the Console Frame (87) into the Handrails (71, 72). Attach the Console Frame with the four 8 1/4" - Reebok 1710 Treadmill | User Manual - Page 12
9. With the help of a second person, hold the console assembly near the Left Handrail (71) and 9 the Right Handrail (not shown). Connect the Upright Wire (70) to the console wire. See the inset drawing. The connectors should slide together easily and snap into place. If they do not, turn one - Reebok 1710 Treadmill | User Manual - Page 13
11. Attach the two Console Clamps (34) to the console assembly with four #8 x 3/4" Screws (6). See step 4. Tighten all six 3/8" x 4" Screws (4). 11 Console Assembly 34 6 12. Identify the Left and Right Trays (45, 85). Orient the Trays as shown and attach each Tray 12 with four #8 x 3/4" Screws - Reebok 1710 Treadmill | User Manual - Page 14
80 81 3 2 81 15. Make sure that all parts are properly tightened before you use the treadmill. If there are sheets of plastic on the treadmill decals, remove the plastic. To protect the floor or carpet, place a mat under the treadmill. Note: Extra parts may be included. Keep the included hex key - Reebok 1710 Treadmill | User Manual - Page 15
, always use a surge suppressor with the treadmill. To purchase a surge suppressor, see precaution 13 on page 3. Use only a surge suppressor that is UL 1449 listed as a transient voltage surge suppressor (TVSS). The surge suppressor must have a UL suppressed voltage rating of 400 volts or less and - Reebok 1710 Treadmill | User Manual - Page 16
your heart rate using the handgrip heart rate monitor. In addition, the console features eighteen onboard workouts-five speed workouts, five incline workouts, five intensity workouts, and three calorie workouts. Each workout automatically controls the speed and incline of the treadmill as it guides you - Reebok 1710 Treadmill | User Manual - Page 17
cord (see page 15). Next, locate the power switch on the treadmill frame near the power cord. Make sure that the switch is in the the left. 2. Select the manual mode. When the key is inserted, the manual mode will be selected. If you have selected a workout, press the Manual button on the console. 3. - Reebok 1710 Treadmill | User Manual - Page 18
the displays. When the manual mode is selected, of the treadmill. Note: When an onboard workout is selected, the display will show the time remaining in the workout instead of the that your hands are clean. Contacts To measure your heart rate, stand on the foot rails and hold the pulse bar - Reebok 1710 Treadmill | User Manual - Page 19
actual number of calories that you burn will depend on various factors such as your weight. In addition, if you manually change the speed or incline of the treadmill during the workout, the number of calories you burn will be affected. If the speed or incline setting is too high or too low - Reebok 1710 Treadmill | User Manual - Page 20
of the program. There are three day workouts for each week of the program. workout (see step 3 on page 19). 6. Follow your progress with the displays. See step 5 on page 18. The lower left corner of the display will show the time remaining instead of the elapsed time. 7. Measure your heart rate - Reebok 1710 Treadmill | User Manual - Page 21
console. The console features an information mode that keeps track of treadmill usage information. The information mode also allows you to select miles information will appear in the display: • The number of hours that the treadmill has been operated. • The total number of miles or kilometers that - Reebok 1710 Treadmill | User Manual - Page 22
the key and unplug the power cord. CAUTION: You must be able to safely lift 45 lbs. (20 kg) to raise, lower, or move the treadmill. 1. Hold the metal frame firmly in the location shown by the arrow below. CAUTION: Do not hold the frame by the plastic foot rails. Bend - Reebok 1710 Treadmill | User Manual - Page 23
TROUBLESHOOTING Most treadmill problems can be solved by following the simple steps below. Find the symptom that applies, and follow the steps listed. If further assistance is needed, see the front cover of this manual. SYMPTOM: The power does not turn on a. Make sure that the power cord is plugged - Reebok 1710 Treadmill | User Manual - Page 24
. Idler Roller Screws c. Your treadmill features a walking belt coated with high-performance lubricant. IMPORTANT: Never apply silicone spray or other substances to the walking belt or the walking platform unless instructed to do so by an authorized service representative. Such substances may - Reebok 1710 Treadmill | User Manual - Page 25
screw counterclockwise 1/2 of a turn. Be careful not to overtighten the walking belt. Then, plug in the power cord, insert the key, and run the treadmill for a few minutes. Repeat until the walking belt is centered. a b. If the walking belt slips when walked on, first remove the key and UNPLUG - Reebok 1710 Treadmill | User Manual - Page 26
problems. The heart rate monitor is not a medical device. Various factors may affect the accuracy of heart rate readings. The heart rate rate as a guide to find the proper intensity level. The chart below shows recommended heart rates rate is near the highest number in your training zone. WORKOUT - Reebok 1710 Treadmill | User Manual - Page 27
Foot Rail Latch Warning Decal Walking Platform Walking Belt Belt Guide Rubber Spacer Drive Roller/Pulley Left Speaker Grill Left Tray Manual Note: Specifications are subject to change without notice. For information about ordering replacement parts, see the back cover of this manual. *These parts - Reebok 1710 Treadmill | User Manual - Page 28
EXPLODED DRAWING A 19 36 88 19 36 88 38 19 25 19 56 14 29 53 19 37 42 28 41 19 19 24 19 93 94 95 46 1 16 27 48 29 43 23 19 19 40 36 19 88 36 88 39 24 19 25 19 50 14 19 19 29 51 47 48 27 32 16 49 42 28 29 19 41 3 12 28 Model No. RCTL70013.0 R1213A 52 19 3 - Reebok 1710 Treadmill | User Manual - Page 29
EXPLODED DRAWING B 6 Model No. RCTL70013.0 R1213A 6 6 58 57 21 59 17 21 58 20 21 17 60 20 22 21 55 1 61 18 6 6 6 68 6 63 62 18 6 64 18 65 66 6 67 1 6 29 - Reebok 1710 Treadmill | User Manual - Page 30
EXPLODED DRAWING C Model No. RCTL70013.0 R1213A 9 5 10 71 8 69 7 70 75 54 31 89 6 6 6 6 9 5 6 6 10 72 4 69 8 73 2 81 77 3 79 33 15 5 77 78 1 67 35 79 33 80 81 3 7 76 15 77 78 35 79 33 74 77 2 79 33 30 5 4 5 4 - Reebok 1710 Treadmill | User Manual - Page 31
EXPLODED DRAWING D Model No. RCTL70013.0 R1213A 86 91 45 55 6 6 6 6 87 83 26 6 11 6 13 11 11 6 34 13 6 11 6 34 6 11 11 82 6 6 6 11 6 6 6 85 6 44 92 30 6 6 31 - Reebok 1710 Treadmill | User Manual - Page 32
charge. For in-home service, the customer will be responsible for a minimal trip charge. This warranty does not extend to freight damage to the product. This warranty will automatically be voided if the product is used as a store display model, if all instructions in this manual are not followed, if
-
 1
1 -
 2
2 -
 3
3 -
 4
4 -
 5
5 -
 6
6 -
 7
7 -
8
-
9
-
10
-
11
-
12
-
13
-
14
-
15
-
16
-
17
-
18
-
19
-
20
-
21
-
22
-
23
-
24
-
25
-
26
-
27
-
28
-
29
-
30
-
31
-
32
 |
 |

USER’S MANUAL
CAUTION
Read all precautions and instruc-
tions in this manual before using
this equipment. Keep this manual
for future reference.
Model No. RCTL70013.0
Serial No.
Write the serial number in the space
above for reference.
www.reebok
fi
tness.com
Serial Number
Decal
ACTIVATE YOUR
WARRANTY
To register your product and acti-
vate your warranty today, contact
Customer Service.
CUSTOMER SERVICE
Call toll-free 1-888-936-4266
Mon.–Fri. 7:30 a.m.–4:30 p.m. ET
(excluding holidays)
or email us at
Please do not contact the store.