Reebok Rt2000 Treadmill English Manual
Reebok Rt2000 Treadmill Manual
 |
View all Reebok Rt2000 Treadmill manuals
Add to My Manuals
Save this manual to your list of manuals |
Reebok Rt2000 Treadmill manual content summary:
- Reebok Rt2000 Treadmill | English Manual - Page 1
QUESTIONS? If you have questions, or if parts are damaged or missing, DO NOT CONTACT manual) before contacting Customer Care. CALL TOLL-FREE: 1-866-362-4490 Mon.-Fri. 6 a.m.-6 p.m. MT Sat. 8 a.m.-4 p.m. MT ON THE WEB: www.reebokservice.com CAUTION Read all precautions and instructions in this manual - Reebok Rt2000 Treadmill | English Manual - Page 2
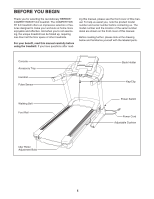
PRECAUTIONS 3 BEFORE YOU BEGIN 5 ASSEMBLY 6 OPERATION AND ADJUSTMENT 11 HOW TO FOLD AND MOVE THE TREADMILL 20 TROUBLESHOOTING 21 EXERCISE GUIDELINES 24 PART LIST 25 EXPLODED DRAWING 27 ORDERING REPLACEMENT PARTS Back Cover LIMITED WARRANTY Back Cover WARNING DECAL PLACEMENT This drawing - Reebok Rt2000 Treadmill | English Manual - Page 3
suppressor, see your local REEBOK dealer or call the telephone number on the front cover of this manual and order part number 146148, or see your the treadmill if the power cord or plug is damaged, or if the treadmill is not working properly. (See TROUBLESHOOTING on page 21 if the treadmill is not - Reebok Rt2000 Treadmill | English Manual - Page 4
the motor hood unless instructed to do so by an authorized service representative. Servicing other than the procedures in this manual should be performed by an authorized service representative only. 26. The treadmill is intended for in-home use only. Do not use the treadmill in any commercial - Reebok Rt2000 Treadmill | English Manual - Page 5
for selecting the revolutionary REEBOK® COMPETITOR RT 8.0 treadmill. The COMPETITOR RT 8.0 treadmill offers an impressive selection of features designed to make your workouts at home more enjoyable and effective. And when you're not exercising, the unique treadmill can be folded up, requiring less - Reebok Rt2000 Treadmill | English Manual - Page 6
hire an authorized service technician to assemble the treadmill, call 1-800-445-2480. Assembly requires two persons. Set the treadmill in a cleared area below each drawing is the key number of the part, from the PART LIST near the end of this manual. The number after the parentheses is the quantity - Reebok Rt2000 Treadmill | English Manual - Page 7
the same way. Note: There are no wires on the left side. 2 91 92 93 Wire Tie 3. With the help of a second person, lower the treadmill off the cardboard stand. The stand will be used again in assembly step 9. Identify the Left Upright Sleeve (89) and the Right Upright Sleeve (90 - Reebok Rt2000 Treadmill | English Manual - Page 8
4. Have a second person hold the console assembly near the Uprights (91, 92). Connect the Upright Wire (93) to the Console Wire (114). See the inset drawing. The connectors should slide together easily and snap into place. If they do not, turn one connector and try again. IF YOU DO NOT CONNECT THE - Reebok Rt2000 Treadmill | English Manual - Page 9
6. Partially tighten three 3/8" x 1 1/4" Patch Bolts (2) with three 3/8" Star Washers (6) into the Right Upright (92); do not fully tighten the Patch Bolts yet. Repeat this step with the Left Upright (91). Then, firmly tighten all six 3/8" x 1 1/4" Patch Bolts (2). 6 91 26 2 6 92 7. Slide the - Reebok Rt2000 Treadmill | English Manual - Page 10
the four 3/8" x 3 3/4" Patch Bolts (5). With the help of the second person, lower the treadmill off the cardboard stand. 103 5 5 Cardboard Stand 10. Make sure that all parts are properly tightened before you use the treadmill. Keep the included hex keys in a secure place; one of the hex keys is - Reebok Rt2000 Treadmill | English Manual - Page 11
and grounded in accordance with all local codes and ordinances. IMPORTANT: The treadmill is not compatible with GFCI-equipped outlets. This product is for use on (TVSS). The surge suppressor must have a UL suppressed voltage rating of 400 volts or less and a minimum surge dissipation of 450 - Reebok Rt2000 Treadmill | English Manual - Page 12
rate using the handgrip pulse sensor. In addition, the console features twenty-eight performance workouts. Each performance workout automatically controls the speed and incline of the treadmill as it guides front cover of this manual. You can even listen to your favorite workout music or audio books - Reebok Rt2000 Treadmill | English Manual - Page 13
mode, designed to be used if the treadmill is displayed in a store. If the displays instructions in this manual refer to miles. Each time the manual mode, use the increase and decrease buttons next to the Enter button and highlight START. Press the Enter button. If you have selected a workout - Reebok Rt2000 Treadmill | English Manual - Page 14
that you select will determine which workout information is shown. To select the fold the treadmill to the storage position, or you may damage the treadmill. Next, remove the key from the console and put it in a secure place. • The approximate number of calories you have burned. • Your heart rate - Reebok Rt2000 Treadmill | English Manual - Page 15
if you manually change the speed or incline of the treadmill during the workout, the treadmill will automatically adjust to the speed and incline settings for the next segment. 4. Select a display mode and monitor your progress with the display. See step 5 on page 14. 5. Measure your heart rate - Reebok Rt2000 Treadmill | English Manual - Page 16
an incline setting for the first one-minute segment of the workout, simply adjust the speed and incline of the treadmill as desired by pressing the Speed and Incline buttons. 2. Select a my memory workout. To select a my memory workout, use the increase and decrease buttons next to the Enter button - Reebok Rt2000 Treadmill | English Manual - Page 17
Enter button to start the workout. A moment after you press the button, the treadmill will automatically adjust to the first monitor your progress with the display. See step 5 on page 14. 5. Measure your heart rate if desired. See step 6 on page 14. 6. When you are finished exercising, remove the - Reebok Rt2000 Treadmill | English Manual - Page 18
treadmill to communicate with your wireless network and unlocks exciting new features. For example, you can download personalized workouts, create your own workouts, track your workout router with SSID broadcast enabled (hidden networks are not supported). You will also need an iFit.com membership. - Reebok Rt2000 Treadmill | English Manual - Page 19
a cushioning system that reduces the impact as you walk or run on the treadmill. To increase the firmness of the walking platform, step off the treadmill and slide the platform cushions toward the front of the treadmill. To decrease the firmness, slide the platform cushions toward the back of the - Reebok Rt2000 Treadmill | English Manual - Page 20
arrow below. CAUTION: Do not hold the frame by the plastic foot rails. Bend your legs and keep your back straight. HOW TO MOVE THE TREADMILL Before moving the treadmill, fold it as described at the left. CAUTION: Make sure that the latch knob is locked in the storage position. Moving the - Reebok Rt2000 Treadmill | English Manual - Page 21
TROUBLESHOOTING Most treadmill problems can be solved by following the steps below. Find the problem that applies, and follow the steps listed. If further assistance is needed, please see the front cover of this manual. PROBLEM: The power does not turn on SOLUTION: a. Make sure that the power - Reebok Rt2000 Treadmill | English Manual - Page 22
Motor Hood (not shown) with the six #8 x 3/4" Screws (not shown), and run the treadmill for a few minutes to check for a correct speed reading. Top View 24 53 1/8 in. 59 58 PROBLEM in the power cord, insert the key, and run the treadmill for a few minutes. Repeat until the walking belt is properly - Reebok Rt2000 Treadmill | English Manual - Page 23
- tered. Then, plug in the power cord, insert the key, and carefully walk on the treadmill for a few minutes. Repeat until the walking belt is properly tightened. PROBLEM: The incline of the treadmill does not change correctly SOLUTION: a. Hold down the Stop button and the Speed increase button - Reebok Rt2000 Treadmill | English Manual - Page 24
You can use your heart rate as a guide to find the proper intensity level. The chart below shows recommended heart rates for fat burning and aerobic intensity of your exercise until your heart rate is near the highest number in your training zone. WORKOUT GUIDELINES Warming Up-Start with 5 to 10 - Reebok Rt2000 Treadmill | English Manual - Page 25
LIST-Model No. RBTL89010.0 To locate the parts listed below, see the EXPLODED DRAWING near the end of this manual. Key No. Qty. Description Key No 10 2 Drive Motor Bolt 11 1 3/8" x 1 3/4" Hex Head Bolt 12 16 #8 x 3/4" Flat Head Screw 13 1 3/8" x 2" Hex Head Bolt 14 4 #8 Belt Guide Screw 15 2 - Reebok Rt2000 Treadmill | English Manual - Page 26
110 1 Handrail 111 2 Handrail Grip 112 2 Console Clamp 113 1 Speaker Cover 114 1 Console Wire * - User's Manual Note: Specifications are subject to change without notice. For information about ordering replacement parts, see the back cover of this manual. *These parts are not illustrated. 26 - Reebok Rt2000 Treadmill | English Manual - Page 27
EXPLODED DRAWING A-Model No. RBTL89010.0 R0512A 27 1 24 41 72 42 43 44 53 1 54 1 1 1 45 24 52 43 42 1 51 1 47 14 12 46 50 12 12 49 68 12 48 12 18 12 96 8 15 32 38 18 69 32 15 70 71 38 12 12 96 8 55 56 24 21 1 20 24 57 73 24 17 58 104 10 59 23 34 61 30 - Reebok Rt2000 Treadmill | English Manual - Page 28
EXPLODED DRAWING B-Model No. RBTL89010.0 1 37 1 75 1 78 37 R0512A 1 7 77 76 74 81 13 11 80 79 7 82 19 83 19 19 84 19 95 7 19 3 28 85 19 7 4 87 - Reebok Rt2000 Treadmill | English Manual - Page 29
EXPLODED DRAWING C-Model No. RBTL89010.0 R0512A 89 24 2 97 6 24 62 91 24 99 98 90 24 2 6 24 93 6 2 44 100 22 101 17 44 7 1 1 1 33 105 29 33 66 105 29 5 23 93 103 44 64 23 7 102 101 29 1 22 1 1 33 105 29 92 7 6 5 33 105 29 - Reebok Rt2000 Treadmill | English Manual - Page 30
EXPLODED DRAWING D-Model No. RBTL89010.0 R0512A 26 28 9 107 1 16 1 108 26 1 1 109 26 1 107 9 26 28 1 1 16 109 110 111 40 112 1 25 112 25 111 40 30 - Reebok Rt2000 Treadmill | English Manual - Page 31
EXPLODED DRAWING E-Model No. RBTL89010.0 16 16 16 16 16 1 113 1 1 1 27 R0512A 26 39 36 94 1 31 26 1 1 1 106 114 31 - Reebok Rt2000 Treadmill | English Manual - Page 32
and material, under normal use and service conditions. The frame and drive motor are warranted for a lifetime. Parts and labor are warranted for one improper or abnormal usage, or repairs not provided by an ICON authorized service center; to products used for commercial or rental purposes or as
-
 1
1 -
 2
2 -
 3
3 -
 4
4 -
 5
5 -
 6
6 -
 7
7 -
8
-
9
-
10
-
11
-
12
-
13
-
14
-
15
-
16
-
17
-
18
-
19
-
20
-
21
-
22
-
23
-
24
-
25
-
26
-
27
-
28
-
29
-
30
-
31
-
32
 |
 |

USER'S MANUAL
www.reebokfitness.com
CAUTION
Read all precautions and instruc-
tions in this manual before using
this equipment. Save this manual
for future reference.
Serial
Number
Decal
Model No. RBTL89010.0
Serial No.
Write the serial number in the space
above for reference.
QUESTIONS?
If you have questions, or if parts are
damaged or missing,
DO NOT CON-
TACT THE STORE; please contact
Customer Care.
IMPORTANT: Please register this
product (see the limited warranty
on the back cover of this manual)
before contacting Customer Care.
CALL TOLL-FREE:
1-866-362-4490
Mon.–Fri. 6 a.m.–6 p.m. MT
Sat. 8 a.m.–4 p.m. MT
ON THE WEB:
www.reebokservice.com