Reebok T7.90 Elliptical English Manual
Reebok T7.90 Elliptical Manual
 |
View all Reebok T7.90 Elliptical manuals
Add to My Manuals
Save this manual to your list of manuals |
Reebok T7.90 Elliptical manual content summary:
- Reebok T7.90 Elliptical | English Manual - Page 1
limited warranty on the back cover of this manual) before contacting Customer Care. CALL TOLL-FREE: 1-877-994-4999 Mon.-Fri., 6 a.m.-6 p.m. MT Sat. 8 a.m.-5 p.m. MT ON THE WEB: www.reebokservice.com CAUTION Read all precautions and instructions in this manual before using this equipment. Keep this - Reebok T7.90 Elliptical | English Manual - Page 2
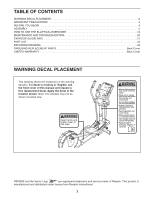
2 IMPORTANT PRECAUTIONS 3 BEFORE YOU BEGIN 4 ASSEMBLY 5 HOW TO USE THE ELLIPTICAL EXERCISER 12 MAINTENANCE AND TROUBLESHOOTING 20 EXERCISE GUIDELINES 21 PART LIST 24 EXPLODED DRAWING 26 ORDERING REPLACEMENT PARTS Back Cover LIMITED WARRANTY Back Cover WARNING DECAL PLACEMENT This drawing - Reebok T7.90 Elliptical | English Manual - Page 3
precautions and instructions in this manual and all warnings on your elliptical exerciser before using your elliptical exerciser. ICON rear of the elliptical exerciser and 2 ft. (0.6 m) on each side. 5. Inspect and properly tighten all parts regularly. Replace any worn parts immediately. 8. Wear - Reebok T7.90 Elliptical | English Manual - Page 4
REEBOK® T 7.90 elliptical exerciser. The T 7.90 elliptical exerciser provides an impressive selection of features designed to make your workouts at home more effective and enjoyable. For your benefit, read this manual manual. Before reading further, please familiarize yourself with the parts that - Reebok T7.90 Elliptical | English Manual - Page 5
mallet . and a rubber As you assemble the elliptical exerciser, use the drawings below to identify small parts. The number in parentheses below each drawing is the key number of the part, from the PART LIST near the end of this manual. The number following the parentheses is the quantity needed - Reebok T7.90 Elliptical | English Manual - Page 6
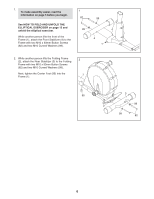
1. To make assembly easier, read the information on page 5 before you begin. See HOW TO FOLD AND UNFOLD THE ELLIPTICAL EXERCISER on page 12 and unfold the elliptical exerciser. While another person lifts the front of the Frame (1), attach the Front Stabilizer (4) to the Frame with two M10 x 93mm - Reebok T7.90 Elliptical | English Manual - Page 7
3. Attach the Front Ramp Cover (6) to the 3 Ramp (5) with four M4 x 16mm Screws (97). 6 Slide an M10 x 25mm Washer (87) onto an M10 x 20mm Button Screw (111). Tighten the Button Screw into one end of the Ramp Axle (72). Apply a small amount of the included 9 grease to the Ramp Axle. 62 - Reebok T7.90 Elliptical | English Manual - Page 8
5. Insert the Roller (38) on the Left Pedal Arm (32) and the Roller on the Right Pedal Arm (33) into 5 the sides of the Ramp (5). Attach the Rear Ramp Cover (7) to the Ramp (5) with two M4 x 16mm Screws (97). See the inset drawing. Lift the Pedal Arm Latch (41) on the Left Pedal Arm (32), and - Reebok T7.90 Elliptical | English Manual - Page 9
6. While another person holds the Upright (10) near the Frame (1), connect the Upper Wire Harness (65) to the Lower Wire Harness (64). Tip: Avoid damaging the Wire Harnesses (64, 65). Carefully insert the Upright (10) into the Frame (1). Attach the Upright with four M8 x 20mm Button Screws (107) and - Reebok T7.90 Elliptical | English Manual - Page 10
8. Hold the Left Rear Upper Body Cover (26) and the Left Front Upper Body Cover (27) around the left Upper Body Leg (24). Attach the Upper Body Covers with five M4 x 16mm Screws (97). Attach the Right Rear Upper Body Cover (28) and the Right Front Upper Body Cover (29) in the same way. 8 97 27 24 - Reebok T7.90 Elliptical | English Manual - Page 11
this product or call the telephone number on the cover of this manual. To avoid damaging the console, use only a manufacturer-supplied AC adapter. Plug one end of the power supply into the jack on the front of the elliptical exerciser; plug the other end into an outlet installed in accordance with - Reebok T7.90 Elliptical | English Manual - Page 12
pulse sensors, and place one foot against the center of the front stabilizer. Pull the pulse sensors until the elliptical exerciser will roll on the front wheels. Carefully move the elliptical exerciser to the desired position, and then lower it. Next, raise the pedal arms until they touch the - Reebok T7.90 Elliptical | English Manual - Page 13
, and engage the ramp pin into one of the three adjustment holes in the front of the frame. HOW TO EXERCISE ON THE ELLIPTICAL EXERCISER To mount the elliptical exerciser, hold the upper body arms and step onto the pedal that is in the lower position. Next, step onto the other pedal - Reebok T7.90 Elliptical | English Manual - Page 14
trainer coaches you through your workouts. iFit cards are available separately. To purchase iFit cards, go to www.iFit.com or see the front cover of this manual pedaling speed as it guides you through an effective workout. In addition, the console features two heart rate workouts that change the - Reebok T7.90 Elliptical | English Manual - Page 15
sound and the console will be ready for use. 2. Select the manual mode. When you turn on the console, the manual mode will be selected. If you have selected a workout, reselect the manual mode by pressing any of the Workouts buttons repeatedly until zeros appear in the display. The lower left - Reebok T7.90 Elliptical | English Manual - Page 16
5. Measure your heart rate if desired. 6. Turn on the fan if desired. If there are sheets of clear plastic on the Contacts metal contacts on the handgrip pulse sensor, remove the plas- tic. In addition, make sure that your hands are clean. To measure your heart rate, hold the handgrip - Reebok T7.90 Elliptical | English Manual - Page 17
setting for the current segment is too high or too low, you can manually override the setting by pressing the Quick Resistance buttons. However, when the speed setting may be programmed for consecutive segments. During the workout, the workout profile will show your progress (see the drawing above). - Reebok T7.90 Elliptical | English Manual - Page 18
rate setting may be programmed for consecutive segments. During the workout, the workout profile in the display will show your progress. The flashing for the current segment is too high or too low, you can manually override the setting by pressing the Quick Resistance buttons. However, when the - Reebok T7.90 Elliptical | English Manual - Page 19
IFIT WORKOUT iFit cards are available separately. To purchase iFit cards, go to www.iFit.com or see the front cover of this manual. iFit workout, the voice of a personal trainer will begin guiding you through your workout. iFit workouts function in the same way as preset workouts. To use the workout - Reebok T7.90 Elliptical | English Manual - Page 20
keep the console out of direct sunlight. CONSOLE TROUBLESHOOTING If the console display become dim, the batteries should be replaced; most console problems are the result of low batteries. See assembly step 11 on page 11 for replacement instructions. If the handgrip pulse sensor does not function - Reebok T7.90 Elliptical | English Manual - Page 21
pre-existing health problems. The pulse INTENSITY WORKOUT GUIDELINES Whether rate as a guide to find the to prevent post-exercise problems. To find the workouts each week, with at least one day of rest between workouts. After a few months of regular exercise, you may complete up to five workouts - Reebok T7.90 Elliptical | English Manual - Page 22
SUGGESTED STRETCHES The correct form for several basic stretches is shown at the right. Move slowly as you stretch-never bounce. 1. Toe Touch Stretch Stand with your knees bent slightly and slowly bend forward from your hips. Allow your back and shoulders to relax as you reach down toward your - Reebok T7.90 Elliptical | English Manual - Page 23
NOTES 23 - Reebok T7.90 Elliptical | English Manual - Page 24
PART LIST-Model No. RBEL77909.0 R0110A Key No. Qty. 1 1 2 1 3 1 4 1 5 1 6 1 7 1 8 2 9 1 10 1 11 1 12 79 4 80 4 81 6 82 4 83 2 84 2 85 2 86 1 87 4 88 7 89 2 90 1 91 1 92 1 93 2 94 3 95 1 96 1 97 51 98 2 99 4 100 4 Description Clamp - Reebok T7.90 Elliptical | English Manual - Page 25
* - * - * - M8 x 25mm Button Screw M10 x 20mm Button Screw M8 x 25mm Shoulder Screw M8 x 30mm Button Screw 1/4" x 19mm Button Screw M4 x 12mm Screw Userʼs Manual Assembly Tool Grease Packet Note: Specifications are subject to change without notice. For information about ordering replacement - Reebok T7.90 Elliptical | English Manual - Page 26
EXPLODED DRAWING A-Model No. RBEL77909.0 R0110A 21 25 11 23 20 25 97 97 97 81 97 29 106 105 115 79 100 21 78 104 40 28 79 100 97 27 71 78 22 79 10 97 24 97 19 105 79 106 104 24 26 97 67 74 106 66 103 89 67 65 81 67 66 110 66 67 103 103 74 31 106 66 106 - Reebok T7.90 Elliptical | English Manual - Page 27
88 111 87 68 88 88 97 14 97 12 68 72 80 68 102 105 68 104 95 104 75 45 105 92 48 90 47 94 51 80 102 114 91 114 46 44 55 97 15 54 53 84 113 103 85 52 112 114 73 87 87 - Reebok T7.90 Elliptical | English Manual - Page 28
number and description of the replacement part(s) (see the PART LIST and the EXPLODED DRAWING near the end of this manual) LIMITED WARRANTY IMPORTANT: You must register this product within 30 days of the purchase date to avoid added fees for service needed under warranty. Go to www.reebokservice
-
 1
1 -
 2
2 -
 3
3 -
 4
4 -
 5
5 -
 6
6 -
 7
7 -
8
-
9
-
10
-
11
-
12
-
13
-
14
-
15
-
16
-
17
-
18
-
19
-
20
-
21
-
22
-
23
-
24
-
25
-
26
-
27
-
28
 |
 |
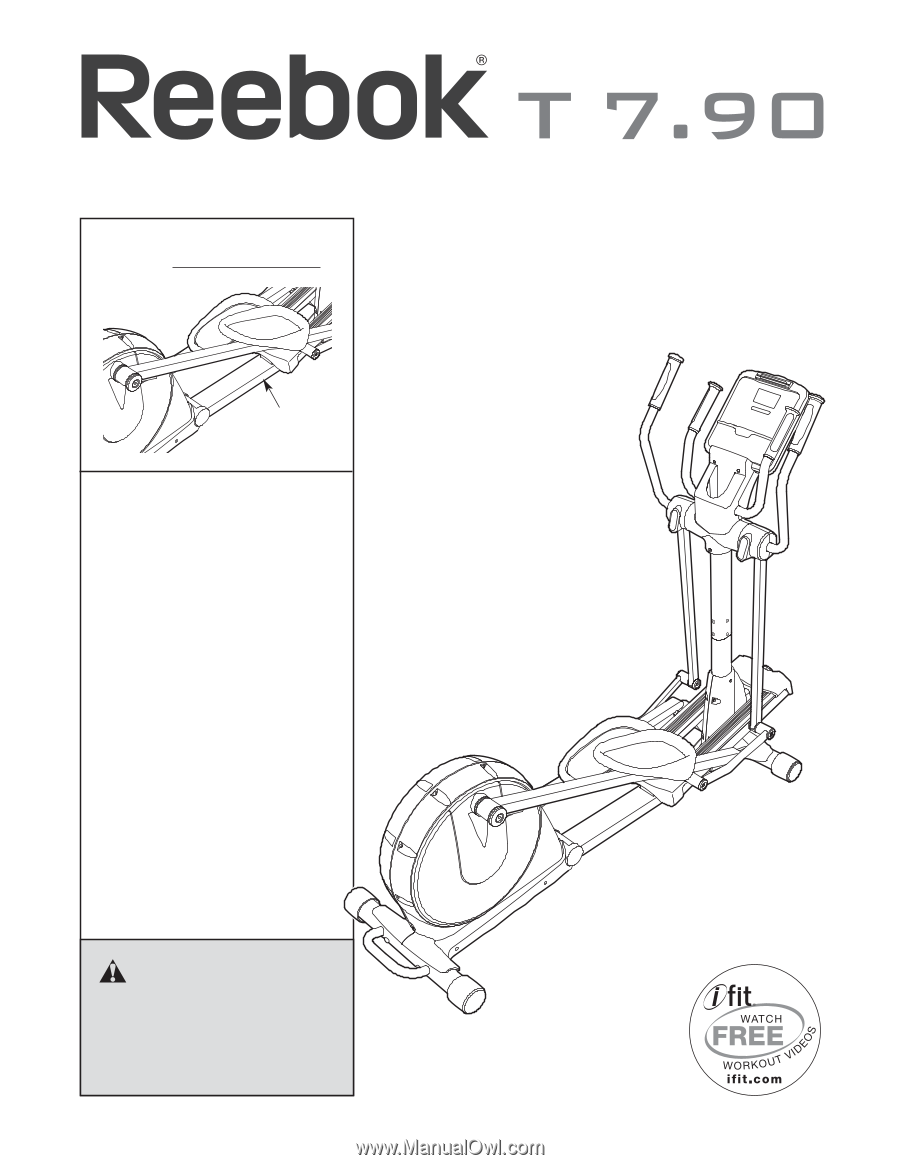
CAUTION
Read all precautions and instruc-
tions in this manual before using
this equipment. Keep this manual
for future reference.
Serial
Number
Decal
Model No. RBEL77909.0
Serial No.
USERʼS MANUAL
www.reebokfitness.com
QUESTIONS?
If you have questions, or if parts are
damaged or missing,
DO NOT
CONTACT THE STORE; please
contact Customer Care.
IMPORTANT: Please register this
product (see the limited warranty
on the back cover of this manual)
before contacting Customer Care.
CALL TOLL-FREE:
1-877-994-4999
Mon.–Fri., 6 a.m.–6 p.m. MT
Sat. 8 a.m.–5 p.m. MT
ON THE WEB:
www.reebokservice.com