Reebok Trainer Rx 1.5 Bike English Manual
Reebok Trainer Rx 1.5 Bike Manual
 |
View all Reebok Trainer Rx 1.5 Bike manuals
Add to My Manuals
Save this manual to your list of manuals |
Reebok Trainer Rx 1.5 Bike manual content summary:
- Reebok Trainer Rx 1.5 Bike | English Manual - Page 1
QUESTIONS? If you have questions, or if parts are damaged or missing, DO NOT CONTACT manual) before contacting Customer Care. CALL TOLL-FREE: 1-877-994-4999 Mon.-Fri. 6 a.m.-6 p.m. MT Sat. 8 a.m.-4 p.m. MT ON THE WEB: www.reebokservice.com CAUTION Read all precautions and instructions in this manual - Reebok Trainer Rx 1.5 Bike | English Manual - Page 2
PRECAUTIONS 3 BEFORE YOU BEGIN 4 ASSEMBLY 5 HOW TO USE THE EXERCISE BIKE 12 FCC INFORMATION 17 MAINTENANCE AND TROUBLESHOOTING 18 EXERCISE GUIDELINES 20 PART LIST 22 EXPLODED DRAWING 23 ORDERING REPLACEMENT PARTS Back Cover LIMITED WARRANTY Back Cover WARNING DECAL PLACEMENT This drawing - Reebok Trainer Rx 1.5 Bike | English Manual - Page 3
IMPORTANT PRECAUTIONS WARNING: To reduce the risk of serious injury, read all important precautions and instructions in this manual and all warnings on your exercise bike before using your exercise bike. ICON assumes no responsibility for personal injury or property damage sustained by or through - Reebok Trainer Rx 1.5 Bike | English Manual - Page 4
REEBOK® TRAINER RX 1.5 exercise bike. Cycling is an effective exercise for increasing cardiovascular fitness, building endurance, and toning the body. The TRAINER RX 1.5 exercise bike front cover of this manual. Before reading further, please familiarize yourself with the parts that are labeled in - Reebok Trainer Rx 1.5 Bike | English Manual - Page 5
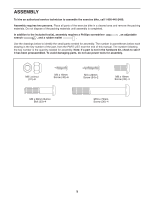
service technician to assemble the exercise bike, call 1-800-445-2480. Assembly requires two persons. Place all parts of the exercise bike the part, from the PART LIST near the end of this manual. The number following the key number is the quantity needed for assembly. Note: If a part is - Reebok Trainer Rx 1.5 Bike | English Manual - Page 6
1. To make assembly easier, read the 1 information on page 5 before you begin. Identify the Rear Stabilizer (14), which has a Leveling Foot (63) near each end. Attach the Rear Stabilizer (14) to the Frame (1) with two M10 x 75mm Screws (36). 14 63 36 2. Attach the Front Stabilizer (2) to the - Reebok Trainer Rx 1.5 Bike | English Manual - Page 7
4. Tip: Avoid pinching the wires. Slide the Upright (3) onto the Frame (1). Attach the Upright (3) with four M8 x 18mm Screws (35). Slide the Top Shield (9) downward and press it onto the Left and Right Shields (17, 18). 4 Avoid pinching the wires 3 9 17 18 35 35 1 5. Attach the Seat (12) to the - Reebok Trainer Rx 1.5 Bike | English Manual - Page 8
6. Using an adjustable wrench, tighten the Adjustment Knob (11) into the Frame (1). 6 Next, loosen the Adjustment Knob (11) a few turns, pull it outward, and insert the Seat Post (5) into the Frame (1). Slide the Seat Post (5) upward or downward to the desired position, and release the Adjustment - Reebok Trainer Rx 1.5 Bike | English Manual - Page 9
as shown by the diagrams inside the battery compartments. To purchase an optional AC adapter, call the telephone number on the front cover of this manual. To avoid damaging the console, use only a manufacturer-supplied AC adapter. Plug one end of the AC adapter into the receptacle on the console - Reebok Trainer Rx 1.5 Bike | English Manual - Page 10
10. While a second person holds the Console (6) near the Upright (3), connect the wires on the Console to the Upper Wire (32) and to the Right and Left Pulse Wires (64, 66). Insert the excess wire downward into the Upright (3) or upward into the Console (6). Tip: Avoid pinching the wires. Attach the - Reebok Trainer Rx 1.5 Bike | English Manual - Page 11
the Right Pedal. Adjust the strap on the Left Pedal (not shown) in the same way. 13 Strap 26 Tab 13. Make sure that all parts are properly tightened before you use the exercise bike. Note: Some hardware may be left over after assembly is completed. Place a mat under the - Reebok Trainer Rx 1.5 Bike | English Manual - Page 12
pedals. Then, adjust the straps to the desired position, and press the ends of the straps onto the tabs. Strap Tab HOW TO LEVEL THE EXERCISE BIKE If the exercise bike rocks slightly on your floor during use, turn one or both of the leveling feet under the rear stabilizer until the - Reebok Trainer Rx 1.5 Bike | English Manual - Page 13
guides you through an effective workout. For example, lose unwanted pounds with the 8-week Weight Loss workout. iFit workouts control the resistance of the pedals while the voice of a personal trainer your favorite music or audio books while you exercise. To use the manual mode, see page 14. To use - Reebok Trainer Rx 1.5 Bike | English Manual - Page 14
tone will sound and the console will be ready for use. 2. Select the manual mode. The left display-This display can show the elapsed time and the approximate will also show a track representing 1/4 mile (400 m). As you exercise, indicators will appear in succession around the track until the entire - Reebok Trainer Rx 1.5 Bike | English Manual - Page 15
Complete profiles of the preset workouts are printed on the sides of the console. 3. Begin pedaling to start the workout. 7. When you are finished exercising, the console will turn off automatically. If the pedals do not move for several seconds, a series of tones will sound, the console will pause - Reebok Trainer Rx 1.5 Bike | English Manual - Page 16
will continue to show exercise feedback; however, the display will not show the elapsed time until you select the manual mode or a new workout moment after you select a workout, the voice of a personal trainer will begin guiding you through your workout. iFit workouts function in the same way - Reebok Trainer Rx 1.5 Bike | English Manual - Page 17
that the exercise bike has been pedaled. To exit the user mode, press the Fan button. The console can show pedaling speed and distance in either miles or kilometers. FCC INFORMATION This equipment has been tested and found to comply with the limits for a Class B digital device, pursuant to Part 15 - Reebok Trainer Rx 1.5 Bike | English Manual - Page 18
AND TROUBLESHOOTING Inspect and tighten all parts of the exercise bike regularly. Replace any worn parts immediately. To clean the exercise bike, use the seat post, the adjustment knob, and the top shield (see the instructions below). To remove the Seat Post (5), loosen the Adjustment Knob (11) - Reebok Trainer Rx 1.5 Bike | English Manual - Page 19
adjust the drive belt, you must remove the seat post, the adjustment knob, the top shield, the right pedal, and the right shield (see the instructions below). To remove the Seat Post (5), loosen the Adjustment Knob (11) a few turns, pull the Adjustment Knob outward, and remove the Seat Post. Then - Reebok Trainer Rx 1.5 Bike | English Manual - Page 20
exercising at the proper intensity is the key to achieving results. You can use your heart rate as a guide to prevent post-exercise problems. To find the exercise, you may complete up to five workouts each week, if desired. Remember, the key to success is to make exercise a regular and enjoyable part - Reebok Trainer Rx 1.5 Bike | English Manual - Page 21
SUGGESTED STRETCHES The correct form for several basic stretches is shown at the right. Move slowly as you stretch-never bounce. 1. Toe Touch Stretch Stand with your knees bent slightly and slowly bend forward from 1 your hips. Allow your back and shoulders to relax as you reach down toward - Reebok Trainer Rx 1.5 Bike | English Manual - Page 22
PART LIST Model No. RBEX11911.1 R1211A Key No. Qty. 1 1 2 1 3 1 4 2 5 1 6 1 7 1 8 1 9 1 10 2 11 1 12 1 13 1 14 1 15 Pulse Wire M6 x 8mm Screw Userʼs Manual Assembly Tool Note: Specifications are subject to change without notice. For information about ordering - Reebok Trainer Rx 1.5 Bike | English Manual - Page 23
EXPLODED DRAWING Model No. RBEX11911.1 R1211A 51 66 6 12 61 65 8 37 24 23 47 53 3 49 37 5 37 54 9 40 19 40 61 53 40 51 65 64 48 35 20 11 21 35 37 32 38 15 27 39 42 25 31 7 40 22 2 1 16 4 63 10 36 39 13 59 27 60 14 28 16 29 62 52 33 67 41 43 46 56 55 34 40 - Reebok Trainer Rx 1.5 Bike | English Manual - Page 24
part(s) (see the PART LIST and the EXPLODED DRAWING near the end of this manual) LIMITED WARRANTY IMPORTANT: You must register this product within 30 days of the purchase date to avoid added fees for service transported outside the USA, if all instructions in this manual are not followed, if the
-
 1
1 -
 2
2 -
 3
3 -
 4
4 -
 5
5 -
 6
6 -
 7
7 -
8
-
9
-
10
-
11
-
12
-
13
-
14
-
15
-
16
-
17
-
18
-
19
-
20
-
21
-
22
-
23
-
24
 |
 |

CAUTION
Read all precautions and instruc-
tions in this manual before using
this equipment. Keep this manual
for future reference.
Serial Number Decal
(under frame)
Model No. RBEX11911.1
Serial No.
Write the serial number in the
space above for reference.
USER'S MANUAL
www.reebokfitness.com
QUESTIONS?
If you have questions, or if parts are
damaged or missing,
DO NOT
CONTACT THE STORE; please
contact Customer Care.
IMPORTANT: Please register this
product (see the limited warranty
on the back cover of this manual)
before contacting Customer Care.
CALL TOLL-FREE:
1-877-994-4999
Mon.–Fri. 6 a.m.–6 p.m. MT
Sat. 8 a.m.–4 p.m. MT
ON THE WEB:
www.reebokservice.com