Ricoh 1160L User Guide - Page 103
Cleaning the OPC Drum, Adjusting Shading - fax toner
 |
View all Ricoh 1160L manuals
Add to My Manuals
Save this manual to your list of manuals |
Page 103 highlights
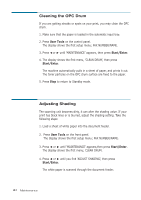
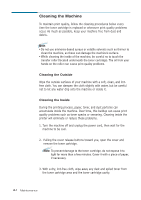
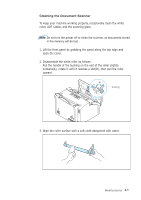
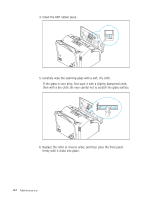
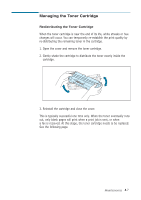
Cleaning the OPC Drum If you are getting streaks or spots on your print, you may clean the OPC drum. 1. Make sure that the paper is loaded in the automatic input tray. 2. Press User Tools on the control panel. The display shows the first setup menu; FAX NUMBER/NAME. 3. Press ➛¤or ❿ until 'MAINTENANCE' appears, then press Start/Enter. 4. The display shows the first menu, 'CLEAN DRUM', then press Start/Enter. The machine automatically pulls in a sheet of paper, and prints it out. The toner particles on the OPC drum surface are fixed to the paper. 5. Press Stop to return to Standby mode. Adjusting Shading The scanning unit becomes dirty, it can alter the shading value. If your print has black lines or is blurred, adjust the shading setting. Take the following steps: 1. Load a sheet of white paper into the document feeder. 2. Press User Tools on the front panel. The display shows the first setup menu; FAX NUMBER/NAME. 3. Press ➛ or ❿ until 'MAINTENANCE' appears,then press Start/Enter. The display shows the first menu; CLEAN DRUM. 4. Press ➛ or ❿ until you find 'ADJUST SHADING', then press Start/Enter. The white paper is scanned through the document feeder. 4.2 Maintenance
-
 1
1 -
2
-
3
-
4
-
5
-
6
-
7
-
8
-
9
-
10
-
11
-
12
-
13
-
14
-
15
-
16
-
17
-
18
-
19
-
20
-
21
-
22
-
23
-
24
-
25
-
26
-
27
-
28
-
29
-
30
-
31
-
32
-
33
-
34
-
35
-
36
-
37
-
38
-
39
-
40
-
41
-
42
-
43
-
44
-
45
-
46
-
47
-
48
-
49
-
50
-
51
-
52
-
53
-
54
-
55
-
56
-
57
-
58
-
59
-
60
-
61
-
62
-
63
-
64
-
65
-
66
-
67
-
68
-
69
-
70
-
71
-
72
-
73
-
74
-
75
-
76
-
77
-
78
-
79
-
80
-
81
-
82
-
83
-
84
-
85
-
86
-
87
-
88
-
89
-
90
-
91
-
92
-
93
-
94
-
95
-
96
-
97
-
 98
98 -
 99
99 -
 100
100 -
 101
101 -
 102
102 -
 103
103 -
 104
104 -
 105
105 -
 106
106 -
 107
107 -
 108
108 -
109
-
110
-
111
-
112
-
113
-
114
-
115
-
116
-
117
-
118
-
119
-
120
-
121
-
122
-
123
-
124
-
125
-
126
-
127
-
128
-
129
-
130
-
131
-
132
-
133
-
134
-
135
-
136
-
137
-
138
-
139
-
140
-
141
-
142
-
143
-
144
-
145
 |
 |