Ricoh 1160L User Guide - Page 107
then with a dry cloth. Be very careful not to scratch the glass surface.
 |
View all Ricoh 1160L manuals
Add to My Manuals
Save this manual to your list of manuals |
Page 107 highlights
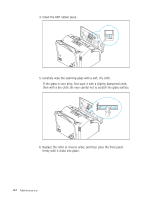
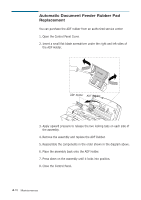
4. Clean the ADF rubber piece. 5. Carefully wipe the scanning glass with a soft, dry cloth. If the glass is very dirty, first wipe it with a slightly dampened cloth, then with a dry cloth. Be very careful not to scratch the glass surface. 6. Replace the roller in reverse order, and then close the front panel firmly until it clicks into place. 4.6 Maintenance
-
 1
1 -
2
-
3
-
4
-
5
-
6
-
7
-
8
-
9
-
10
-
11
-
12
-
13
-
14
-
15
-
16
-
17
-
18
-
19
-
20
-
21
-
22
-
23
-
24
-
25
-
26
-
27
-
28
-
29
-
30
-
31
-
32
-
33
-
34
-
35
-
36
-
37
-
38
-
39
-
40
-
41
-
42
-
43
-
44
-
45
-
46
-
47
-
48
-
49
-
50
-
51
-
52
-
53
-
54
-
55
-
56
-
57
-
58
-
59
-
60
-
61
-
62
-
63
-
64
-
65
-
66
-
67
-
68
-
69
-
70
-
71
-
72
-
73
-
74
-
75
-
76
-
77
-
78
-
79
-
80
-
81
-
82
-
83
-
84
-
85
-
86
-
87
-
88
-
89
-
90
-
91
-
92
-
93
-
94
-
95
-
96
-
97
-
98
-
99
-
100
-
101
-
 102
102 -
 103
103 -
 104
104 -
 105
105 -
 106
106 -
 107
107 -
 108
108 -
 109
109 -
 110
110 -
 111
111 -
 112
112 -
113
-
114
-
115
-
116
-
117
-
118
-
119
-
120
-
121
-
122
-
123
-
124
-
125
-
126
-
127
-
128
-
129
-
130
-
131
-
132
-
133
-
134
-
135
-
136
-
137
-
138
-
139
-
140
-
141
-
142
-
143
-
144
-
145
 |
 |

4.
6
Maintenance
4. Clean the ADF rubber piece.
5. Carefully wipe the scanning glass with a soft, dry cloth.
If the glass is very dirty, first wipe it with a slightly dampened cloth,
then with a dry cloth. Be very careful not to scratch the glass surface.
6. Replace the roller in reverse order, and then close the front panel
firmly until it clicks into place.