Ricoh 1160L User Guide - Page 84
Graphic, until you see
 |
View all Ricoh 1160L manuals
Add to My Manuals
Save this manual to your list of manuals |
Page 84 highlights
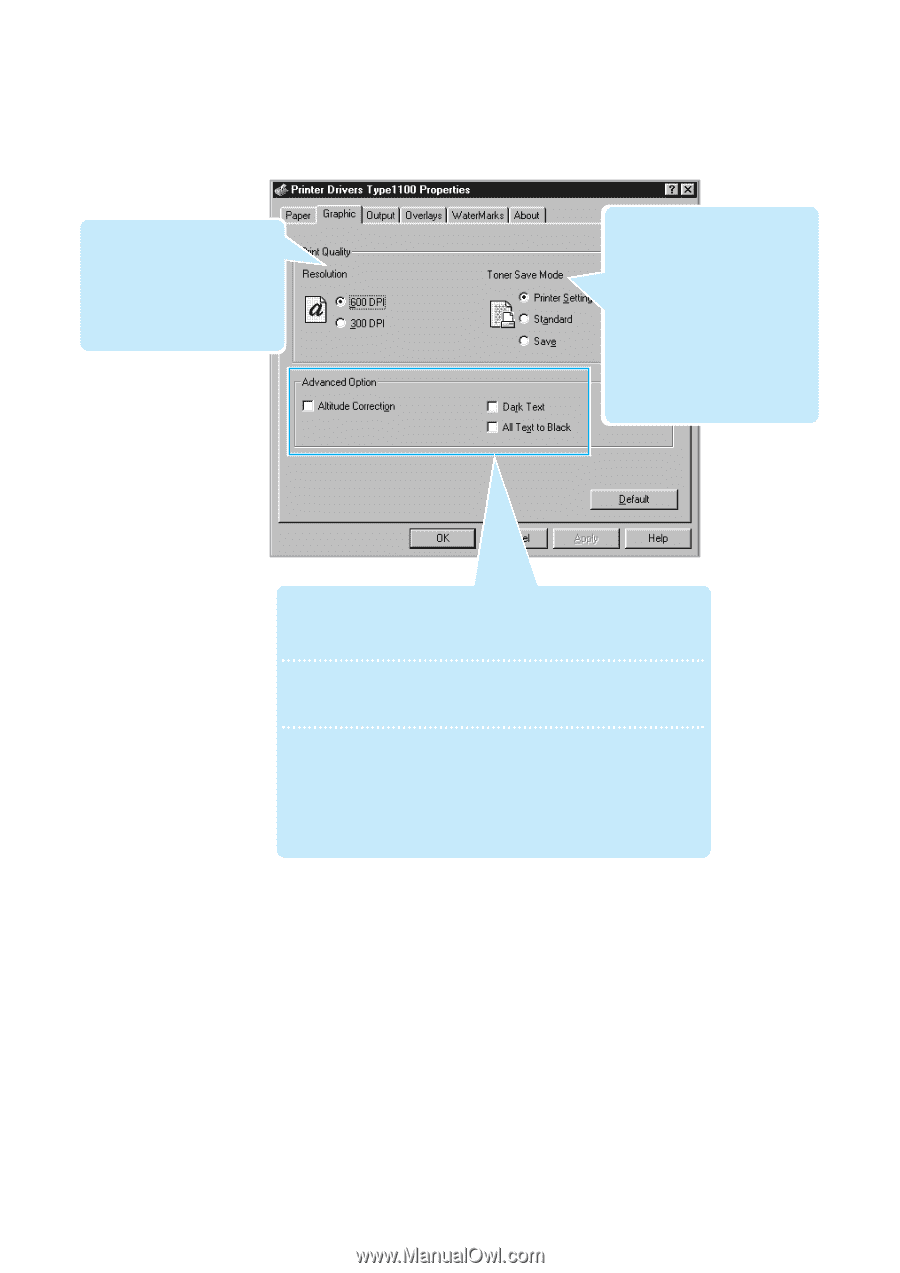
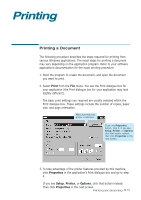
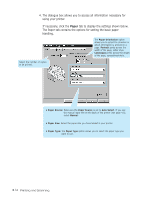
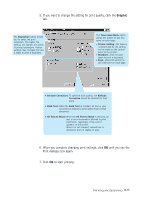
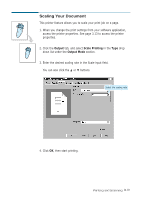
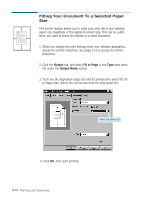
5. If you want to change the setting for print quality, click the Graphic tab. The Resolution option allows you to select the print resolution. The higher the setting, the sharper the clarity of printed characters. Higher settings may increase the time it takes to print a document. The Toner Save Mode option allows the printer to use less toner on each page. • Printer Setting: this feature is determined by the setting you've made on the control panel of the printer. • Standard: does not save toner to print a document. • Save: allows the printer to use less toner on each page. • Altitude Correction: To optimize print quality, the Altitude Correction should be checked for high place. • Dark Text: When the Dark Text is checked, all text in your document is allowed to print darker than normal document. • All Text to Black: When the All Text to Black is checked, all text in your document is allowed to print solid black, regardless of the color it appears on the screen. When it is not checked, colored text is allowed to print in shades of gray. 6. When you complete changing print settings, click OK until you see the Print dialogue box again. 7. Click OK to start printing. Printing and Scanning 3.15
-
 1
1 -
2
-
3
-
4
-
5
-
6
-
7
-
8
-
9
-
10
-
11
-
12
-
13
-
14
-
15
-
16
-
17
-
18
-
19
-
20
-
21
-
22
-
23
-
24
-
25
-
26
-
27
-
28
-
29
-
30
-
31
-
32
-
33
-
34
-
35
-
36
-
37
-
38
-
39
-
40
-
41
-
42
-
43
-
44
-
45
-
46
-
47
-
48
-
49
-
50
-
51
-
52
-
53
-
54
-
55
-
56
-
57
-
58
-
59
-
60
-
61
-
62
-
63
-
64
-
65
-
66
-
67
-
68
-
69
-
70
-
71
-
72
-
73
-
74
-
75
-
76
-
77
-
78
-
 79
79 -
 80
80 -
 81
81 -
 82
82 -
 83
83 -
 84
84 -
 85
85 -
 86
86 -
 87
87 -
 88
88 -
 89
89 -
90
-
91
-
92
-
93
-
94
-
95
-
96
-
97
-
98
-
99
-
100
-
101
-
102
-
103
-
104
-
105
-
106
-
107
-
108
-
109
-
110
-
111
-
112
-
113
-
114
-
115
-
116
-
117
-
118
-
119
-
120
-
121
-
122
-
123
-
124
-
125
-
126
-
127
-
128
-
129
-
130
-
131
-
132
-
133
-
134
-
135
-
136
-
137
-
138
-
139
-
140
-
141
-
142
-
143
-
144
-
145
 |
 |