Ricoh Aficio MP 1600 Printer Reference - Page 18
Setting the Paper Size Using the Control Panel, User Tools/Counter
 |
View all Ricoh Aficio MP 1600 manuals
Add to My Manuals
Save this manual to your list of manuals |
Page 18 highlights
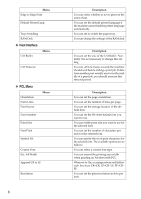
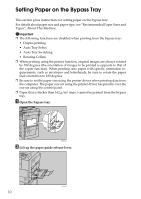
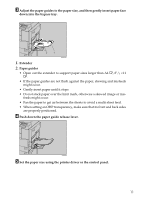
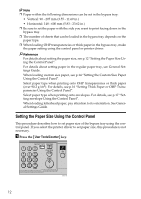
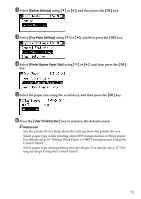
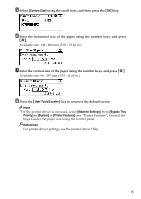
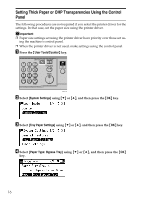
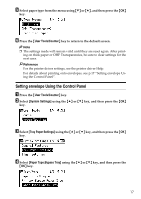
Note ❒ Paper within the following dimensions can be set in the bypass tray: • Vertical: 90 - 297 mm (3.55 - 11.69 in.) • Horizontal: 148 - 600 mm (5.83 - 23.62 in.) ❒ Be sure to set the paper with the side you want to print facing down in the bypass tray. ❒ The number of sheets that can be loaded in the bypass tray depends on the paper type. ❒ When loading OHP transparencies or thick paper in the bypass tray, make the paper setting using the control panel or printer driver. Reference For details about setting the paper size, see p.12 "Setting the Paper Size Using the Control Panel". For details about setting paper in the regular paper tray, see General Settings Guide. When loading custom size paper, see p.14 "Setting the Custom Size Paper Using the Control Panel". Select paper type when printing onto OHP transparencies or thick paper (over 90.2 g/m2). For details, see p.16 "Setting Thick Paper or OHP Transparencies Using the Control Panel". Select paper type when printing onto envelopes. For details, see p.17 "Setting envelope Using the Control Panel". When loading letterhead paper, pay attention to its orientation. See General Settings Guide. Setting the Paper Size Using the Control Panel This procedure describes how to set paper size of the bypass tray using the control panel. If you select the printer driver to set paper size, this procedure is not necessary. A Press the {User Tools/Counter} key. 12 ASC011S
-
 1
1 -
2
-
3
-
4
-
5
-
6
-
7
-
8
-
9
-
10
-
11
-
12
-
 13
13 -
 14
14 -
 15
15 -
 16
16 -
 17
17 -
 18
18 -
 19
19 -
 20
20 -
 21
21 -
 22
22 -
 23
23 -
24
-
25
-
26
-
27
-
28
-
29
-
30
-
31
-
32
-
33
-
34
-
35
-
36
-
37
-
38
-
39
-
40
-
41
-
42
-
43
-
44
-
45
-
46
-
47
-
48
-
49
-
50
-
51
-
52
-
53
-
54
-
55
-
56
-
57
-
58
-
59
-
60
-
61
-
62
-
63
-
64
-
65
-
66
-
67
-
68
-
69
-
70
-
71
-
72
-
73
-
74
-
75
-
76
-
77
-
78
-
79
-
80
-
81
-
82
-
83
-
84
-
85
-
86
-
87
-
88
-
89
-
90
-
91
-
92
-
93
-
94
-
95
-
96
-
97
-
98
-
99
-
100
-
101
-
102
-
103
-
104
-
105
-
106
-
107
-
108
 |
 |