Ricoh Aficio MP 1600 Printer Reference - Page 30
Installing the Printer Driver for the Selected Port, Using the SmartDeviceMonitor for Client Port - printer software
 |
View all Ricoh Aficio MP 1600 manuals
Add to My Manuals
Save this manual to your list of manuals |
Page 30 highlights
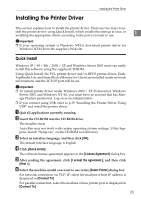
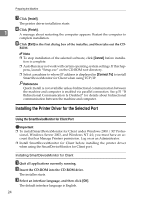
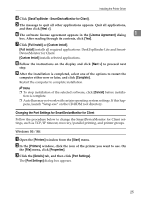
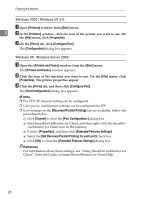
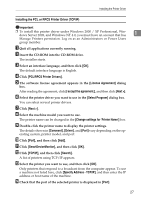
Preparing the Machine G Click [Install]. The printer driver installation starts. H Click [Finish]. 1 A message about restarting the computer appears. Restart the computer to complete installation. I Click [Exit] in the first dialog box of the installer, and then take out the CD- ROM. Note ❒ To stop installation of the selected software, click [Cancel] before installa- tion is complete. ❒ Auto Run may not work with certain operating system settings. If this happens, launch "Setup.exe" on the CD-ROM root directory. ❒ Select a machine to whose IP address is displayed in [Connect To] to install SmartDeviceMonitor for Client when using TCP/IP. Reference Quick Install is not available unless bidirectional communication between the machine and computer is enabled via parallel connection. See p.51 "If Bidirectional Communication Is Disabled" for details about bidirectional communication between the machine and computer. Installing the Printer Driver for the Selected Port Using the SmartDeviceMonitor for Client Port Important ❒ To install SmartDeviceMonitor for Client under Windows 2000 / XP Profes- sional, Windows Server 2003, and Windows NT 4.0, you must have an account that has Manage Printers permission. Log on as an Administrator. ❒ Install SmartDeviceMonitor for Client before installing the printer driver when using the SmartDeviceMonitor for Client port. Installing SmartDeviceMonitor for Client A Quit all applications currently running. B Insert the CD-ROM into the CD-ROM drive. The installer starts. C Select an interface language, and then click [OK]. The default interface language is English. 24
-
 1
1 -
2
-
3
-
4
-
5
-
6
-
7
-
8
-
9
-
10
-
11
-
12
-
13
-
14
-
15
-
16
-
17
-
18
-
19
-
20
-
21
-
22
-
23
-
24
-
 25
25 -
 26
26 -
 27
27 -
 28
28 -
 29
29 -
 30
30 -
 31
31 -
 32
32 -
 33
33 -
 34
34 -
 35
35 -
36
-
37
-
38
-
39
-
40
-
41
-
42
-
43
-
44
-
45
-
46
-
47
-
48
-
49
-
50
-
51
-
52
-
53
-
54
-
55
-
56
-
57
-
58
-
59
-
60
-
61
-
62
-
63
-
64
-
65
-
66
-
67
-
68
-
69
-
70
-
71
-
72
-
73
-
74
-
75
-
76
-
77
-
78
-
79
-
80
-
81
-
82
-
83
-
84
-
85
-
86
-
87
-
88
-
89
-
90
-
91
-
92
-
93
-
94
-
95
-
96
-
97
-
98
-
99
-
100
-
101
-
102
-
103
-
104
-
105
-
106
-
107
-
108
 |
 |