Ricoh Aficio MP 1600 Printer Reference - Page 39
box, and then click, Check that the port of the selected printer is displayed
 |
View all Ricoh Aficio MP 1600 manuals
Add to My Manuals
Save this manual to your list of manuals |
Page 39 highlights
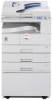
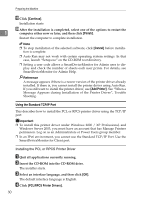
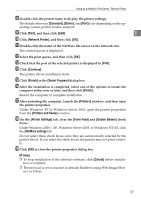
Installing the Printer Driver I Double-click the printer name to display the printer settings. The details shown in [Comment], [Driver], and [Port] vary depending on the operating system, printer model, and port. J Click [Port], and then click [Add]. 1 K Click [LPR Port], and then click [OK]. If [LPR Port] does not appear, see Windows Help and install it. L Enter the printer's IP address in the [Name or address of server providing lpd] box. M Enter "lp" in the [Name of printer or print queue on that server] box, and then click [OK]. The port is added. N Check that the port of the selected printer is displayed in [Port]. O Configure the default printer as necessary. P Click [Continue]. The printer driver installation starts. Q After the installation is completed, select one of the options to restart the computer either now or later, and then click [Finish]. Restart the computer to complete installation. Note ❒ To stop installation of the selected software, click [Cancel] before installa- tion is complete. ❒ Auto Run may not work with certain operating system settings. In that case, launch "Setup.exe" on the CD-ROM root directory. Reference A message appears if there is a newer version of the printer driver already installed. If there is, you cannot install the printer driver using Auto Run. If you still want to install the printer driver, use [Add Printer]. See "When a Message Appears during Installation of the Printer Driver", Trouble Shooting. 33
-
 1
1 -
2
-
3
-
4
-
5
-
6
-
7
-
8
-
9
-
10
-
11
-
12
-
13
-
14
-
15
-
16
-
17
-
18
-
19
-
20
-
21
-
22
-
23
-
24
-
25
-
26
-
27
-
28
-
29
-
30
-
31
-
32
-
33
-
 34
34 -
 35
35 -
 36
36 -
 37
37 -
 38
38 -
 39
39 -
 40
40 -
 41
41 -
 42
42 -
 43
43 -
 44
44 -
45
-
46
-
47
-
48
-
49
-
50
-
51
-
52
-
53
-
54
-
55
-
56
-
57
-
58
-
59
-
60
-
61
-
62
-
63
-
64
-
65
-
66
-
67
-
68
-
69
-
70
-
71
-
72
-
73
-
74
-
75
-
76
-
77
-
78
-
79
-
80
-
81
-
82
-
83
-
84
-
85
-
86
-
87
-
88
-
89
-
90
-
91
-
92
-
93
-
94
-
95
-
96
-
97
-
98
-
99
-
100
-
101
-
102
-
103
-
104
-
105
-
106
-
107
-
108
 |
 |