Ricoh Aficio MP 1600 Printer Reference - Page 46
check box, and then click, Insert the CD-ROM into the CD-ROM drive.
 |
View all Ricoh Aficio MP 1600 manuals
Add to My Manuals
Save this manual to your list of manuals |
Page 46 highlights
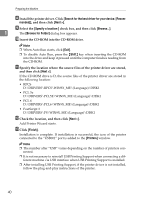
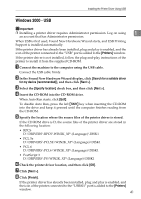
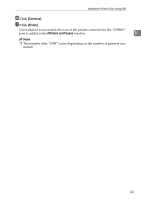
Preparing the Machine H Install the printer driver. Click [Search for the best driver for your device. [Recom- mended]], and then click [Next >]. I Select the [Specify a location:] check box, and then click [Browse...]. 1 The [Browse for Folder] dialog box appears. J Insert the CD-ROM into the CD-ROM drive. Note ❒ When Auto Run starts, click [Exit]. ❒ To disable Auto Run, press the {Shift} key when inserting the CD-ROM into the drive and keep it pressed until the computer finishes reading from the CD-ROM. K Specify the location where the source files of the printer driver are stored, and then click [Next >]. If the CD-ROM drive is D, the source files of the printer driver are stored in the following location: • RPCS D:\DRIVERS\RPCS\WIN9X_ME\(Language)\DISK1 • PCL 5e D:\DRIVERS\PCL5E\WIN9X_ME\(Language)\DISK1 • PCL 6 D:\DRIVERS\PCL6\WIN9X_ME\(Language)\DISK1 • PostScript 3 D:\DRIVERS\PS\WIN9X_ME\(Language)\DISK1 L Check the location, and then click [Next >]. Add Printer Wizard starts. M Click [Finish]. Installation is complete. If installation is successful, the icon of the printer connected to the "USB001" port is added to the [Printers] window. Note ❒ The number after "USB" varies depending on the number of printers con- nected. ❒ It is not necessary to reinstall USB Printing Support when connecting a different machine via USB interface when USB Printing Support is installed. ❒ After installing USB Printing Support, if the printer driver is not installed, follow the plug-and-play instructions of the printer. 40
-
 1
1 -
2
-
3
-
4
-
5
-
6
-
7
-
8
-
9
-
10
-
11
-
12
-
13
-
14
-
15
-
16
-
17
-
18
-
19
-
20
-
21
-
22
-
23
-
24
-
25
-
26
-
27
-
28
-
29
-
30
-
31
-
32
-
33
-
34
-
35
-
36
-
37
-
38
-
39
-
40
-
 41
41 -
 42
42 -
 43
43 -
 44
44 -
 45
45 -
 46
46 -
 47
47 -
 48
48 -
 49
49 -
 50
50 -
 51
51 -
52
-
53
-
54
-
55
-
56
-
57
-
58
-
59
-
60
-
61
-
62
-
63
-
64
-
65
-
66
-
67
-
68
-
69
-
70
-
71
-
72
-
73
-
74
-
75
-
76
-
77
-
78
-
79
-
80
-
81
-
82
-
83
-
84
-
85
-
86
-
87
-
88
-
89
-
90
-
91
-
92
-
93
-
94
-
95
-
96
-
97
-
98
-
99
-
100
-
101
-
102
-
103
-
104
-
105
-
106
-
107
-
108
 |
 |