Ricoh Aficio MP 1600 Printer Reference - Page 68
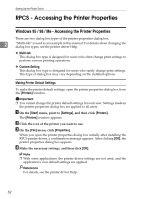
RPCS - Accessing the Printer Properties, Windows 95 / 98 / Me - Accessing the Printer Properties
 |
View all Ricoh Aficio MP 1600 manuals
Add to My Manuals
Save this manual to your list of manuals |
Page 68 highlights
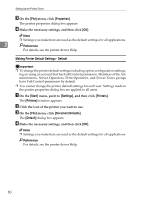
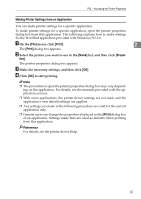
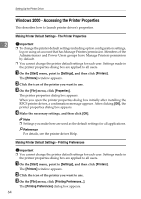
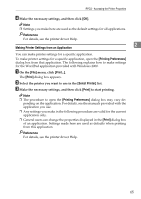
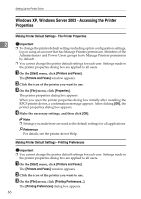
Setting Up the Printer Driver RPCS - Accessing the Printer Properties Windows 95 / 98 / Me - Accessing the Printer Properties There are two dialog box types of the printer properties dialog box. 2 "Multi-tab" is used as an example in this manual. For details about changing the dialog box types, see the printer driver Help. ❖ Multi-tab This dialog box type is designed for users who often change print settings to perform various printing operations. ❖ Custom Setting This dialog box type is designed for users who rarely change print settings. This type of dialog box may vary depending on the installed options. Making Printer Default Settings To make the printer default settings, open the printer properties dialog box from the [Printers] window. Important ❒ You cannot change the printer default settings for each user. Settings made in the printer properties dialog box are applied to all users. A On the [Start] menu, point to [Settings], and then click [Printers]. The [Printers] window appears. B Click the icon of the printer you want to use. C On the [File] menu, click [Properties]. When you open the printer properties dialog box initially after installing the RPCS printer driver, a confirmation message appears. After clicking [OK], the printer properties dialog box appears. D Make the necessary settings, and then click [OK]. Note ❒ With some applications, the printer driver settings are not used, and the application's own default settings are applied. Reference For details, see the printer driver Help. 62
-
 1
1 -
2
-
3
-
4
-
5
-
6
-
7
-
8
-
9
-
10
-
11
-
12
-
13
-
14
-
15
-
16
-
17
-
18
-
19
-
20
-
21
-
22
-
23
-
24
-
25
-
26
-
27
-
28
-
29
-
30
-
31
-
32
-
33
-
34
-
35
-
36
-
37
-
38
-
39
-
40
-
41
-
42
-
43
-
44
-
45
-
46
-
47
-
48
-
49
-
50
-
51
-
52
-
53
-
54
-
55
-
56
-
57
-
58
-
59
-
60
-
61
-
62
-
 63
63 -
 64
64 -
 65
65 -
 66
66 -
 67
67 -
 68
68 -
 69
69 -
 70
70 -
 71
71 -
 72
72 -
 73
73 -
74
-
75
-
76
-
77
-
78
-
79
-
80
-
81
-
82
-
83
-
84
-
85
-
86
-
87
-
88
-
89
-
90
-
91
-
92
-
93
-
94
-
95
-
96
-
97
-
98
-
99
-
100
-
101
-
102
-
103
-
104
-
105
-
106
-
107
-
108
 |
 |