Ricoh Aficio MP 2500 Scanner Reference - Page 99
Basic Procedure for Scanning Files Using TWAIN Scanner - scan to file windows 7
 |
View all Ricoh Aficio MP 2500 manuals
Add to My Manuals
Save this manual to your list of manuals |
Page 99 highlights
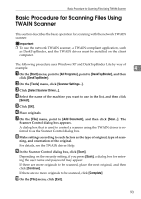
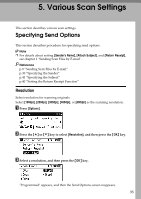
Basic Procedure for Scanning Files Using TWAIN Scanner Basic Procedure for Scanning Files Using TWAIN Scanner This section describes the basic operation for scanning with the network TWAIN scanner. Important ❒ To use the network TWAIN scanner, a TWAIN-compliant application, such as DeskTopBinder, and the TWAIN driver must be installed on the client computer. The following procedure uses Windows XP and DeskTopBinder Lite by way of example. 4 A On the [Start] menu, point to [All Programs], point to [DeskTopBinder], and then click [DeskTopBinder]. B On the [Tools] menu, click [Scanner Settings...]. C Click [Select Scanner Driver...]. D Select the name of the machine you want to use in the list, and then click [Select]. E Click [OK]. F Place originals. G On the [File] menu, point to [Add Document], and then click [Scan...]. The Scanner Control dialog box appears. A dialog box that is used to control a scanner using the TWAIN driver is referred to as the Scanner Control dialog box. H Make settings according to such factors as the type of original, type of scan- ning, and orientation of the original. For details, see the TWAIN driver Help. I In the Scanner Control dialog box, click [Scan]. Depending on the security setting, if you press [Scan], a dialog box for entering the user name and password may appear. If there are more originals to be scanned, place the next original, and then click [Continue]. If there are no more originals to be scanned, click [Complete]. J On the [File] menu, click [Exit]. 93
-
 1
1 -
2
-
3
-
4
-
5
-
6
-
7
-
8
-
9
-
10
-
11
-
12
-
13
-
14
-
15
-
16
-
17
-
18
-
19
-
20
-
21
-
22
-
23
-
24
-
25
-
26
-
27
-
28
-
29
-
30
-
31
-
32
-
33
-
34
-
35
-
36
-
37
-
38
-
39
-
40
-
41
-
42
-
43
-
44
-
45
-
46
-
47
-
48
-
49
-
50
-
51
-
52
-
53
-
54
-
55
-
56
-
57
-
58
-
59
-
60
-
61
-
62
-
63
-
64
-
65
-
66
-
67
-
68
-
69
-
70
-
71
-
72
-
73
-
74
-
75
-
76
-
77
-
78
-
79
-
80
-
81
-
82
-
83
-
84
-
85
-
86
-
87
-
88
-
89
-
90
-
91
-
92
-
93
-
 94
94 -
 95
95 -
 96
96 -
 97
97 -
 98
98 -
 99
99 -
 100
100 -
 101
101 -
 102
102 -
 103
103 -
 104
104 -
105
-
106
-
107
-
108
-
109
-
110
-
111
-
112
-
113
-
114
-
115
-
116
-
117
-
118
-
119
-
120
-
121
-
122
-
123
-
124
-
125
-
126
-
127
-
128
-
129
-
130
-
131
-
132
-
133
-
134
-
135
-
136
 |
 |