Ricoh Aficio MP C305 Manuals - Page 141
Thick Paper, When loading thick paper of 106-163 g/m
 |
View all Ricoh Aficio MP C305 manuals
Add to My Manuals
Save this manual to your list of manuals |
Page 141 highlights
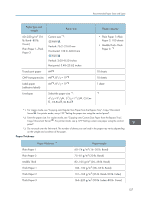
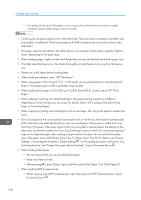
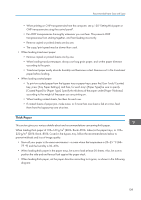
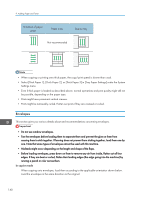
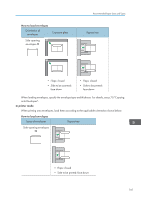
Recommended Paper Sizes and Types • When printing on OHP transparencies from the computer, see p.130 "Setting thick paper or OHP transparencies using the control panel". • Fan OHP transparencies thoroughly whenever you use them. This prevents OHP transparencies from sticking together, and from feeding incorrectly. • Remove copied or printed sheets one by one. • The copy/print speed may be slower than usual. • When loading translucent paper: • Remove copied or printed sheets one by one. • When loading translucent paper, always use long grain paper, and set the paper direction according to the grain. • Translucent paper easily absorbs humidity and becomes curled. Remove curl in the translucent paper before loading. • When loading coated paper: • To print on coated paper from the bypass tray or paper trays: press the [User Tools/Counter] key, press [Tray Paper Settings], and then, for each tray's [Paper Type] be sure to specify [Coated Paper] for [Paper Type]. Specify the thickness of the paper under [Paper Thickness] according to the weight of the paper you are printing on. • When loading coated sheets, fan them for each use. • If coated sheets of paper jam, make noise, or if more than one sheet is fed at a time, feed them from the bypass tray one at a time. Thick Paper This section gives you various details about and recommendations concerning thick paper. When loading thick paper of 106-163 g/m2 (28 lb. Bond-90 lb. Index) in the paper trays, or 106- 220 g/m2 (28 lb. Bond-80 lb. Cover) in the bypass tray, follow the recommendations below to prevent misfeeds and loss of image quality. • Store all your paper in the same environment - a room where the temperature is 20-25 °C (68- 77 °F) and the humidity is 30-65%. • When loading thick paper in the paper trays, be sure to load at least 20 sheets. Also, be sure to position the side and end fences flush against the paper stack. • When loading thick paper, set the paper direction according to its grain, as shown in the following diagram: 139
-
 1
1 -
2
-
3
-
4
-
5
-
6
-
7
-
8
-
9
-
10
-
11
-
12
-
13
-
14
-
15
-
16
-
17
-
18
-
19
-
20
-
21
-
22
-
23
-
24
-
25
-
26
-
27
-
28
-
29
-
30
-
31
-
32
-
33
-
34
-
35
-
36
-
37
-
38
-
39
-
40
-
41
-
42
-
43
-
44
-
45
-
46
-
47
-
48
-
49
-
50
-
51
-
52
-
53
-
54
-
55
-
56
-
57
-
58
-
59
-
60
-
61
-
62
-
63
-
64
-
65
-
66
-
67
-
68
-
69
-
70
-
71
-
72
-
73
-
74
-
75
-
76
-
77
-
78
-
79
-
80
-
81
-
82
-
83
-
84
-
85
-
86
-
87
-
88
-
89
-
90
-
91
-
92
-
93
-
94
-
95
-
96
-
97
-
98
-
99
-
100
-
101
-
102
-
103
-
104
-
105
-
106
-
107
-
108
-
109
-
110
-
111
-
112
-
113
-
114
-
115
-
116
-
117
-
118
-
119
-
120
-
121
-
122
-
123
-
124
-
125
-
126
-
127
-
128
-
129
-
130
-
131
-
132
-
133
-
134
-
135
-
 136
136 -
 137
137 -
 138
138 -
 139
139 -
 140
140 -
 141
141 -
 142
142 -
 143
143 -
 144
144 -
 145
145 -
 146
146 -
147
-
148
-
149
-
150
-
151
-
152
-
153
-
154
-
155
-
156
-
157
-
158
-
159
-
160
-
161
-
162
-
163
-
164
-
165
-
166
-
167
-
168
-
169
-
170
-
171
-
172
-
173
-
174
-
175
-
176
-
177
-
178
-
179
-
180
-
181
-
182
-
183
-
184
-
185
-
186
-
187
-
188
-
189
-
190
-
191
-
192
-
193
-
194
-
195
-
196
-
197
-
198
-
199
-
200
-
201
-
202
-
203
-
204
-
205
-
206
-
207
-
208
-
209
-
210
-
211
-
212
-
213
-
214
-
215
-
216
 |
 |