Ricoh FW780 Service Manual - Page 453
- Pressure Roller Evaluation Procedure, BULLETIN NUMBER, FW740 - 011, APPLICABLE MODEL: FW740
 |
View all Ricoh FW780 manuals
Add to My Manuals
Save this manual to your list of manuals |
Page 453 highlights
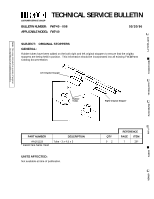
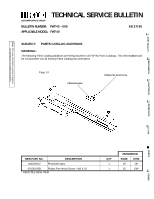
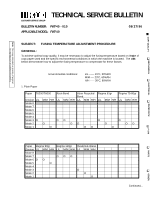
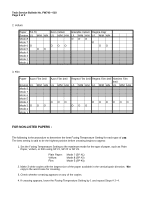
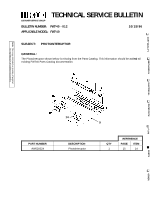
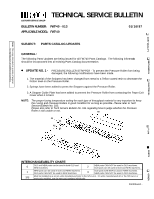
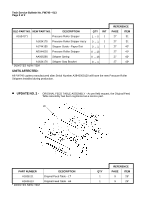
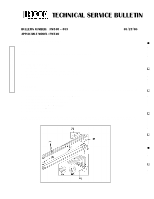
TECHNICAL SERVICE BULLETIN CUSTOMER SERVICE GROUP BULLETIN NUMBER: FW740 - 011 APPLICABLE MODEL: FW740 09/27/96 COPY QUALITY MECHANICAL Note: This copy intended as master of original for reproduction of additional bulletins. SUBJECT: PRESSURE ROLLER EVALUATION PROCEDURE GENERAL: The following procedure is a method to determine whether the pressure roller should be replaced. ELECTRICAL PAPER PATH F S M 1. Access SP mode with the steps below. In order, press Clear Modes (C) key, Plus (+) key, Minus (-) key, Clear/Stop key, press and hold the Clear/Stop key again for longer than 3 seconds. 2. Select Lamp Off Mode with the steps below. a) Confirm that "Lead Margin" indicator lights. If "Lead Margin" indicator does not light, pressFunction Select key until it lights. b) Select "-51" by pressingMinus key. ("-51" is the number to select Lamp Off Mode.) c) Press Function Select key until "Paper Length" indicator lights. d) Select "1" by pressingPlus key. ("1" is the number to set Lamp Off Mode.) e) Press RF Select key to set Lamp Off Mode. 3. To prevent a paper misfeed, create a lead edge margin with the steps below. a) Press Function Select key until "Lead Margin" indicator lights. b) Continue to press Plus key until "99 mm" or "4.0 inches" (max. value) is indicated. 4. Make a copy using a less fusible kind of paper like film, translucent paper or thicker plain paper iwth vertical grain direction. Note: Before making a copy, set the fusing temperature setting to the mode which is one step lower than the proper setting for the particular kind of paper. For example, if the proper setting is Mode 3, select Mode 2 for this test. Refer to TSB No. FW740-010 for more information regarding the proper settings for particular types of paper and the adjustment procedure for non-listed papers. 5. Scrape some black areas on the copy using a cotton cloth approximately 5 times. 6. Check whether the toner is peeled off on the areas that correspond with the scraped parts of the pressure roller. If white lines and/or bands appear, the pressure roller should be replaced with anew one. 7. Before turning the main switch "OFF" to reset the SP mode, reset "Lamp Off Mode", "Lead Margin" and "Fusing Temperature Setting" back to the original settings. FIELD SERVICE MANUAL - INSERT The Field Service Manual page(s) listed below must be replaced with the page(s) supplied. Each bueltlin package contains 1 set of replacement pages. PAGES: The revised areas have been highlighted by an arrow • 4-38 Additional Information Pressure Roller Evaluation Procedure PARTS OTHER
-
 1
1 -
2
-
3
-
4
-
5
-
6
-
7
-
8
-
9
-
10
-
11
-
12
-
13
-
14
-
15
-
16
-
17
-
18
-
19
-
20
-
21
-
22
-
23
-
24
-
25
-
26
-
27
-
28
-
29
-
30
-
31
-
32
-
33
-
34
-
35
-
36
-
37
-
38
-
39
-
40
-
41
-
42
-
43
-
44
-
45
-
46
-
47
-
48
-
49
-
50
-
51
-
52
-
53
-
54
-
55
-
56
-
57
-
58
-
59
-
60
-
61
-
62
-
63
-
64
-
65
-
66
-
67
-
68
-
69
-
70
-
71
-
72
-
73
-
74
-
75
-
76
-
77
-
78
-
79
-
80
-
81
-
82
-
83
-
84
-
85
-
86
-
87
-
88
-
89
-
90
-
91
-
92
-
93
-
94
-
95
-
96
-
97
-
98
-
99
-
100
-
101
-
102
-
103
-
104
-
105
-
106
-
107
-
108
-
109
-
110
-
111
-
112
-
113
-
114
-
115
-
116
-
117
-
118
-
119
-
120
-
121
-
122
-
123
-
124
-
125
-
126
-
127
-
128
-
129
-
130
-
131
-
132
-
133
-
134
-
135
-
136
-
137
-
138
-
139
-
140
-
141
-
142
-
143
-
144
-
145
-
146
-
147
-
148
-
149
-
150
-
151
-
152
-
153
-
154
-
155
-
156
-
157
-
158
-
159
-
160
-
161
-
162
-
163
-
164
-
165
-
166
-
167
-
168
-
169
-
170
-
171
-
172
-
173
-
174
-
175
-
176
-
177
-
178
-
179
-
180
-
181
-
182
-
183
-
184
-
185
-
186
-
187
-
188
-
189
-
190
-
191
-
192
-
193
-
194
-
195
-
196
-
197
-
198
-
199
-
200
-
201
-
202
-
203
-
204
-
205
-
206
-
207
-
208
-
209
-
210
-
211
-
212
-
213
-
214
-
215
-
216
-
217
-
218
-
219
-
220
-
221
-
222
-
223
-
224
-
225
-
226
-
227
-
228
-
229
-
230
-
231
-
232
-
233
-
234
-
235
-
236
-
237
-
238
-
239
-
240
-
241
-
242
-
243
-
244
-
245
-
246
-
247
-
248
-
249
-
250
-
251
-
252
-
253
-
254
-
255
-
256
-
257
-
258
-
259
-
260
-
261
-
262
-
263
-
264
-
265
-
266
-
267
-
268
-
269
-
270
-
271
-
272
-
273
-
274
-
275
-
276
-
277
-
278
-
279
-
280
-
281
-
282
-
283
-
284
-
285
-
286
-
287
-
288
-
289
-
290
-
291
-
292
-
293
-
294
-
295
-
296
-
297
-
298
-
299
-
300
-
301
-
302
-
303
-
304
-
305
-
306
-
307
-
308
-
309
-
310
-
311
-
312
-
313
-
314
-
315
-
316
-
317
-
318
-
319
-
320
-
321
-
322
-
323
-
324
-
325
-
326
-
327
-
328
-
329
-
330
-
331
-
332
-
333
-
334
-
335
-
336
-
337
-
338
-
339
-
340
-
341
-
342
-
343
-
344
-
345
-
346
-
347
-
348
-
349
-
350
-
351
-
352
-
353
-
354
-
355
-
356
-
357
-
358
-
359
-
360
-
361
-
362
-
363
-
364
-
365
-
366
-
367
-
368
-
369
-
370
-
371
-
372
-
373
-
374
-
375
-
376
-
377
-
378
-
379
-
380
-
381
-
382
-
383
-
384
-
385
-
386
-
387
-
388
-
389
-
390
-
391
-
392
-
393
-
394
-
395
-
396
-
397
-
398
-
399
-
400
-
401
-
402
-
403
-
404
-
405
-
406
-
407
-
408
-
409
-
410
-
411
-
412
-
413
-
414
-
415
-
416
-
417
-
418
-
419
-
420
-
421
-
422
-
423
-
424
-
425
-
426
-
427
-
428
-
429
-
430
-
431
-
432
-
433
-
434
-
435
-
436
-
437
-
438
-
439
-
440
-
441
-
442
-
443
-
444
-
445
-
446
-
447
-
 448
448 -
 449
449 -
 450
450 -
 451
451 -
 452
452 -
 453
453 -
 454
454 -
 455
455 -
 456
456 -
 457
457 -
 458
458 -
459
-
460
-
461
-
462
-
463
-
464
-
465
-
466
-
467
-
468
-
469
-
470
-
471
-
472
-
473
-
474
-
475
-
476
-
477
-
478
-
479
-
480
-
481
 |
 |
