Ricoh RDC-I700 Operation Manual
Ricoh RDC-I700 Manual
 |
View all Ricoh RDC-I700 manuals
Add to My Manuals
Save this manual to your list of manuals |
Ricoh RDC-I700 manual content summary:
- Ricoh RDC-I700 | Operation Manual - Page 1
Camera Operation Manual To ensure correct use of your camera, read this manual carefully before use. Keep the manual handy for future use. - Ricoh RDC-I700 | Operation Manual - Page 2
Thank you for purchasing a Ricoh RDC-i700. This manual explains the correct handling procedures and precautions for your camera. To ensure the best performance, please read the manual thoroughly before using the camera. Keep the manual handy for quick future reference. Ricoh Co., Ltd. Test Shots - Ricoh RDC-I700 | Operation Manual - Page 3
➜ Read This Before Proceeding! These instructions explain the procedure for checking the contents of the package and loading the battery to enable you to use the camera straightaway. Basic operation ➜ Camera Operation Manual (this manual) This manual explains in detail the preparations to take - Ricoh RDC-I700 | Operation Manual - Page 4
35 Using the On-screen Keypad 35 Using the Tool Palette 37 Registering the Camera Information 39 Setting the Date and Time 39 Registering Owner Information 42 At the end of this manual troubleshooting for error messages, alphabetical index and index by functions are listed for your convenience - Ricoh RDC-I700 | Operation Manual - Page 5
Storage Memory 43 Adjusting the Viewfinder Diopter 44 How to Hold the Camera 44 Chapter 3 Shooting Basic Shooting 48 Operation Flow 48 Selecting a 66 Using the Self-Timer 67 Close-up Shooting (Macro Mode 69 Manual Focus Shooting 70 Date Imprinting 71 Changing the ISO Sensitivity 72 Using - Ricoh RDC-I700 | Operation Manual - Page 6
Folder 100 Protecting a File 100 Auto Playback 101 Setting DPOF (Digital Print Order Format 103 Preparing and Playing a Presentation 106 Preparing a LCD Confirmation Time 120 Adding or Deleting a Folder 121 Turning the Camera On/Off When the LCD Monitor is Opened ....... 122 Initializing the - Ricoh RDC-I700 | Operation Manual - Page 7
Appendix Troubleshooting 130 Error Messages 133 Using This Camera Abroad 135 Recording Capacities 136 Accessories 137 Handling Precautions 138 Care and Storage 139 Specifications 140 About the Warranty and Servicing 142 Index 144 Tips Tips to Extend the Recording and Playback Times 17 - Ricoh RDC-I700 | Operation Manual - Page 8
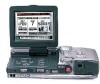
Parts & Names s Camera Body Front Zoom Lever (P.54) Main Shutter Release button (P.45) LCD Panel (P. Reception (P.125)/ Self Timer Lamp Terminal Cover Tripod Screw Hole Diopter adjuster (P.44) USB/AUX Terminal (RS232C cable can be connected) Reset Switch (P.133) 6 EJECT Lever Cover CF Card Slot - Ricoh RDC-I700 | Operation Manual - Page 9
Button (P.24) DISPLAY Button LCD Contrast Adjustment Button (P.28) Strap Eyelet (P.14) s Battery/Battery Charger Battery Charger (BJ-1) Power Cord s AC Adapter (optional) • AC-3 (100 V - 240 V) Power Cord Rechargeable Battery (DB-30) s Remote Control Unit (optional) • DR-3 Connection Cable 7 - Ricoh RDC-I700 | Operation Manual - Page 10
symbols are used throughout this operation manual and on the product to prevent irregularity, such as the equipment emitting smoke or a strange smell. Remove the battery as soon as possible, being careful to avoid electric shocks or burns. If nearest service center at your earliest convenience. 8 - Ricoh RDC-I700 | Operation Manual - Page 11
of the equipment immemorytely if it is malfunctioning. Contact the nearest service center at your earliest convenience. o q Avoid any contact with store the battery with metallic ballpoint pens, necklaces, coins, hairpins, etc. • Remove the battery from the camera or battery charger immemorytely in - Ricoh RDC-I700 | Operation Manual - Page 12
battery charger. • Do not use a power source voltage other than that indicated. Avoid putting several loads on one power outlet or using an extension cable the battery as soon as possible, being careful to avoid electric shocks or burns. Take the equipment to your nearest dealer or service center - Ricoh RDC-I700 | Operation Manual - Page 13
RWarning m q Do not use the equipment near flammable gases, gasoline, benzine, thinner or similar substances to avoid the risk of explosion, fire or burns. q Do not use the equipment in aircraft or other locations where usage is restricted or prohibited as this may lead to disasters or accidents. - Ricoh RDC-I700 | Operation Manual - Page 14
cars and trains, as this may cause the driver to lose control and result in a traffic accident. Safety Warning for Accessories • Safety warnings for the optional accessories such as the remote control unit and AC adapter are contained in the operation manual provided with each product and should be - Ricoh RDC-I700 | Operation Manual - Page 15
1Chapter Getting Started Before Using the Camera ....... 14 Attaching the Neck Strap 14 Attaching the Lens Cap 14 Powering the Camera 15 Charging the Battery 15 Loading the Battery 16 Connecting an AC Adapter .......... 18 Storage Memory 19 Inserting a CF Card or PC Card ... 20 - Ricoh RDC-I700 | Operation Manual - Page 16
each loop through the strap eyelet. B Pass the strap through the buckle and adjust the length of the strap. Important Note • Do not swing the camera around by its strap. Attaching the Lens Cap A Push the lens cap on in the direction shown by the arrow. To remove the lens cap - Ricoh RDC-I700 | Operation Manual - Page 17
to charge the battery. • Do not use the battery charger to charge batteries other than the DB-30 battery. • Charge the battery in a well ventilated place with an ambient temperature in the range of 10°C to 40°C (50°F to 104°F). • When the battery approaches the end of its service life, its operating - Ricoh RDC-I700 | Operation Manual - Page 18
for the first time, be sure to charge the battery. (The battery is not charged when the camera leaves the factory.) → P.15 "Charging the Battery" A Check that the camera is turned off, and then open the battery cover by pressing the catch and sliding it in the direction shown. See • P.24 "Turning - Ricoh RDC-I700 | Operation Manual - Page 19
manual. • Use the specified battery. → P.137 "Accessories" • Wipe the terminals of the battery and the contacts of the camera with a dry cloth. • Continued use of the battery for long periods may cause the battery to become hot. Wait until it cools before removing it. • Store the battery charger - Ricoh RDC-I700 | Operation Manual - Page 20
in the accompanying manual. A Check that the camera is turned off, and connect the AC adapter connection cable to the power supply terminal (DC input) on the camera. See • P.24 "Turning On/Off the Camera" B Insert the power plug into the electrical outlet. Note • If the battery is loaded in - Ricoh RDC-I700 | Operation Manual - Page 21
of them in fire. • Memory cards have a limited service life. Cards that have been used over an extended period of camera malfunction or repair. Ricoh Co., Ltd. assumes no liability for damages incurred by such loss of recorded data. • Do not remove the battery from the camera, turn off the camera - Ricoh RDC-I700 | Operation Manual - Page 22
malfunction. • Before using a new card or a card that has been used on another device (such as a PC), you need to format (initialize) it with the camera. → P.43 "Formatting the Storage Memory" • Do not remove the PC card while data is being recorded or erased. The data stored on the card could - Ricoh RDC-I700 | Operation Manual - Page 23
turned off, and then open the EJECT lever cover. See • P.24 "Turning On/Off the Camera" B Turn the CF or PC card EJECT lever in the direction shown by the arrow and press it. q CF card Press the upper EJECT lever. q - Ricoh RDC-I700 | Operation Manual - Page 24
64 MB • Operating voltage: 3.3 V Insert the SmartMedia memory card into the PC card adapter. Insert the PC card adapter into the camera. Be sure to read the accompanying manual before using a SmartMedia memory card or PC card adapter. * Do not insert or remove the SmartMedia memory card while the PC
-
 1
1 -
 2
2 -
 3
3 -
 4
4 -
 5
5 -
 6
6 -
 7
7 -
8
-
9
-
10
-
11
-
12
-
13
-
14
-
15
-
16
-
17
-
18
-
19
-
20
-
21
-
22
-
23
-
24
 |
 |

To ensure correct use of your
camera, read this manual
carefully before use. Keep the
manual handy for future use.
Camera Operation Manual
Camera Operation Manual