Rocketfish RF-SBM101 User Manual (English)
Rocketfish RF-SBM101 Manual
 |
View all Rocketfish RF-SBM101 manuals
Add to My Manuals
Save this manual to your list of manuals |
Rocketfish RF-SBM101 manual content summary:
- Rocketfish RF-SBM101 | User Manual (English) - Page 1
RF-SBM101 Soundbar Mount User Guide Safety information and specifications ........ 2 What you need 4 Package contents: parts 4 Package contents: hardware 5 Installation instructions 7 Before using your new product, please read these instructions to prevent any damage. - Rocketfish RF-SBM101 | User Manual (English) - Page 2
*, RF-TVMLPT02*, RF-TVMLPT03*, RF-TVMFM01*, RF-TVMFM02*, RF-TVMFM03*, DX-TVM111*, DX-TVM112*, DX-TVM113*, DX-DRTVM102*, DX-DRTVL103*, and SANUS VISIONMOUNT television mounts mounted below the television. This soundbar mount was designed to be installed and utilized ONLY as specified in this manual - Rocketfish RF-SBM101 | User Manual (English) - Page 3
guidance. • You have the tools needed for installation. • If your TV bracket has built-in or integrated spacers (see Figure 1), or mounting holes or slots that are wider than 11mm [.43 in.] (see Figure 2), you cannot use this product. Call Customer Service for assistance. - Rocketfish RF-SBM101 | User Manual (English) - Page 4
What you need You will need the following to assemble your new sound bar mount: Phillips screwdriver TV Wall Mount Bracket Level Package contents: parts Make sure that you have all the parts necessary to assemble your new sound bar mount. A Soundbar Bracket Arm (2) B TV Bracket Arm (2) 4 - Rocketfish RF-SBM101 | User Manual (English) - Page 5
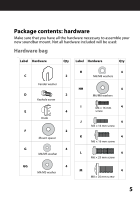
you have all the hardware necessary to assemble your new soundbar mount. Not all hardware included will be used: Hardware bag GG Label Hardware Qty Label Hardware Qty C 2 Fender washer D 2 Keyhole screw E 4 Knob F 2 Mount spacer G 4 M4/M5 washer GG 4 M4/M5 washer H 4 M6/M8 - Rocketfish RF-SBM101 | User Manual (English) - Page 6
Hardware bag (continued) Label Hardware Qty Label Hardware Qty N 4 Spacers P 4 M4 × 40 mm screw Q 4 M5 × 40 mm screw R 4 M6 × 40 mm screw S 4 M6 × 50 mm screw T 4 M8 × 40mm screw 1 2 3 4in 10 20 30 40 50 60 70 80 90 100mm 6 - Rocketfish RF-SBM101 | User Manual (English) - Page 7
Installation instructions STEP 1: Option 1 - Mount the bracket arms to the soundbar 1 Check the compatibility of the soundbar bracket with your soundbar. 2 Insert the keyhole screws (D) into the knobs (E). 3 Attach the soundbar arms (A) to your soundbar with the assembled knob/keyhole screws. NOTE: - Rocketfish RF-SBM101 | User Manual (English) - Page 8
4 [OPTIONAL] If there are gaps or recesses under the soundbar arms, slip a "Fender" washer (C) onto the keyhole screws (D) and under the soundbar arms (A) make sure that the soundbar arms (A) lay flat on the soundbar. A C E 5 Loosely tighten the knobs (E). 8 - Rocketfish RF-SBM101 | User Manual (English) - Page 9
STEP 1: Option 2 - Mount the bracket arms to a hanger Some soundbars come with a manufacturer supplied hanger (for example Samsung). 1 Attach the soundbar arms (A) to the soundbar hanger with the assembled knob/keyhole screws. Do not fully tighten knobs. A E Soundbar manufacturer supplied hanger D 9 - Rocketfish RF-SBM101 | User Manual (English) - Page 10
instructions for how to properly remove your TV from the brackets. 1 Remove all cables attached to your TV. 2 Remove your TV from the wall. 3 Remove the existing wall mount bracket from the back of your TV. • Save the existing screws and washers in case you want to use the TV without the soundbar - Rocketfish RF-SBM101 | User Manual (English) - Page 11
CAUTION: Heavy. You may need assistance with this step. 3 2 You'll need Phillips screwdriver 11 - Rocketfish RF-SBM101 | User Manual (English) - Page 12
. See the documentation that came with your TV for instructions. 3 Temporarily lay your existing TV wall mount brackets (not included) on the back of your TV. 4 Align the screw holes in your existing TV wall mount brackets with the mounting screw holes on your TV. 5 Identify which type of back your - Rocketfish RF-SBM101 | User Manual (English) - Page 13
on the back of your TV. You will need spacers when assembling the wall mount. • Irregularly-shaped back: There is a gap between a bracket and some part of the back of your TV. You will need spacers when assembling the wall mount. 6 Remove the TV brackets. You'll need TV wallmount bracket 13 - Rocketfish RF-SBM101 | User Manual (English) - Page 14
to your TV. If you encounter resistance, stop immediately and contact customer service. Use the shortest screw and spacer combination to accommodate your TV. Using hardware that is too long may damage your TV. However, using a screw that is too short may cause your TV to fall from the mount. 14 - Rocketfish RF-SBM101 | User Manual (English) - Page 15
short 2 Remove the screws. 3 For a flat back TV, go to "STEP 5 - Option 1: Attaching the mounting hardware to TVs with a flat back" on page 16. -OR- For an irregular or obstructed back, go to "STEP 5 - Option 2: Attaching the mounting hardware to TVs with irregular or obstructed backs" on page 18 - Rocketfish RF-SBM101 | User Manual (English) - Page 16
on the wall, align the arms so they reach the bottom or corners of the TV, but do not over hang the edges. 3 Align your existing TV wall mount brackets with the screw holes on the back of the TV. 4 Install screws (I, J, K, L, or M) and washers (G, GG, H, or HH) through the top two holes in - Rocketfish RF-SBM101 | User Manual (English) - Page 17
-tighten. NOTE: Your existing TV wall mount may vary from the one shown below. Refer to the instructions that came with your existing TV wall mount for attaching brackets to the bac of the TV. However, you MUST use the screws and washers provided with the soundbar mount instead of the screws and - Rocketfish RF-SBM101 | User Manual (English) - Page 18
on the wall, align the arms so they reach the bottom or corners of the TV, but do not over hang the edges. 3 Align your existing TV wall mount bracket with the screw holes on the back of the TV. 4 Install screws (P, Q, R, S, or T) and washers (G, GG, H, or HH) through the top two holes in - Rocketfish RF-SBM101 | User Manual (English) - Page 19
may vary from the one shown below. Refer to the instructions that came with your existing TV wall mount for attaching brackets to the back of the TV. However, you MUST use the screws and washers provided with the soundbar mount instead of the screws and washers that came with your existing wall - Rocketfish RF-SBM101 | User Manual (English) - Page 20
STEP 6: Options 1 and 2 - Attach the soundbar assembly to your TV CAUTION: The ends of the TV/bracket arms (A) must not extend beyond the edge of the TV. • Attach the soundbar bracket arm (A) assembly to the TV bracket arm (B) assembly with two knobs (E). Do not fully tighten the connections. E A 05 - Rocketfish RF-SBM101 | User Manual (English) - Page 21
STEP 6: Option 3 - Attach the soundbar hanger assembly to your TV • Attach the soundbar bracket arm (A) and hanger assembly to the TV bracket arm (B) assembly with two knobs (E). Do not fully tighten the connections. E A B You'll need E Knobs (2) 21 - Rocketfish RF-SBM101 | User Manual (English) - Page 22
STEP 7 - Final adjustments, tightening, and hanging the TV 1 Adjust the soundbar bracket arm (A) assembly and the TV bracket arm (B) until the soundbar is in the position you want. NOTE: The soundbar must be positioned within 2 inches (5.1 cm) of the TV. CAUTION: Heavy. You may need assistance with - Rocketfish RF-SBM101 | User Manual (English) - Page 23
NOTE: The TV/bracket arms should be positioned as vertically as possible. 2 When the soundbar is in the correct position, tighten all fasteners. 23 - Rocketfish RF-SBM101 | User Manual (English) - Page 24
3 Hang the TV/soundbar assembly on the wall, following the instructions that came with your existing TV wall mount, then reconnect the cables and power cord. You'll need Phillips screwdriver For customer service, call: 800-620-2790 (U.S./Canada markets) or 01-800-926-3010 (Mexico). 24 - Rocketfish RF-SBM101 | User Manual (English) - Page 25
2790 Distributed by Best Buy Purchasing, LLC 7601 Penn Avenue South, Richfield, MN 55423-3645 USA © 2013 BBY Solutions, Inc. All rights reserved. ROCKETFISH is a trademark of BBY Solutions, Inc. All other products and brand names are trademarks of their respective owners. Part number: 6907-002048 00
-
 1
1 -
 2
2 -
 3
3 -
 4
4 -
 5
5 -
 6
6 -
 7
7 -
8
-
9
-
10
-
11
-
12
-
13
-
14
-
15
-
16
-
17
-
18
-
19
-
20
-
21
-
22
-
23
-
24
-
25
 |
 |
RF-SBM101
Soundbar Mount
User Guide
Before using your new product, please read these instructions to prevent any damage.
Safety information and specifications
........
2
What you need
....................................................
4
Package contents: parts
...................................
4
Package contents: hardware
..........................
5
Installation instructions
....................................
7