Roku HD1000 User Guide - Page 13
Audio Connections, Connecting Your HD1000 to Your Home Network, Connecting Your HD1000 To Use - power supply
 |
UPC - 029610841001
View all Roku HD1000 manuals
Add to My Manuals
Save this manual to your list of manuals |
Page 13 highlights
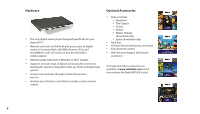
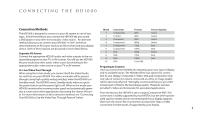
listed in the previous table. If you have pressed the right arrow button ten times without a picture appearing, check the "Troubleshooting" section. 6. Once the proper format has been selected, press Select. Then use the down arrow to move the yellow highlight to the Accept button, and press the Select key to confirm your choice. 7. Once the proper format has been selected, use the down arrow to move the yellow highlight to the OK button, and press the Select key to confirm your choices. Audio Connections You may connect your HD1000 to an amplifier, a display with powered speakers or an external set of powered speakers to enjoy music playback. The HD1000 supports both analog audio output and digital (S/PDIF) audio output. 1. Decide which audio output you want to use: analog or digital. 2. If using analog audio, connect a standard stereo audio cable (supplied) to the red and white Audio Out connectors on the back of your HD1000. Connect the other end of the cable to the audio input on your amplifier, display or speakers. Be sure to match the colors of the plugs to the colors of the connectors. 3. If using digital audio, connect a coaxial digital audio cable to the Digital Audio Out connector on your HD1000. Connect the other end of the cable to an S/PDIF-compatible audio input on your amplifier, display or speakers. Your HD1000 can also act as a pass-through for external audio sources. Connect a standard stereo audio cable to the Audio In jacks on the back of your HD1000, taking care to match plug and connector colors. Connect the other end of the cable to the audio output of the desired audio source. For example, the Monitor connection on your AV receiver, or the Audio Out connection on your stereo. When the HD1000 is in Standby, this audio connection is passed through to the stereo Audio Out connectors. Connecting Your HD1000 to Your Home Network Your HD1000 can be used to enjoy your existing collection of pictures, music and more by connecting to your computer over your home network. A 10/100 Ethernet port is included right on the back of the unit, and the HD1000 will automatically configure itself via the DHCP protocol. Just connect the network cable before plugging the unit into AC Power. Wireless network adapters are also supported for connection to an existing Wi-Fi network. See our website at www.rokulabs.com/ support for details on supported wireless adapters, as well as detailed instructions for accessing your PC or Mac over the network. Connecting Your HD1000 To Use the Video Pass-Through Feature Your HD1000 comes equipped with S-Video and Component video inputs. This feature allows you to connect the HD1000 between an existing source component (like a DVD player or AV receiver) and your display. In this way, you can share an input on your display without running another cable. And the HD1000 can act as an automatic Screen Saver, detecting a non-moving picture on the video input and switching to a display designed to minimize burn-in. To use your HD1000 in pass-through mode, follow these steps: 1. Decide on the type of input you will use on your display. If that display input is already connected to an existing source, discon- 11
-
 1
1 -
2
-
3
-
4
-
5
-
6
-
7
-
 8
8 -
 9
9 -
 10
10 -
 11
11 -
 12
12 -
 13
13 -
 14
14 -
 15
15 -
 16
16 -
 17
17 -
 18
18 -
19
-
20
-
21
-
22
-
23
-
24
-
25
-
26
-
27
-
28
-
29
-
30
-
31
-
32
-
33
-
34
-
35
 |
 |
