Roku N1101 User Guide
Roku N1101 - HD-XR Player Manual
 |
UPC - 829610847122
View all Roku N1101 manuals
Add to My Manuals
Save this manual to your list of manuals |
Roku N1101 manual content summary:
- Roku N1101 | User Guide - Page 1
User Guide - Roku N1101 | User Guide - Page 2
Copyright Copyright © 2008-2009 by Roku, Inc. All rights reserved. Roku and the Roku logo are trademarks of Roku, Inc. Other brand and product names are trademarks or registered trademarks of their respective holders. • • ii • • • • - Roku N1101 | User Guide - Page 3
the batteries in the remote control 4 Chapter 2 Connecting Your Player 5 Connecting your player to your TV 5 Viewing HD video 6 Video connections 7 Audio connections 9 Connecting your player to your home network 11 Connecting your player to a power source 12 Chapter 3 Setting Up Your - Roku N1101 | User Guide - Page 4
Information 37 Manually entering your network's name (SSID 37 Using the Reset button 39 Understanding player performance 40 Notices 41 Macrovision Statement 41 FCC Statement 41 Roku Digital Video Player License Agreement and Warranty Statement . . . . 42 Important Safety Instructions 46 - Roku N1101 | User Guide - Page 5
Chapter 1 Welcome Congratulations on your purchase of the Roku™ Digital Video Player. In just a few minutes you'll be ready to select videos and watch them instantly on your TV. What's in the box? Your Digital Video Player package should include all of these items: • • • • 1 • • - Roku N1101 | User Guide - Page 6
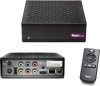
Overview Before you set up your player, get familiar with the inputs on the player and the buttons on the remote control. Player inputs Status light IR receiver Optical audio Component video Power • • 2 • • • • Chapter 1 S-Video Reset button Composite Audio video HDMI Ethernet - Roku N1101 | User Guide - Page 7
Remote control Select Home Up Reverse scan Play/Pause Up Right Down Forward scan • • Welcome • • 3 • • - Roku N1101 | User Guide - Page 8
Inserting the batteries in the remote control 1 Do one of the following: • If your remote has a battery door release button on the back, press the button and then slide the top panel upward to open the remote. • If your remote doesn't have a battery door release button, just slide the top panel - Roku N1101 | User Guide - Page 9
TV, your network, and a power source. Connecting your player to your TV There are several ways to connect your player to your TV. The method you choose depends on the inputs supported by your TV and the cables you have available. Your player includes a combination cable that has both composite video - Roku N1101 | User Guide - Page 10
a high-resolution setup, audio/video quality streams (4.0 Mbps or greater). See "Connecting your player to your home network" for details. • Select the HDTV option in Display Type Settings. See "Changing your display setting" for details. • Choose a video that is available in HD format. Some channels - Roku N1101 | User Guide - Page 11
viewing enjoyment. Connecting a composite video cable 1 Insert the yellow connector on the standard A/V cable into the yellow composite video jack on your player. 2 Insert the yellow connector on the other end of the standard A/V cable into the yellow composite video jack on your TV or A/V receiver - Roku N1101 | User Guide - Page 12
, blue, and red video cable into the jacks with the matching colors on your player. 2 Insert the other end of the green, blue, and red cable into the HDMI cable 1 Insert one end of the HDMI cable into the HDMI jack on your player. 2 Insert the other end of the HDMI cable into the HDMI jack on your - Roku N1101 | User Guide - Page 13
Audio connections For standard stereo sound (2-channels, left/right), use the red and white connectors white connectors on the standard A/V cable into the red (Right) and white (Left) audio jacks on your player. 2 Insert the other end of the stereo cable into the red (Right) and white (Left) audio - Roku N1101 | User Guide - Page 14
Connecting an HDMI cable 1 Insert one end of the HDMI cable into the HDMI jack on your player. 2 Insert the other end of the HDMI cable into the HDMI jack on your TV or A/V receiver. NOTE: If you use an HDMI cable, you - Roku N1101 | User Guide - Page 15
to your home network using either a wireless or wired connection. Your home network must have broadband Internet access, so that your player can access the Internet when it is connected to your home network. A minimum connection speed of 1.5Mbps is required. However, we recommend using a connection - Roku N1101 | User Guide - Page 16
Connecting your player to a power source Like most home entertainment products, your player requires electricity to run. 1 Connect the AC adapter to the back of your player. 2 Insert the power plug into a power outlet. • • 12 • • • • Chapter 2 - Roku N1101 | User Guide - Page 17
, as described in the previous chapter, you're ready to access your player and complete Guided Setup to set up your wireless network connection (if applicable). Accessing your player After you plug your player into a power outlet, it is on all the time. There is no power button to turn on and off - Roku N1101 | User Guide - Page 18
• Security key or passphrase (if your network is secured) • Security method (supported types are: WEP, WPA, and WPA2) 1 Do one of the following is highlighted, press select , and you're done with setup. • Wireless: Make sure your player is within range of your wireless router. Press down on - Roku N1101 | User Guide - Page 19
2 Do one of the following: • If your player detects your home network, press left or right on the remote to highlight your home network, and then press the wireless network connection. A weak network connection may impact the quality of the video you receive with your player. • • Setting Up Your - Roku N1101 | User Guide - Page 20
remote to highlight not shown, and then press select . Make sure your player is within range of your wireless router, highlight scan again, and then network name (SSID) manually, press select , and then see "Manually entering your network's name (SSID)" for additional instructions. • • 16 • - Roku N1101 | User Guide - Page 21
in the key or passphrase. 4 After you enter the security key or passphrase, press down to highlight done, and then press select . • • Setting Up Your Player • • 17 • • - Roku N1101 | User Guide - Page 22
• • 18 • • • • Chapter 3 - Roku N1101 | User Guide - Page 23
a channel. You can then use your player's remote to select and watch videos on your TV. You'll be amazed at how quick and easy it is! NOTE: Some channels require account setup the first time you access the channel. If you need help setting up an account for a channel, go to www.roku.com/support - Roku N1101 | User Guide - Page 24
them on your TV. For information on selecting videos for a specific channel, go to www.roku.com/support. 1 Turn on your TV, and if necessary, select the input on your TV that displays the player. 2 On the player remote, press home . • • 20 • • • • Chapter 4 3 Press left or right to highlight - Roku N1101 | User Guide - Page 25
Playing a video While watching a video via your player, you have full control over your viewing experience. You can use the buttons on the remote to pause and playing from the point you paused the video, press up . Stops the video and displays the Home screen. • • Using Your Player • • 21 • • - Roku N1101 | User Guide - Page 26
• • 22 • • • • Chapter 4 - Roku N1101 | User Guide - Page 27
, and screensaver settings. You can also view information about your player and reset your player to the original factory settings. Changing your network settings If you install a new network router or change to a different Internet Service Provider (ISP), you need to update your network settings - Roku N1101 | User Guide - Page 28
3 Highlight network settings, and then press select . 4 Highlight repeat guided setup and then press select . • • 24 • • • • Chapter 5 5 Follow the onscreen instructions to enter your new network settings. See "Selecting your network type" for details. - Roku N1101 | User Guide - Page 29
Changing your display setting If you purchase a new TV or connect your player to a different TV you already have, you can change your display type selection. 1 Press home to go to the Home screen. 2 Highlight settings , and then - Roku N1101 | User Guide - Page 30
3 Highlight display type, and then press select . 4 Press left or right on the remote to highlight HDTV, 4:3 standard, or 16:9 anamorphic (also known as widescreen, full, or stretch mode), and then press select . • • 26 • • • • Chapter 5 5 Press select to accept your new the setting. - Roku N1101 | User Guide - Page 31
Setting the volume for sound effects You can adjust the volume level of the sound effects produced by your player, or you can turn off the sound effects completely. 1 Press home to go to the Home screen. 2 Highlight settings , and then press select to display - Roku N1101 | User Guide - Page 32
3 Highlight sound effects, and then press select . 4 Press up or down to highlight the volume level you want to use, and then press select . • • 28 • • • • Chapter 5 - Roku N1101 | User Guide - Page 33
Changing your screensaver settings When your player remains inactive for five minutes, the screensaver appears. You can, however, adjust this setting and screen. 2 Highlight settings , and then press select to display the Settings screen. • • Adjusting Settings on Your Player • • 29 • • - Roku N1101 | User Guide - Page 34
3 Highlight screensaver, and then press select . 4 Press up or down to highlight the option you want to use, and then press select . • • 30 • • • • Chapter 5 - Roku N1101 | User Guide - Page 35
and software version and the serial number, as well as your current network settings. You can also check for software updates to keep your player up-to-date. 1 Press home to go to the Home screen. 2 Highlight settings , and then press select to display the Settings screen. • • Adjusting Settings - Roku N1101 | User Guide - Page 36
3 Highlight player info, and then press select . 4 Highlight check for update and then press select . • • 32 • • • • Chapter 5 - Roku N1101 | User Guide - Page 37
5 Highlight yes and then press select to begin the update. 6 When you're player finishes updating, it restarts and displays the Home screen. • • Adjusting Settings on Your Player • • 33 • • - Roku N1101 | User Guide - Page 38
restores your player's original factory settings. If you plan on selling your player, we recommend that you perform a factory reset before delivering the player to your settings. If you want to keep your settings and keep your player activated, do a restart instead (see "Using the Reset button" for - Roku N1101 | User Guide - Page 39
3 Highlight factory reset, and then press select . 4 To continue with the reset, select factory reset. To cancel the reset, select back. • • Adjusting Settings on Your Player • • 35 • • - Roku N1101 | User Guide - Page 40
5 When prompted, highlight yes to confirm that you want to reset your player, and then press select . • • 36 • • • • Chapter 5 - Roku N1101 | User Guide - Page 41
about select topics in this guide. Manually entering your network's name (SSID) If your network is setup as a hidden network that doesn't broadcast its name, you can enter the name manually. 1 From the Choose Wireless Network screen in Guided Setup or the Network Settings screen, highlight - Roku N1101 | User Guide - Page 42
2 Highlight enter wireless network name (SSID) manually, and then press select . 3 Use the remote to highlight the first character of the network name, and then press select to enter it in the - Roku N1101 | User Guide - Page 43
and erases all of your settings. If you want to keep your settings and keep your player activated, do a restart instead. • To restart your player, press the Reset button. • To do a factory reset, press and hold the Reset button for 15 seconds. Reset button • • Additional Information • • 39 - Roku N1101 | User Guide - Page 44
when connecting the audio and video cables to your player. • Your broadband speed. Your Internet Service Provider (ISP) determines your broadband speed. We recommend transfer, online gaming, or other instances of streaming video), your sound and picture quality may be compromised. • • 40 • • • - Roku N1101 | User Guide - Page 45
installation. This equipment generates, uses, and can radiate radio frequency energy and, if not installed and used according to the instructions, may cause harmful interference to radio communications. However, there is no guarantee that interference will not occur in a particular installation - Roku N1101 | User Guide - Page 46
Roku Digital Video Player License Agreement and Warranty Statement IMPORTANT: READ THIS AGREEMENT CAREFULLY AND REVIEW THE FULL PRODUCT MANUAL AND SAFETY INFORMATION AT WWW.ROKU.COM BEFORE POWERING UP YOUR ROKU PRODUCT FOR THE FIRST TIME. THIS LICENSE AGREEMENT AND WARRANTY STATEMENT IS THE LEGAL - Roku N1101 | User Guide - Page 47
with one of Roku's content service providers ("Service Provider"). You must adhere to the Service Provider's terms of service with respect to your relationship with any Service Provider that you choose to use. See www.roku.com for a list of Service Providers for the Roku Product. Roku may add or - Roku N1101 | User Guide - Page 48
and Warranty Service Process below for return instructions. Limited Warranty Subject to the provisions herein, Roku warrants the Roku Product against case of a return under Roku's Limited Warranty (described above). We may attempt to troubleshoot a warrantyrelated problem prior to issuing an RMA - Roku N1101 | User Guide - Page 49
but not limited to service disruption, changes in service terms, changes in offerings, changes in format, or technical problems. This warranty does not cover damage due to acts of God, accident, misuse, abuse, negligence, commercial use or modification of, or to any part of, your Roku Product. This - Roku N1101 | User Guide - Page 50
Roku, Inc. All rights reserved. Roku and the Roku logo are trademarks of Roku, Inc. Other brand and product names are trademarks or registered trademarks of their respective holders. Important Safety Instructions 1 Read Instructions of power source indicated on the marking label. If you are not sure - Roku N1101 | User Guide - Page 51
normally by following the operating instructions. Adjust only those controls that are covered by the operating instructions as an improper adjustment of product exhibits a distinct change in performance, this indicates a need for service. 15 Heat. The product should be situated away from heat sources
-
 1
1 -
 2
2 -
 3
3 -
 4
4 -
 5
5 -
 6
6 -
 7
7 -
8
-
9
-
10
-
11
-
12
-
13
-
14
-
15
-
16
-
17
-
18
-
19
-
20
-
21
-
22
-
23
-
24
-
25
-
26
-
27
-
28
-
29
-
30
-
31
-
32
-
33
-
34
-
35
-
36
-
37
-
38
-
39
-
40
-
41
-
42
-
43
-
44
-
45
-
46
-
47
-
48
-
49
-
50
-
51
 |
 |

User Guide