Ryobi AC40VSD Operation Manual
Ryobi AC40VSD Manual
 |
View all Ryobi AC40VSD manuals
Add to My Manuals
Save this manual to your list of manuals |
Ryobi AC40VSD manual content summary:
- Ryobi AC40VSD | Operation Manual - Page 1
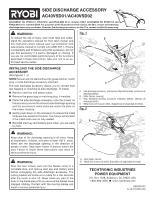
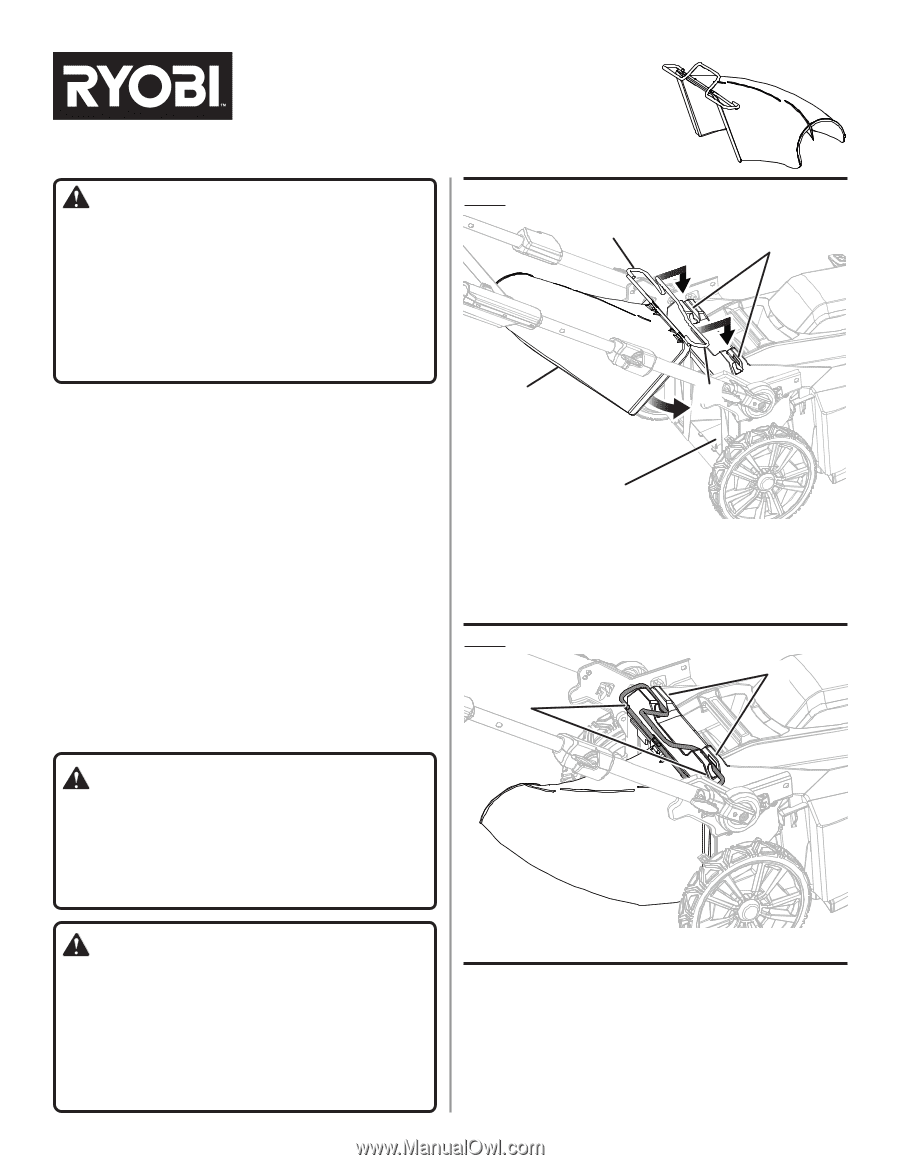
user must read and understand the operator's manual for their lawn mower and this instruction sheet. Always wear eye protection with side performing any of the functions described in these instructions, take your unit to an authorized service center. INSTALLING THE SIDE DISCHARGE ACCESSORY See - Ryobi AC40VSD | Operation Manual - Page 2
la tondeuse si quelqu'un entre dans la zone. Ne pas respecter ces instructions représente un risque de blessures graves. AVERTISSEMENT : Arrêter le moteur el riesgo de sufrir lesiones, el usuario debe leer y entender el manual del operador para su podadora y esta hoja de instrucciones. Use siempre
-
 1
1 -
 2
2
 |
 |
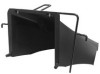
SIDE DISCHARGE ACCESSORY
AC40VSD01/AC40VSD02
AC40VSD01 fits RY401011, RY401012, and RY40LM03 20 in. mowers ONLY. AC40VSD02 fits RY401013 and
RY40LM01 21 in. mowers ONLY. For purposes of the illustrations in this manual, the 20 in. mower and matching
discharge accessory are shown. However, the discharge accessory on the 21 in. mower installs the same way.
WARNING:
To reduce the risk of injury, user must read and under-
stand the operator’s manual for their lawn mower and
this instruction sheet. Always wear eye protection with
side shields marked to comply with ANSI Z87.1. Ensure
compatibility and fit before using this accessory. Do not
use this accessory if a part is damaged or missing. If
you are not comfortable performing any of the functions
described in these instructions, take your unit to an au-
thorized service center.
INSTALLING THE SIDE DISCHARGE
ACCESSORY
See Figures 1 - 2.
NOTE:
Mower will not start without the grass catcher, mulch
plug, or side discharge accessory attached.
The side discharge accessory allows you to convert from
rear bagging or mulching to side discharge. To install:
Remove start key and battery pack.
Remove the grass bag or mulching plug, if installed.
Place the side discharge accessory onto the mower so
the accessory covers the mower’s rear discharge opening
and the accessory’s metal locks are inside the slots on
the mower housing.
Gently push down on the accessory to ensure the metal
locks are fully seated in the slots. The mower will not start
if the metal locks are not fully seated.
Reinstall start key and battery pack when you are ready
to mow.
WARNING:
Keep clear of the discharge opening at all times. Keep
all bystanders, children, and pets at least 100 ft. away.
Never aim the discharge opening in the direction of
people or pets. Stop lawn mower if anyone enters the
area. Failure to follow these instructions may result in
serious personal injury.
WARNING:
Stop the lawn mower, wait until the blades come to a
complete stop, and remove start key and battery pack
before unclogging the side discharge accessory. The
cutting blades will continue to rotate for a few seconds
after the motor is shut off. Never place any part of the
body in the blade area until you are sure the blades have
stopped rotating. Contact with the moving blades can
result in serious personal injury.
995000733
6-16-18 (REV:02)
TECHTRONIC INDUSTRIES
POWER EQUIPMENT
P.O. Box 1288, Anderson, SC 29622 USA
1-800-860-4050
www.ryobitools.com
A - Side discharge accessory (accessoire d’éjection latérale, accesorio de
descarga lateral)
B - Slots (fentes, ranuras)
C - Rear discharge opening (ouverture d’éjection latérale, abertura de
descarga lateral)
D - Metal locks (verrous de métal, dispositivos de seguridad de metal)
A - Slot (fente, ranura)
B - Metal lock (verrou de métal, dispositivo de seguridad de metal)
Fig. 2
Fig. 1
A
D
D
B
C
B
A