Ryobi BE318-2 English Manual - Page 9
Operation - sanding belt
 |
View all Ryobi BE318-2 manuals
Add to My Manuals
Save this manual to your list of manuals |
Page 9 highlights
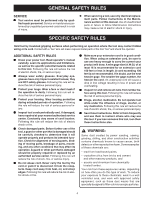
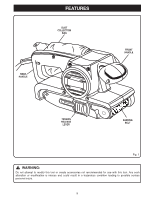
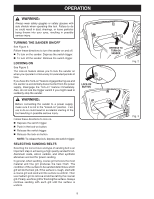
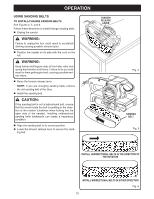
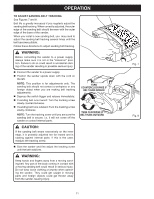
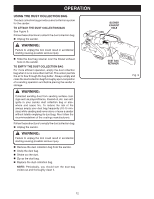
OPERATION WARNING: Always wear safety goggles or safety glasses with side shields when operating this tool. Failure to do so could result in dust, shavings, or loose particles being thrown into your eyes, resulting in possible serious injury. TURNING THE SANDER ON/OFF See Figure 2. Follow these directions to turn the sander on and off. To turn on the sander: Depress the switch trigger. To turn off the sander: Release the switch trigger. LOCKING ON See Figure 3. The lock-on feature allows you to lock the sander on when you operate it continuously for extended periods of time. If you have the "lock-on" feature engaged during use and the sander is accidentally disconnected from the power supply, disengage the "lock-on" feature immediately. Also, do not lock the trigger switch if you might need to suddenly stop the sander. WARNING: Before connecting the sander to a power supply, make sure it is not in the "locked-on" position. Failure to do so could result in accidental starting of the tool resulting in possible serious injury. Follow these directions to lock on. Depress the switch trigger. Push in the lock-on button. Release the switch trigger. Release the lock-on button. NOTE: To release the lock, depress the switch trigger. SELECTING SANDING BELTS Selecting the correct size and type of sanding belt is an important step in achieving a high quality sanded finish. Aluminum oxide, silicon carbide, and other synthetic abrasives are best for power sanding. In general, when sanding, coarse grit removes the most material and fine grit produces the best finish. The condition of the surface to be sanded determines which grit will do the best job. If the surface is rough, start with a coarse grit and sand until the surface is uniform. Then use medium grit to remove scratches left by the coarser grit. Finally, use finer grit for finishing the surface. Always continue sanding with each grit until the surface is uniform. LOCK-ON BUTTON 9 DEPRESS TO TURN ON SANDER Fig. 2 Fig. 3
-
 1
1 -
2
-
3
-
 4
4 -
 5
5 -
 6
6 -
 7
7 -
 8
8 -
 9
9 -
 10
10 -
 11
11 -
 12
12 -
 13
13 -
 14
14 -
15
-
16
 |
 |