Ryobi CSB123 English Manual
Ryobi CSB123 Manual
 |
View all Ryobi CSB123 manuals
Add to My Manuals
Save this manual to your list of manuals |
Ryobi CSB123 manual content summary:
- Ryobi CSB123 | English Manual - Page 1
OPERATOR'S MANUAL 7-1/4 in. CIRCULAR SAW DOUBLE INSULATED CSB123 Your circular saw has been engineered and manufactured to our high standard for dependability, ease of operation, and operator safety. When properly cared for, it will give you years of rugged, trouble-free performance. WARNING: To - Ryobi CSB123 | English Manual - Page 2
Warranty...2 General Power Tool Safety Warnings and Instructions 3-4 Circular Saw Safety Warnings and Instructions...4-5 Symbols...6-7 Electrical...8 Features...9-10 Assembly...10-12 Operation...12-19 Maintenance...20 Accessories...20 Parts Ordering / Service...Back - Ryobi CSB123 | English Manual - Page 3
warnings and instructions for future from heat, oil, sharp edges, or moving parts. Damaged or entangled cords increase switch is dangerous and must be repaired. Disconnect the plug from the power source and/or the battery pack from the power tool before making any adjustments, changing accessories - Ryobi CSB123 | English Manual - Page 4
Have your power tool serviced by a qualified repair person using only identical replacement parts. This will ensure that the safety of the power tool is maintained. circular saw safety warnings and instructions DANGER: Keep hands away from cutting area and the blade. Keep your second hand on - Ryobi CSB123 | English Manual - Page 5
guard and the spring are not operating properly, they must be serviced before use. Lower guard may operate sluggishly due to damaged parts, gummy deposits, or a build-up of debris. Lower blade guard handle should be retracted manually only for special cuts, such as "plunge cuts" and "compound cuts - Ryobi CSB123 | English Manual - Page 6
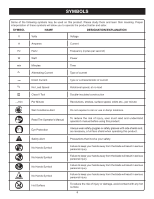
not expose to rain or use in damp locations. Read The Operator's Manual Eye Protection Safety Alert No Hands Symbol No Hands Symbol No Hands Symbol your hands away from the blade will result in serious personal injury. Failure to keep your hands away from the blade will result in serious personal - Ryobi CSB123 | English Manual - Page 7
CENTER for repair. When servicing, use only identical replacement parts. WARNING: To avoid serious personal injury, do not attempt to use this product until you read thoroughly and understand completely the operator's manual. If you do not understand the warnings and instructions in the operator - Ryobi CSB123 | English Manual - Page 8
service technician. For service, we suggest you return the product to your nearest authorized service center for repair. Always use original factory replacement parts when servicing round jacketed cords listed by Underwriter's Laboratories 12 100' 16 16 14 12 10 - **Used on 12 gauge - 20 amp - Ryobi CSB123 | English Manual - Page 9
) Input 120 V, AC only, 60 Hz, 12 Amps Net Weight 9.36 lbs. HANDLE Blade wrench STORAGE AREA UPPER BLADE GUARD BLADE blade wrench BASE dust chute LOWER BLADE GUARD HANDLE LOWER BLADE GUARD SPINDLE LOCK BUTTON SWITCH bevel adjustment knob edge guide lock knob bevel stop adjusting screw - Ryobi CSB123 | English Manual - Page 10
are damaged or missing, please call 1-800-525-2579 for assistance. PACKING LIST Circular Saw 7-1/4 in. Blade Blade Wrench Operator's Manual WARNING: If any parts are damaged or missing do not operate this product until the parts are replaced. Failure to heed this warning could result in serious - Ryobi CSB123 | English Manual - Page 11
and the arrow on the upper guard are pointing in the same direction. NOTE: The saw teeth point upward at the front of the saw as shown. n Fit the saw blade inside the lower blade guard and onto the spindle. n Replace "D" washer. n Replace spring washer with cupped side against "D" washer. n Depress - Ryobi CSB123 | English Manual - Page 12
You may use this product for the purposes listed below: Cutting all types of wood products blade in the wood. KICKBACK - BLADE SET TOO DEEP INCORRECT SUPPORT Fig. 5 Fig. 6 DANGER: Release switch immediately if blade binds or saw stalls. Kickback could cause you to lose control of the saw - Ryobi CSB123 | English Manual - Page 13
to the circular saw is there for your protection and safety. Do not alter it for any reason. If it becomes damaged, do not operate the saw until you have the guard repaired or replaced. Always leave guard in operating position when using the saw. CORRECT SUPPORT Fig. 8 LOWER BLADE GUARD IS - Ryobi CSB123 | English Manual - Page 14
guard, do not use the saw. Take it to an authorized factory service center for repair. STARTING/STOPPING THE SAW See Figure 10. To start the saw: Depress the switch trigger. Always let the blade reach full speed, then guide the saw into the workpiece. WARNING: The blade coming in contact with the - Ryobi CSB123 | English Manual - Page 15
the cord hangs up on the workpiece during a cut, release the switch trigger immediately and allow the blade to come to a complete stop. Unplug the saw and reposition the cord to prevent it from hanging up again. DANGER: Using a saw with a damaged cord could result in serious injury or death. If the - Ryobi CSB123 | English Manual - Page 16
NOTE: You may also use a edge guide to make rip cuts. Refer to OPTIONAL Edge guide later in this manual. Secure the workpiece. Clamp a straight edge to the workpiece using C-clamps. Saw along the straight edge to achieve a straight rip cut. NOTE: Do not bind the blade in the cut. BEVEL CUTTING - Ryobi CSB123 | English Manual - Page 17
See Figure 18 - 19. Hold the saw firmly with both hands as shown. Rest the front edge of the base on the workpiece. Start the saw and let the blade reach full speed. Guide the saw into the workpiece and make the cut. Release the switch trigger and allow the blade to come to a complete stop - Ryobi CSB123 | English Manual - Page 18
an upside down position on a work- bench. Check the squareness of the saw blade plate to the base of the saw using a combination square. To adjust 0° bevel stop: Unplug the circular saw. Loosen bevel adjustment knob. Loosen hex nut securing adjusting screw. Turn adjusting screw and adjust - Ryobi CSB123 | English Manual - Page 19
workpiece. Guide the saw along the edge to achieve a straight rip cut. NOTE: The guiding edge of the workpiece must be straight for the cut to be straight. Use caution to prevent the blade from binding in the cut. OPTIONAL DUST NOZZLE KIT See Figure 24. You may purchase a dust nozzle kit, part no - Ryobi CSB123 | English Manual - Page 20
: When servicing, use only identical replacement parts. Use of any other parts may create ACCESSORIES To order these accessories, call 1-800-525-2579. Edge Guide...969862009 Dust Nozzle Kit...200673001 WARNING: Current attachments and accessories available for use with this product are listed - Ryobi CSB123 | English Manual - Page 21
NOTES 21 - Ryobi CSB123 | English Manual - Page 22
. • Parts and Service Prior to requesting service or purchasing replacement parts, please obtain your model and serial number from the product data plate. • MODEL NUMBER • SERIAL NUMBER CSB123 • How to obtain Replacement Parts: Replacement parts can be purchased online at www.ryobitools.com or
-
 1
1 -
 2
2 -
 3
3 -
 4
4 -
 5
5 -
 6
6 -
 7
7 -
8
-
9
-
10
-
11
-
12
-
13
-
14
-
15
-
16
-
17
-
18
-
19
-
20
-
21
-
22
 |
 |

SAVE THIS MANUAL FOR FUTURE REFERENCE
Your circular saw has been engineered and manufactured to our high standard for dependability, ease of operation, and
operator safety. When properly cared for, it will give you years of rugged, trouble-free performance.
WARNING:
To reduce the risk of injury, the user must read and understand the operator’s manual before using
this product.
Thank you for your purchase.
OPERATOR’S MANUAL
7-1/4 in. CIRCULAR SAW
DOUBLE INSULATED
CSB123