Ryobi GDM421 Operation Manual
Ryobi GDM421 Manual
 |
View all Ryobi GDM421 manuals
Add to My Manuals
Save this manual to your list of manuals |
Ryobi GDM421 manual content summary:
- Ryobi GDM421 | Operation Manual - Page 1
MANUAL DEL OPERADOR SPEED CONTROL FAN ACCESSORY FOR RYOBI GARAGE DOOR OPENER ACCESSOIRE DE VENTILATION À VITESSE RÉGLABLE POUR OUVRE-PORTE DE GARAGE RYOBI ACCESORIO DE VENTILADOR DE CONTROL DE VELOCIDAD PARA EL SISTEMA DE APERTURA PARA PORTÓN DE GARAJE RYOBI GDM421 SAFETY RULES FOR FAN ACCESSORY - Ryobi GDM421 | Operation Manual - Page 2
le manuel d'utilisation de la ouvre-porte de garage RYOBI. Assurez-vous de la compatibilité et de prêté, il doit être accompagné de ces instructions, afin d'éviter un usage incorrect et d'é apertura para portón de garaje como se describe en el manual del sistema de apertura para portón de garaje.
-
 1
1 -
 2
2
 |
 |

OPERATOR’S MANUAL
MANUEL D’UTILISATION
MANUAL DEL OPERADOR
SPEED CONTROL FAN ACCESSORY FOR
RYOBI GARAGE DOOR OPENER
ACCESSOIRE DE VENTILATION À VITESSE RÉGLABLE
POUR OUVRE-PORTE DE GARAGE RYOBI
ACCESORIO DE VENTILADOR DE CONTROL DE
VELOCIDAD PARA EL SISTEMA DE APERTURA PARA
PORTÓN DE GARAJE RYOBI
GDM421
A - Accessory port #1 (prise de accessoire no 1, puerto del accesorio N.° 1)
B - Latch (loquet, pestillo)
C - Fan accessory (accessoire de ventilation, accesorio de ventilador)
D - Hooks (crochets, ganchos)
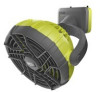
A - Fan mount (montage du ventilateur, montaje del ventilador)
B - Fan housing (boîtier du ventilateur, carcasa del ventilador)
A - Indoor keypad (intérieur du clavier, panel interno)
B - Icon label (étiquette d’icône, etiqueta del ícono)
C - Number 2 (no 2, número 2)
D - Accessory port #2 (prise de accessoire no 2, puerto del accesorio N.° 2)
WARNING:
To reduce the risk of injury, do not attempt to use this
product until you have read thoroughly and understand
completely this operator’s manual and the operator’s
manual for the RYOBI garage door opener. Ensure
compatibility and fit before using this accessory. Do
not use this accessory if a part is damaged or missing.
Do not allow children to operate this product.
It is not
a toy.
Do not operate fans in explosive atmospheres, such as in
the presence of flammable liquids, gases, or dust. Fans
can create sparks which may ignite the dust or fumes.
Do not overreach. Keep proper footing and balance at all
times. Proper footing and balance enable better control
of the fan in unexpected situations.
Dress properly. Do not wear loose clothing or jewelry.
Contain long hair. Keep your hair, clothing, and gloves
away from moving parts.
Loose clothes, jewelry, or long
hair can be caught in moving parts.
Do not use fan if the indoor keypad or smartphone app
does not turn it on or off. A fan that cannot be con-
trolled with the keypad or app is dangerous and must
be repaired.
Deactivate accessory ports and ensure the fan blades
have stopped moving before making adjustments, clean-
ing, or changing accessories. Such preventive safety
measures reduce the risk of starting the fan accidentally.
Keep the fan and its handle dry, clean and free from oil
and grease. Always use a clean cloth when cleaning.
Never use brake fluids, gasoline, petroleum-based
products, or any strong solvents to clean your fan. Fol-
lowing this rule will reduce the risk of loss of control and
deterioration of the enclosure plastic.
Clean only with dry cloth.
Do not operate near any heat sources such as radiators,
heat registers, stoves, or other apparatus (including
amplifiers) that produce heat.
For general ventilating use only. Do not use to exhaust
hazardous or explosive materials and vapors.
Save these instructions. Refer to them frequently and use
them to instruct others who may use this tool. If you loan
someone this tool, loan them these instructions also to
prevent misuse of the product and possible injury.
SAFETY RULES FOR FAN ACCESSORY
ASSEMBLY
SYMBOLS
OPERATION
PACKING LIST
Fan Accessory, Icon Label, and Operator’s Manual.
WARNING:
Ensure accessories are properly and securely connected
to their port on the garage door opener.
Failure to properly
secure the accessory can cause it to fall and could result
in serious personal injury or property damage.
WARNING:
Use extreme care if you need to stand on a ladder to
install or adjust this accessory. Ensure someone is holding
the ladder on the ground to keep it stable. Failure to
safely use a ladder can cause a fall and result in death
or serious personal injury.
INSTALLING/REMOVING FAN ACCESSORY
See Figure 1.
Assemble and mount the garage door opener as
described
in the garage door opener manual.
Connect the garage door opener to an AC power supply.
Select one of the DC accessory ports to power your fan
accessory.
NOTICE:
To prevent interference with the rail assembly and
trolley, the fan accessory should never be installed in
accessory port #7.
Hook the accessory to the top of the garage door opener
and insert it into the accessory port. Ensure the bottom
latch on the accessory is secured to the port on the
garage door opener.
NOTE:
DC accessories will not recieve power unless
the accessory port has been activated. See
Activating/
Deactivating DC Accessory Ports
later in this manual.
Depress latches to release and remove the accessory.
WARNING:
Always deactivate
accessory
ports and ensure the fan
blades have stopped moving when you are assembling
parts, making adjustments, cleaning, or when not in use.
Deactivating accessory ports will prevent accidental
starting that could cause serious personal injury.
ACTIVATING/DEACTIVATING DC ACCESSORY
PORTS
See Figure 3.
To activate a DC accessory port, press the number on
the indoor keypad (not included) corresponding with the
desired port. For example, to activate accessory port #2
press
NUMBER 2
on your keypad.
NOTE:
Multiple ports can be activated at once.
To deactivate a DC accessory port, press the number
on the indoor keypad (not included) corresponding with
the port.
STARTING/STOPPING THE FAN ACCESSORY
See Figure 3.
Install the fan accessory and activate the appropriate
accessory port by pressing the corresponding number
on the keypad.
NOTE:
For quick identification, the supplied icon label
can be placed over the keypad number.
After the accessory port is activated, the fan accessory
can be controlled by pressing the keypad number.
•
For high speed, press the number one time.
•
For medium speed, press the number two times.
•
For low speed, press the number three times.
•
To stop the fan and deactivate the accessory port,
press the number four times.
This product has a Three-Year Limited Warranty.
For
Warranty details go to www.ryobitools.com
FIG. 1
FIG. 2
FIG. 3
A
B
D
A
B
A
991000841
2-13-18 (REV:05)
C
D
B
C
ONE WORLD TECHNOLOGIES, INC.
1428 Pearman Dairy Road, Anderson, SC 29625 • Phone 1-877-205-5714
États-Unis, Téléphone 1-877-205-5714 • USA, Teléfono 1-877-205-5714
www.ryobitools.com
Some of the following symbols may be used on this product.
Please study them and learn their meaning. Proper interpretation
of these symbols will allow you to operate the product better
and safer.
SYMBOL
NAME
DESIGNATION/EXPLANATION
Safety Alert
Indicates a potential personal
injury hazard.
Read
Operator’s
Manual
To reduce the risk of injury,
user must read and understand
operator’s manual before using
this product.
Electrocution/
Electric Shock
Do not touch electrical
connections, do not install with
wet hands, and keep accessory
away from water to reduce the
risk of electrocution or electric
shock.
Long Hair
Failure to keep long hair away from
air inlet could result in personal
injury.
Fan Blades
Contact with moving fan blades
can cause serious personal injury.
The following signal words and meanings are intended to explain
the levels of risk associated with this product.
SYMBOL
SIGNAL
MEANING
DANGER:
Indicates a hazardous situation,
which, if not avoided, will result in
death or serious injury.
WARNING:
Indicates a hazardous situation,
which, if not avoided, could result in
death or serious injury.
CAUTION:
Indicates a hazardous situation, that,
if not avoided, may result in minor or
moderate injury.
NOTICE:
(Without Safety Alert Symbol)
Indicates information considered
important, but not related to
a potential injury (e.g. messages
relating to property damage).
ADJUSTING THE HEAD
See Figure 2.
CAUTION:
Be careful not to pinch your hand or fingers when
adjusting fan position.
The fan mount can be rotated 170 degrees. To switch mount
positions, adjust mount to desired position. The fan housing
can also rotate as desired.