Ryobi P307 Operation Manual
Ryobi P307 Manual
 |
View all Ryobi P307 manuals
Add to My Manuals
Save this manual to your list of manuals |
Ryobi P307 manual content summary:
- Ryobi P307 | Operation Manual - Page 1
P307 TABLE OF CONTENTS Important Safety Instructions 3 Symbols 4 Assembly 5 Operation 5-7 Maintenance 7 Illustrations 8-9 Parts Ordering and Service Back page TABLE DES MATIÈRES Instructions and understand the operator's manual before using this product. - Ryobi P307 | Operation Manual - Page 2
warnings and instructions may result in electric shock, fire and/or serious injury. Know your glue gun. Read operator's manual carefully. footing and balance at all times. Do not use on a ladder or unstable support. This enables better control of the battery product in unexpected situations. Do - Ryobi P307 | Operation Manual - Page 3
safety of the battery product is maintained. When servicing a battery product, use only identical replacement parts. Follow instructions in the Maintenance section of this manual. Use of unauthorized parts or failure to follow Maintenance instructions may create a risk of shock or injury. Save - Ryobi P307 | Operation Manual - Page 4
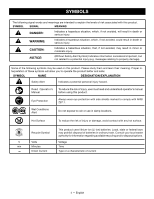
. SYMBOL NAME DESIGNATION/EXPLANATION Safety Alert Indicates a potential personal injury hazard. Read Operator's Manual To reduce the risk of injury, user must read and understand operator's manual before using this product. Eye Protection Always wear eye protection with side shields marked - Ryobi P307 | Operation Manual - Page 5
charging instructions, see the operator's manuals for your battery pack and charger. INSERTING GLUE STICKS See Figures 2 - 5, pages 8 and 9. The glue gun uses full size glue sticks - 1/2 in. (11-12 mm) diameter. Use Ryobi back of the glue gun. Guide the glue stick into the glue - Ryobi P307 | Operation Manual - Page 6
injury. SELECTING NOZZLES The glue gun comes with a standard nozzle installed and can utilize multiple threaded nozzle tips. NOZZLE SELECTION GUIDE Nozzle Dia. Purpose Standard 3 mm Versatile and suitable for general use. *Precision Extended *Spreader *Angled Extension Perfect for working - Ryobi P307 | Operation Manual - Page 7
gun is cooling. Allow the glue stick and glue gun nozzle to completely cool before removing the battery pack. MAINTENANCE WARNING: When servicing, use only identical replacement parts. Use of any other parts could create a hazard or cause product damage. GENERAL MAINTENANCE Avoid using solvents - Ryobi P307 | Operation Manual - Page 8
les avertissements et toutes les instructions. Ne pas suivre l'ensemble des avertissements et des instructions peut entraîner une é bien campé et en équilibre. Ne pas utiliser l'outil sur une échelle ou un support instable. Ceci permettra de mieux contrôler l'outil en cas de situation imprévue. Ne - Ryobi P307 | Operation Manual - Page 9
à celles d'origine. Ceci assurera le maintien de la sécurité de l'outil. Utiliser exclusivement des pièces identiques à celles d'origine pour les réparations. Se conformer aux instructions de la section Entretien de ce manuel. L'usage de pièces non autorisées ou le non-respect des - Ryobi P307 | Operation Manual - Page 10
SYMBOLES Les termes de mise en garde suivants et leur signification ont pour but d'expliquer le degré de risques associé à l'utilisation de ce produit. SYMBOLE SIGNAL SIGNIFICATION DANGER : Indique une situation dangereuse qui, si elle n'est pas évitée, aura pour conséquences des blessures - Ryobi P307 | Operation Manual - Page 11
à colle utilise des bâtons de colle pleine grandeur, mesurant 11 à 12 mm (1/2 po) de diamètre. Utiliser des bâtonnets de colle de Ryobi pour assurer la meilleure performance. AVERTISSEMENT : Pour réduire les risques de blessure, le pistolet à colle doit être considéré CHAUD chaque fois que le - Ryobi P307 | Operation Manual - Page 12
DEL deviendra ROUGE pour indiquer que le pistolet chauffe. NOTE : Les différentes variétés de bâtons de colle chaufferont et atteindront la température de service selon un rythme différent. Toujours faire un essai sur un morceau à jeter pour s'assurer que la colle a atteint sa température optimale - Ryobi P307 | Operation Manual - Page 13
UTILISATION APPLICATION DE COLLE CHAUDE Voir la figure 7, page 9. Installer le bloc-piles et mettre l'interrupteur à la position élevée ou basse. Attendre que la colle fonde et qu'elle coule librement de la buse. Tenir fermement le pistolet à colle chaude puis placer la buse près de la - Ryobi P307 | Operation Manual - Page 14
de las advertencias e instrucciones puede ocasionar descarga eléctrica, fuego o lesiones graves. Familiarícese con su herramienta eléctrica. Lea cuidadosamente el manual del operador. Aprenda sus usos y limitaciones, así como los posibles peligros específicos de esta herramienta eléctrica. Con el - Ryobi P307 | Operation Manual - Page 15
a una herramienta eléctrica, sólo utilice piezas de repuesto idénticas. Siga las instrucciones señaladas en la sección Mantenimiento de este manual. El empleo de piezas no autorizadas o el incumplimiento de las instrucciones de mantenimiento puede significar un riesgo de descarga eléctrica o de - Ryobi P307 | Operation Manual - Page 16
ÓN/EXPLICACIÓN Alerta de seguridad Indica un peligro posible de lesiones personales. Lea el manual del operador Para reducir el riesgo de lesiones, el usuario debe leer y comprender el manual del operador antes de usar este producto. Protección ocular Siempre póngase protección ocular - Ryobi P307 | Operation Manual - Page 17
paquete de baterías. Para obtener instrucciones específicas de carga, lea el manual del operador que se incluye con el cargador y la batería. INSERTION DES BÂ 12 mm (1/2 pulg.) de diámetro. Utilice palitos de pegamento Ryobi para obtener el mejor rendimiento. ADVERTENCIA Para reducir el riesgo de - Ryobi P307 | Operation Manual - Page 18
FUNCIONAMIENTO de pegamento dentro de la cámara de pegamento hasta el fondo. Levante la bandeja de goteo ubicada debajo de la pistola de pegamento para recoger cualquier resto de pegamento mientras la pistola se calienta. Instale el paquete de baterías. Mueva el interruptor de alta/baja/ - Ryobi P307 | Operation Manual - Page 19
FUNCIONAMIENTO caliente la superficie de unión y, posiblemente, provoque quemaduras y daños en los objetos cercanos.. Deje que el pegamento se seque completamente antes de seguir con su trabajo para garantizar una adhesión correcta y reducir el riesgo de quemaduras. Si aplica pegamento a - Ryobi P307 | Operation Manual - Page 20
P307 D E *I C *H *J G A A - Switch trigger (gâchette de commande gatillo del interruptor) B - High/Low/Off switch (commutateur élevée/basse/arrêt, interruptor de alto/baja/apagado) C - Standard nozzle (buse classique, - Ryobi P307 | Operation Manual - Page 21
Fig. 3 A Fig. 6 OFF ARRÊT APAGADO ON/LOW TEMP MARCHE/ BASSE TEMPÉRATURE ENCENDIDO/BAJA TEMPERATURA ON/HIGH TEMP MARCHE/ BASSE TEMPÉRATURE ENCENDIDO/BAJA TEMPERATURA A - High/Low/Off switch (commutateur élevée/basse/arrêt, interruptor de alto/baja/apagado) A A - Standard nozzle (buse classique, - Ryobi P307 | Operation Manual - Page 22
NOTES / NOTAS - Ryobi P307 | Operation Manual - Page 23
NOTES / NOTAS - Ryobi P307 | Operation Manual - Page 24
MANUAL DEL OPERADOR / PISTOLA DE PEGAMENTO DE 18 V P307 To request service, purchase replacement parts, locate an Authorized Service Center or obtain Customer or Technical Support calling for service. RYOBI is a trademark of Ryobi Limited and is used pursuant to a license granted by Ryobi Limited.
-
 1
1 -
 2
2 -
 3
3 -
 4
4 -
 5
5 -
 6
6 -
 7
7 -
8
-
9
-
10
-
11
-
12
-
13
-
14
-
15
-
16
-
17
-
18
-
19
-
20
-
21
-
22
-
23
-
24
 |
 |

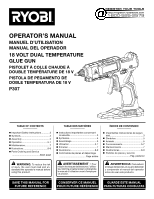
OPERATOR’S MANUAL
MANUEL D’UTILISATION
MANUAL DEL OPERADOR
18 VOLT DUAL TEMPERATURE
GLUE GUN
PISTOLET À COLLE CHAUDE À
DOUBLE TEMPÉRATURE DE 18 V
PISTOLA DE PEGAMENTO DE
DOBLE TEMPERATURA DE 18 V
P307
WARNING:
To reduce the risk
of injury, the user must read and un-
derstand the operator’s manual before
using this product.
SAVE THIS MANUAL FOR
FUTURE REFERENCE
ADVERTENCIA:
Para reducir
el riesgo de lesiones, el usuario debe leer
y comprender el manual del operador
antes de usar este producto.
AVERTISSEMENT :
Pour
réduire les risques de blessures, l’utilisa-
teur doit lire et veiller à bien comprendre
le manuel d’utilisation avant d’employer
ce produit.
GUARDE ESTE MANUAL
PARA FUTURAS CONSULTAS
CONSERVER CE MANUEL
POUR FUTURE RÉFÉRENCE
TABLE OF CONTENTS
****************
Important Safety Instructions
.............
3
Symbols
..............................................
4
Assembly
............................................
5
Operation
.........................................
5-7
Maintenance
.......................................
7
Illustrations
......................................
8-9
Parts Ordering and Service
............................................
Back page
TABLE DES MATIÈRES
****************
Instructions importantes concernant
la sécurité
...........................................
3
Symboles
............................................
4
Assemblage
........................................
5
Utilisation
........................................
5-7
Entretien
.............................................
7
Illustrations
......................................
8-9
Commande de pièces et dépannage
.........................................
Page arrière
ÍNDICE DE CONTENIDO
****************
Importantes instrucciones de seguri-
dad
.....................................................
3
Símbolos
............................................
5
Armado
..............................................
5
Funcionamiento
.............................
5-7
Mantenimiento
...................................
7
Illustraciones
..................................
8-9
Pedidos de piezas y servicio
......................................
Pág. posterior