Ryobi P852 User Manual
Ryobi P852 Manual
 |
View all Ryobi P852 manuals
Add to My Manuals
Save this manual to your list of manuals |
Ryobi P852 manual content summary:
- Ryobi P852 | User Manual - Page 1
mm (10 po) MANUAL DEL OPERADOR TALADRADORA DE COLUMNA DE 254 mm (10 pulg.) DP103L Your drill press has been trouble-free performance. WARNING: To reduce the risk of injury, the user must read and understand the operator's manual before using this product. Thank you for purchase. SAVE THIS MANUAL - Ryobi P852 | User Manual - Page 2
Adjustments...14 Maintenance...15 Troubleshooting...16 Illustrations...17 Parts Ordering / Service...Back Page INTRODUCTION This tool has many COVERS: This warranty covers all defects in workmanship or materials in your RYOBI® power tool for a period of three years from the date of - Ryobi P852 | User Manual - Page 3
serious personal injury. READ ALL INSTRUCTIONS KNOW YOUR POWER TOOL. Read the operator's manual carefully. Learn the applications and limitations safer performance. Follow instructions for lubricating and changing accessories. DISCONNECT TOOLS. When not in use, before servicing, or when changing - Ryobi P852 | User Manual - Page 4
TURN IT ON AND OFF. Have defective switches replaced by an authorized service center. ALWAYS TURN SWITCH OFF before disconnecting it to avoid accidental starting in this manual or addendums. Use of accessories that are not listed may cause the risk of personal injury. Instructions for safe use - Ryobi P852 | User Manual - Page 5
be replaced only by the manufacturer or by an authorized service center to avoid risk. SAVE THESE INSTRUCTIONS. Refer to them frequently and use to instruct other users. If you loan someone this tool, loan them these instructions also. CALIFORNIA PROPOSITION 65 WARNING: This product and some dust - Ryobi P852 | User Manual - Page 6
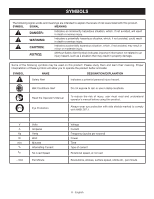
Eye Protection Do not expose to rain or use in damp locations. To reduce the risk of injury, user must read and understand operator's manual before using this product. Always wear eye protection with side shields marked to comply with ANSI Z87.1. V A Hz W min no .../min Volts Amperes Hertz Watt - Ryobi P852 | User Manual - Page 7
greater distance. A line that can support one power tool may not be able to support two or three tools. GROUNDING INSTRUCTIONS See Figure 1, page 17. In live terminal. Check with a qualified electrician or service personnel if the grounding instructions are not completely understood, or if in doubt - Ryobi P852 | User Manual - Page 8
workpiece. Pilot Hole (drill presses) A small hole drilled in a workpiece that serves as a guide for drilling large holes accurately. Push at either end of a workpiece by cutter blades when the workpiece is not properly supported. Taper Cut A cut where the material being cut has a different width at - Ryobi P852 | User Manual - Page 9
in. Table Movement 45° bevel, 360° swivel Overall Height 29 in. KNOW YOUR DRILL PRESS See Figure 2, page 17. The safe use of this product requires an understanding of the information on the tool and in this operator's manual as well as a knowledge of the project you are attempting. - Ryobi P852 | User Manual - Page 10
ASSEMBLY UNPACKING This product requires assembly. Carefully remove the tool and any accessories from the box. Place it on a level work surface. NOTE: This tool is heavy. To avoid back injury, lift with your legs, not your back, and get help when needed. WARNING: Do not use this product if any - Ryobi P852 | User Manual - Page 11
the intersection of the laser lines is precisely at the spot where the drill bit meets the workpiece. If it is not, the laser lines should head assembly. Mark an "X" on a piece of scrap wood. Insert a small drill bit into the chuck and align its tip to the intersection of the lines of the "X". - Ryobi P852 | User Manual - Page 12
-ejecting chuck key ensures the chuck key is removed from the chuck before the drill press is turned on. In order to loosen or tighten the chuck using the Figure 16, page 21. The table can be rotated out of the way when drilling large objects. Loosen the table lock handle. Rotate the table to the - Ryobi P852 | User Manual - Page 13
bit based on the hole size desired. For large holes, drill a pilot hole first, using a smaller diameter bit. Select and set the recommended spindle speed. Refer to "Changing Speeds" in the Adjustments section of this manual. Set table assembly to desired height. Refer to "Adjusting Table" Height - Ryobi P852 | User Manual - Page 14
to the desired angle. Retighten the hex bolt securely. ADJUSTING DEPTH GAUGE See Figure 21, page 22. Adjust the depth gauge when you need to drill a number of holes to exactly the same depth. Loosen the depth stop locking collar. Rotate depth gauge to desired setting. Retighten depth stop - Ryobi P852 | User Manual - Page 15
MAINTENANCE WARNING: When servicing, use only identical replacement parts. Use of any other parts rack in order to keep the vertical movement smooth and to help prolong the life of the drill press. BATTERIES Check the laser batteries regularly to avoid deterioration. Remove the batteries if you will - Ryobi P852 | User Manual - Page 16
TROUBLESHOOTING Problem Noisy operation Bit burns or smokes Excessive drill runout or wobble Drill bit binds in workpiece Workpiece support service center. Excessive feed pressure. Improper belt tension. Reduce feed pressure. Adjust belt tension. Workpiece not supported or clamped Check support - Ryobi P852 | User Manual - Page 17
NOTES 17 - English - Ryobi P852 | User Manual - Page 18
tous les vices de matériaux et de fabrication de cet outil électrique RYOBI®, pour une période de trois ans, à compter de la date d'achat agréé le plus proche peut être obtenue en contactant un représentant du service après-vente par courrier, à l'adresse One World Technologies, Inc., P.O. Box - Ryobi P852 | User Manual - Page 19
état. Utiliser exclusivement un cordon d'une capacité suffisante pour supporter le courant de fonctionnement de l'outil. Un cordon de capacité propres pour accroître la sécurité et les performances. Suivre les instructions de lubrification et de changement d'accessoires. DÉBRANCHER TOUS LES OUTILS - Ryobi P852 | User Manual - Page 20
. UTILISER EXCLUSIVEMENT LES ACCESSOIRES RECOMMANDÉS dans ce manuel ou ses addendas. L'emploi de tout accessoire non recommandé peut présenter un risque de blessure. Les instructions de sécurité d'utilisation sont fournies avec les accessoires. 4 - Français - Ryobi P852 | User Manual - Page 21
. ÉVITER LE CONTACT OCULAIRE DIRECT avec le guide laser. TOUJOURS S'ASSURER QUE LE FAISCEAU LASER EST assuré que la poignée de verrouillage de support de la table et de la perceuse est est prêté, il doit être accompagné de ces instructions. PROPOSITION 65 DE L'ÉTAT DE CALIFORNIE AVERTISSEMENT : - Ryobi P852 | User Manual - Page 22
SYMBOLES Les termes de mise en garde suivants et leur signification ont pour but d'expliquer le degré de risques associé à l'utilisation de ce produit. SYMBOLE SIGNAL SIGNIFICATION DANGER: Indique une situation extrêmement dangereuse qui, si elle n'est pas évitée, aura pour conséquences des - Ryobi P852 | User Manual - Page 23
veiller à utiliser un cordon prolongateur d'une capacité suffisante pour supporter l'appel de courant de l'outil. Un cordon de capacité une borne sous tension. Consulter un électricien qualifié ou le personnel de service si les instructions de mise à la terre ne sont pas bien comprises, ou en cas - Ryobi P852 | User Manual - Page 24
avec laquelle la lame ne traverse pas complètement la pièce. Trou pilote (perceuses à colonne) Petit trou pratiqué dans une pièce servant de guide pour assurer la précision d'un trou de plus grand diamètre. Blocs poussoirs et bâtons poussoirs Dispositifs utilisés pour pousser le matériau contre - Ryobi P852 | User Manual - Page 25
CARACTÉRISTIQUES FICHE TECHNIQUE Mandrin 12,7 mm (1/2 po) Alimentation 120 V, c.a. seulement, 60 Hz, 3 A Moteur 1/4 HP, à induction Vitesse à vide 620 à 3 100 r/min (RPM) Pivotement 254 mm (10 po) Course de la broche 50,8 mm (2 po) VEILLER À BIEN CONNAÎTRE LA PERCEUSE À COLONNE Voir la figure - Ryobi P852 | User Manual - Page 26
ASSEMBLAGE DÉBALLAGE Ce produit doit être assemblé. Avec précaution, sortir l'outil et les accessoires de la boîte. Les placer sur une surface plane. NOTE : Cet outil est lourd. Pour éviter des problèmes lombaires soulever avec les jambes, pas avec le dos et demander de l'aide lorsque nécessaire. - Ryobi P852 | User Manual - Page 27
bonne qualité de 19 mm (3/4 po) d'épaisseur. ■ Marquer les trous de montage sur la surface où la perceuse doit être montée en utilisant la base comme guide. ■ Percer les trous dans la surface de montage. ■ Placer la perceuse sur la surface de montage, en alignant les trous de sa base sur ceux - Ryobi P852 | User Manual - Page 28
UTILISATION AVERTISSEMENT : Ne pas laisser la familiarité avec l'outil faire oublier la prudence. Ne pas oublier qu'une fraction de seconde d'inattention peut entraîner des blessures graves. AVERTISSEMENT : Toujours porter une protection oculaire munie d'écrans latéraux certifiée conforme à la - Ryobi P852 | User Manual - Page 29
UTILISATION AVERTISSEMENT : Ne pas insérer un foret dans les mors en serrant comme illustré à la figure 19. Le foret pourrait être projeté de la perceuse, et causer des blessures graves ou endommager le mandrin. Serrer fermement les mors au moyen de la clé à mandrin fournie. Ne pas utiliser une - Ryobi P852 | User Manual - Page 30
le couvercle de la tête de la perceuse pour l'ouvrir. Desserrer le boulon de tension. Retirer la courroie d'entraînement. Repositionner la courroie selon les instructions du tableau des vitesses. Resserrer le boulon de tension. 14 - Français - Ryobi P852 | User Manual - Page 31
ENTRETIEN AVERTISSEMENT : Utiliser exclusivement des pièces identiques à celles d'origine pour les réparations. L'usage de toute autre pièce pourrait créer une situation dangereuse ou endommager l'outil. AVERTISSEMENT : Toujours porter une protection oculaire munie d'écrans latéraux certifiée - Ryobi P852 | User Manual - Page 32
éé. Le foret se coince dans la pièce Pression excessive. Tension de la courroie incorrecte. Réduire la pression. Ajuster la tension de la courroie. Le support de la pièce se desserre Pièce pas soutenue ou assujettie Vérifier le - Ryobi P852 | User Manual - Page 33
NOTES 17 - Français - Ryobi P852 | User Manual - Page 34
al amparo de esta garantía o puede intercambiar cualquier herramienta eléctrica RYOBI® que no funcione correctamente debido a defectos en los materiales o en los defectos en material y en mano de obra empleados en la herramienta eléctrica RYOBI® por un período de tres años a partir de la fecha de - Ryobi P852 | User Manual - Page 35
que el interruptor esté en la posición de apagado antes de conectar la clavija de cualquier herramienta. USE ACCESSORIOS RECOMENDADOS. Consulte este manual del operador, donde aparecen los accesorios recomendados. El empleo de accesorios inadecuados puede causar lesiones. NO SE PARE NUNCA EN LA - Ryobi P852 | User Manual - Page 36
diferentes puede causar un peligro o dañar el producto. SOLAMENTE UTILICE ACCESORIOS recomendados en este manual o en los apéndices. El uso de accesorios no señalados en este manual puede presentar riesgos de lesiones corporales. Con los accesorios se incluyen instrucciones para el uso seguro de - Ryobi P852 | User Manual - Page 37
REGLAS DE SEGURIDAD ESPECÍFICAS MANTENGA LAS BROCAS LIMPIAS Y AFILADAS. Las brocas afiladas reducen al mínimo los atorones. Las brocas sucias y desafiladas pueden causar la desalineación del material y posibles lesiones corporales al operador. MANTENGA LAS MANOS ALEJADAS DEL ÁREA DE TRABAJO. - Ryobi P852 | User Manual - Page 38
Amperes Hertz Watts Minutos Corriente alterna Velocidad en vacío Por minuto Para reducir el riesgo de lesiones, el usuario debe leer y comprender el manual del operador antes de usar este producto. Siempre póngase protección ocular con protección lateral con la marca de cumplimiento de la norma - Ryobi P852 | User Manual - Page 39
ASPECTOS ELÉCTRICOS CORDONES DE EXTENSIÓN Sólo utilice cordones de extensión de 3 conductores con clavijas de tres patillas y receptáculos de tres polos que acepten la clavija del cordón de la herramienta. Al utilizar una herramienta eléctrica a una distancia considerable del suministro de - Ryobi P852 | User Manual - Page 40
GLOSARIO DE TÉRMINOS Trinquetes anticontragolpe (sierras radiales y de mesa) Es un dispositivo, el cual, cuando se instala y da mantenimiento correctamente, sirve para detener la pieza de trabajo para no ser lanzada hacia atrás, hacia la parte frontal la sierra durante una operación de corte al - Ryobi P852 | User Manual - Page 41
COLUMNA Vea la figura 2, página 17. El uso seguro que este producto requiere la comprensión de la información impresa en la herramienta y en el manual del operador así como ciertos conocimientos sobre el proyecto a realizar. Antes de usar este producto, familiarícese con todas las características de - Ryobi P852 | User Manual - Page 42
ARMADO DESEMPAQUETADO Este producto requiere armarse. HERRAMIENTAS NECESARIAS Vea la figura 3, página 17. Extraiga cuidadosamente de la caja la herramienta y los accesorios. Colóquela sobre una superficie de trabajo nivelada. NOTA: Esta herramienta es pesada. Para evitar sufrir lesiones en la - Ryobi P852 | User Manual - Page 43
ARMADO Deslice con ambas manos todo el conjunto de la mesa y la cremallera por la columna hasta que la parte inferior de la cremallera quede colocada en el collar de la base y contra la columna. Deslice el collar de la columna por ésta con el lado del bisel hacia abajo, hasta que el lado - Ryobi P852 | User Manual - Page 44
FUNCIONAMIENTO ADVERTENCIA: No permita que su familarización con las herramientas lo vuelva descuidado. Tenga presente que un descuido de un instante es suficiente para causar una lesión grave. ADVERTENCIA: Siempre utilice protección para los ojos con escudos laterales que cumplan con ANSI Z87.1. - Ryobi P852 | User Manual - Page 45
FUNCIONAMIENTO MONTAJE Y DESMONTAJE DE LAS BROCAS Vea la figura 17, página 21. ■ Conecte la taladradora de columna. Abra o cierre las mordazas del portabrocas hasta que la abertura sea levemente más grande que la broca deseada. Introduzca la broca en el portabrocas, en toda la profundidad de - Ryobi P852 | User Manual - Page 46
AJUSTES ADVERTENCIA: Antes de efectuar cualquier ajuste, asegúrese de que la herramienta esté desconectada del suministro de corriente. La inobservancia de esta advertencia podría causar lesiones serias. AJUSTE DE LA ALTURA DE LA MESA Vea la figura 19, página 21. Sujete la mesa con una mano y - Ryobi P852 | User Manual - Page 47
MANTENIMIENTO ADVERTENCIA: Al dar servicio a la unidad, sólo utilice piezas de repuesto idénticas. El empleo de piezas diferentes puede causar un peligro o dañar el producto. ADVERTENCIA: Siempre utilice protección para los ojos con escudos laterales que cumplan con ANSI Z87.1. La inobservancia de - Ryobi P852 | User Manual - Page 48
la broca. Avance demasiado lento Falta lubricación. Cambie la velocidad. Consulte el apartado "Cambio de velocidad" en la sección Ajustes de este manual. Retraiga frecuentemente la broca para extraer las virutas. Reemplace o afile la broca. Avance la broca con suficiente rapidez, permítale hacer el - Ryobi P852 | User Manual - Page 49
NOTAS 17 - Español - Ryobi P852 | User Manual - Page 50
Fig. 1 Fig. 3 TOOLS NEEDED OUTILS NÉCESSAIRES HERRAMIENTAS NECESARIAS B A A B A - Grounding pin (broche de terre, patilla de conexión a tierra) B - 120V grounded outlet (prise secteur 120 V mise à la terre, toma de corriente con tierra, de 120 V) Fig. 2 A - LED Worklight (témoin DEL, luces de - Ryobi P852 | User Manual - Page 51
Fig. 4 M PULL OUT LOCK A LOOSE PARTS PIÈCES DÉTACHÉES PIEZAS SUELTAS C E H F G H I J L K B D A - Depth gauge (limiteur de profondeur, calibre de profundidad) B - Chuck key (clé à mandrin, llave del portabrocas) C - Table assembly (ensemble de table, conjunto de la mesa) D - Hex key (clé - Ryobi P852 | User Manual - Page 52
Fig. 5 A B Fig. 8 A E B D C C A - Column assembly (colonne, conjunto de la columna) B - Hex bolt (boulons six pan, pernos de cabeza hexagonal) C - Base (base, base) Fig. 6 C A E B A - Set screw (vis d'arrêt, tornillos fijadores) B - Table assembly (ensemble de table, conjunto de la - Ryobi P852 | User Manual - Page 53
Fig. 10 C B A A - Mallet (maillet, mazo de goma) B - Scrap wood (chute de bois, madera de desecho) C - Chuck (mandrin, portabrocas) Fig. 11 PULL OUT LOCK Fig. 13 C DANGER / DANGER / PELIGRO ANGER / DANGER / PELIGRO PULL OUT LOCK A A - Laser housing (boîtier de laser, alojamiento del láser) B - - Ryobi P852 | User Manual - Page 54
Fig. 15 A Fig. 18 B A A - Chuck key (clé à mandrin, llave del portabrocas) B - Key hole (trou à guichet, agujero para la llave) Fig. 16 A - Clamp (bride, prensa) Fig. 19 A B C A B A - Table lock handle (poignée de verrouillage de table, manija de fijación de la mesa) B - Table assembly ( - Ryobi P852 | User Manual - Page 55
Fig. 21 Fig. 23 A A PULL OUT LOCK B A - Pulley set screws (vis d'arrêt de poulies, tornillos fijadores de las poleas) A - Depth gauge (limiteur de profondeur, graduador de profundidad) B - Depth stop locking collar (Collier de fixation de la butée de profondeur, Anillo de fijación para tope de - Ryobi P852 | User Manual - Page 56
OPERATOR'S MANUAL/10 in DRILL PRESS MANUEL D'UTILISATION / PERCEUSE À COLONNE DE 254 mm (10 po) MANUAL DEL OPERADOR/TALADRADORA DE COLUMNA DE 254 mm (10 pulg.) DP103L To request service, purchase replacement parts, locate an Authorized Service Center and obtain Customer or Technical Support: Visit
-
 1
1 -
 2
2 -
 3
3 -
 4
4 -
 5
5 -
 6
6 -
 7
7 -
8
-
9
-
10
-
11
-
12
-
13
-
14
-
15
-
16
-
17
-
18
-
19
-
20
-
21
-
22
-
23
-
24
-
25
-
26
-
27
-
28
-
29
-
30
-
31
-
32
-
33
-
34
-
35
-
36
-
37
-
38
-
39
-
40
-
41
-
42
-
43
-
44
-
45
-
46
-
47
-
48
-
49
-
50
-
51
-
52
-
53
-
54
-
55
-
56
 |
 |

OPERATOR’S MANUAL
10 in. DRILL PRESS
MANUEL D’UTILISATION
PERCEUSE À COLONNE DE 254 mm (10 po)
MANUAL DEL OPERADOR
TALADRADORA DE COLUMNA DE 254 mm
(10 pulg.)
DP103L
Cette perceuse à colonne a été conçue et fabriquée conformément
à nos strictes normes de fiabilité, simplicité d’emploi et sécu-
rité d’utilisation. Correctement entretenue, elle vous donnera des
années de fonctionnement robuste et sans problème.
AVERTISSEMENT :
Pour réduire les risques de
blessures, l’utilisateur doit lire et veiller à bien comprendre le
manuel d’utilisation avant d’employer ce produit.
Merci de votre achat.
Su nueva taladradora de columna ha sido diseñada y fabricada de
conformidad con nuestras estrictas normas para brindar fiabilidad,
facilidad de uso y seguridad para el operador. Con el debido cui-
dado, le brindará muchos años de sólido y eficiente funcionamiento.
ADVERTENCIA:
Para reducir el riesgo de lesiones,
el usuario debe leer y comprender el manual del operador antes
de usar este producto.
Le agradecemos su compra.
CONSERVER CE MANUEL POUR
FUTURE RÉFÉRENCE
GUARDE ESTE MANUAL PARA
FUTURAS CONSULTAS
SAVE THIS MANUAL FOR FUTURE REFERENCE
Your drill press has been engineered and manufactured to our high standard for dependability, ease of operation, and
operator safety. When properly cared for, it will give you years of rugged, trouble-free performance.
WARNING:
To reduce the risk of injury, the user must read and understand the operator’s manual before using
this product.
Thank you for purchase.
PULL OUT LOCK