Ryobi PSBRA02B Operation Manual
Ryobi PSBRA02B Manual
 |
View all Ryobi PSBRA02B manuals
Add to My Manuals
Save this manual to your list of manuals |
Ryobi PSBRA02B manual content summary:
- Ryobi PSBRA02B | Operation Manual - Page 1
6 Operation 6-8 Maintenance 8 Troubleshooting 9 Illustrations 10-11 Parts Ordering and Service Back page WARNING: To reduce the risk of el manual del operador antes de usar este producto. SAVE THIS MANUAL FOR FUTURE REFERENCE CONSERVER CE MANUEL GUARDE ESTE MANUAL POUR - Ryobi PSBRA02B | Operation Manual - Page 2
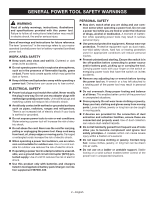
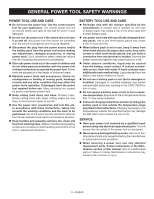
electric shock, fire and/or serious injury. Save all warnings and instructions for future reference. The term "power tool" in the warnings refers . Do not use on a ladder or unstable support. Stable footing on a solid surface enables better control of the power tool in unexpected situations. 2 - Ryobi PSBRA02B | Operation Manual - Page 3
be performed by the manufacturer or authorized service providers. When servicing a power tool, use only identical replacement parts. Follow instructions in the Maintenance section of this manual. Use of unauthorized parts or failure to follow Maintenance instructions may create a risk of shock or - Ryobi PSBRA02B | Operation Manual - Page 4
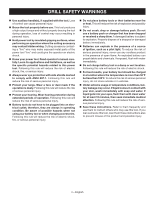
operator an electric shock. Know your power tool. Read operator's manual carefully. Learn its applications and limitations, as well as the specific risk of serious personal injury. Save these instructions. Refer to them frequently and use them to instruct others who may use this tool. If you - Ryobi PSBRA02B | Operation Manual - Page 5
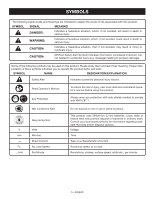
. SYMBOL NAME DESIGNATION/EXPLANATION Safety Alert Indicates a potential personal injury hazard. Read Operator's Manual To reduce the risk of injury, user must read and understand operator's manual before using this product. Eye Protection Always wear eye protection with side shields marked - Ryobi PSBRA02B | Operation Manual - Page 6
the battery pack is secured in the product before beginning operation. Depress the latches to remove the battery pack. For complete charging instructions, see the operator's manuals for your battery pack and charger. SWITCH TRIGGER See Figure 2, page 10. To turn the drill ON, depress the switch - Ryobi PSBRA02B | Operation Manual - Page 7
OPERATION NOTE: You might hear a whistling or ringing noise from the switch during use. Do not be concerned; this is a normal part of the switch function. DIRECTION OF ROTATION SELECTOR (FORWARD/REVERSE/CENTER LOCK) See Figure 2, page 10. The direction of bit rotation is reversible and is - Ryobi PSBRA02B | Operation Manual - Page 8
or irregular-shaped holes. When drilling large holes in metal, start with a small bit, then finish with a larger bit. MAINTENANCE WARNING: When servicing, use only identical replacement parts. Use of any other part could create a hazard or cause product damage. GENERAL MAINTENANCE Avoid using - Ryobi PSBRA02B | Operation Manual - Page 9
ésentées ci-dessous risque d'entraîner des décharges électriques, un incendie et/ou des blessures graves. Conserver les avertissements et les instructions à des fins de référence ultérieure. Le terme « outil motorisé », utilisé dans tous les avertissements ci-dessous désigne tout outil fonctionnant - Ryobi PSBRA02B | Operation Manual - Page 10
pas utiliser l'outil sur une échelle ou un support instable. Une bonne tenue et un bon équilibre service autorisés doivent effectuer la réparation ou l'entretien des blocspiles. Utiliser exclusivement des pièces identiques à celles d'origine pour les réparations. Se conformer aux instructions - Ryobi PSBRA02B | Operation Manual - Page 11
S'assurer d'un support adéquat de l'outil avant de l'utiliser. Cet outil produit un couple de sortie élevé et sans support adéquat de l' cette règle réduira les risques de blessures graves. Conserver ces instructions. Les consulter fréquemment et les utiliser pour instruire les autres - Ryobi PSBRA02B | Operation Manual - Page 12
SYMBOLES Les termes de mise en garde suivants et leur signification ont pour but d'expliquer le degré de risques associé à l'utilisation de ce produit. SYMBOLE SIGNAL SIGNIFICATION DANGER : Indique une situation dangereuse qui, si elle n'est pas évitée, aura pour conséquences des blessures - Ryobi PSBRA02B | Operation Manual - Page 13
CARACTÉRISTIQUES FICHE TECHNIQUE Mandrin 10 mm (3/8 po), sans clé Commutateur Vitesse variable Vitesse à vide 0 à 450 - 0 à 1 700/min (RPM) Couple 40 Nm (350 po-lb) ASSEMBLAGE AVERTISSEMENT : Ne pas utiliser le produit s'il n'est pas complètement assemblé ou si des pièces semblent - Ryobi PSBRA02B | Operation Manual - Page 14
UTILISATION NOTE : La gâchette peut produire un bruit de sifflement ou de grincement pendant le fonctionnement. Ne pas s'inquiéter, ce bruit fait partie du fonctionnement normal. SÉLECTEUR DE SENS DE ROTATION (AVANT/ARRIÈRE / VERROUILLAGE / POSITION CENTERALE) Voir la figure 2, page 10. Le sens de - Ryobi PSBRA02B | Operation Manual - Page 15
adéquat de l'outil avant de l'utiliser. Cet outil produit un couple de sortie élevé et sans support adéquat de l'outil pendant le fonctionnement pourrait occasionner une perte de contrôle et causer des blessures corporelles. AVERTISSEMENT : Ne pas enfoncer de vis - Ryobi PSBRA02B | Operation Manual - Page 16
ADVERTENCIAS DE SEGURIDAD PARA HERRAMIENTAS ELÉCTRICAS ADVERTENCIA Lea todas las advertencias, instrucciones, ilustraciones y especificaciones proporcionadas con esta herramienta eléctrica. No seguir las instrucciones indicadas a continuación puede provocar descargas eléctricas, incendios o - Ryobi PSBRA02B | Operation Manual - Page 17
a una herramienta eléctrica, sólo utilice piezas de repuesto idénticas. Siga las instrucciones señaladas en la sección Mantenimiento de este manual. El empleo de piezas no autorizadas o el incumplimiento de las instrucciones de mantenimiento puede significar un riesgo de descarga eléctrica o de - Ryobi PSBRA02B | Operation Manual - Page 18
metálicas expuestas de la herramienta y da una descarga eléctrica al operador. Familiarícese con su herramienta eléctrica. Lea cuidadosamente el manual del operador. Aprenda sus usos y limitaciones, así como los posibles peligros específicos de esta herramienta eléctrica. Con el cumplimiento de - Ryobi PSBRA02B | Operation Manual - Page 19
DENOMINACIÓN/EXPLICACIÓN Alerta de seguridad Indica un peligro posible de lesiones personales. Lea el manual del operador Para reducir el riesgo de lesiones, el usuario debe leer y comprender el manual del operador antes de usar este producto. V min no .../min Protección ocular Alerta de - Ryobi PSBRA02B | Operation Manual - Page 20
la herramienta antes de comenzar a utilizarla. Oprima los pestillos para extraer el paquete de baterías. Para obtener instrucciones específicas de carga, lea el manual del operador que se incluye con el cargador y la batería. 6 - Español - Ryobi PSBRA02B | Operation Manual - Page 21
FUNCIONAMIENTO GATILLO DEL INTERRUPTOR Vea la figura 2, page 10. ADVERTENCIA: Para encender el taladro, oprima el gatillo del interruptor. Para apagarlo, suelte el gatillo del interruptor. VELOCIDAD VARIABLE Esta herramienta dispone de un interruptor de velocidad variable, el cual produce mayor - Ryobi PSBRA02B | Operation Manual - Page 22
FUNCIONAMIENTO TALADRADO/INTRODUCCIÓN DE TORNILLOS Vea la figura 7, página 11. Revise el selector de sentido de rotación para ver si está en la posición correcta (marcha adelante o atrás). Asegure la pieza de trabajo en una prensa o con abrazaderas para evitar que rote a medida que la broca - Ryobi PSBRA02B | Operation Manual - Page 23
TROUBLESHOOTING LED LIGHT FUNCTIONS TOOL STATUS LED LIGHT SCENARIO ACTION REQUIRED Normal Solid Light (No Flashes) No Action Needed Low Battery 3 Flashes Replace Battery Excessive Force 6 - Ryobi PSBRA02B | Operation Manual - Page 24
PSBRA02 A OPTIONAL Fig. 3 B A B E F C D OPTIONAL H E D C RIGHT / CORRECT / FORMA CORRECTA A - Drill bit (foret, broca) B - Unlock (release) (déverrouiller [desserrer], desasegurar [desasegurar]) C - Chuck body (corps du mandrin, cuerpo del portabrocas) D- Lock (tighten) (lock [serrer], - Ryobi PSBRA02B | Operation Manual - Page 25
Fig. 5 C Fig. 6 B Fig. 7 AB D C A A - Hole (trou, agujero) B - Belt hook (not included) [crochet de ceinture (non inclus), gancho para el cinto (no incluida)] C - Screw (vis, tornillo) D - Bit holder (not included) (porte-embout [pas inclus], soporte del brocas [no se incluyen]) C A - LO - Ryobi PSBRA02B | Operation Manual - Page 26
NOTES/NOTAS - Ryobi PSBRA02B | Operation Manual - Page 27
NOTES/NOTAS - Ryobi PSBRA02B | Operation Manual - Page 28
ONE+ TALADRO DE ÁNGULO RECTO COMPACTO SIN ESCOBILLAS DE 10 MM (3/8 PULG.) ONE+ PSBRA02 To request service, purchase replacement parts, locate an Authorized Service Center or obtain Customer or Technical Support: Visit www.ryobitools.com or call 1-800-525-2579 If any parts or accessories are damaged
-
 1
1 -
 2
2 -
 3
3 -
 4
4 -
 5
5 -
 6
6 -
 7
7 -
8
-
9
-
10
-
11
-
12
-
13
-
14
-
15
-
16
-
17
-
18
-
19
-
20
-
21
-
22
-
23
-
24
-
25
-
26
-
27
-
28
 |
 |

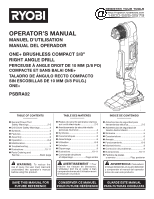
OPERATOR’S MANUAL
MANUEL D’UTILISATION
MANUAL DEL OPERADOR
ONE+ BRUSHLESS COMPACT 3/8”
RIGHT ANGLE DRILL
PERCEUSE À ANGLE DROIT DE 10 MM (3/8 PO)
COMPACTE ET SANS BALAI ONE+
TALADRO DE ÁNGULO RECTO COMPACTO
SIN ESCOBILLAS DE 10 MM (3/8 PULG.)
ONE+
PSBRA02
WARNING:
To reduce the
risk of injury, the user must read and
understand the operator’s manual
before using this product.
SAVE THIS MANUAL FOR
FUTURE REFERENCE
ADVERTENCIA:
Para reducir
el riesgo de lesiones, el usuario debe leer
y comprender el manual del operador
antes de usar este producto.
AVERTISSEMENT :
Pour
réduire les risques de blessures,
l’utilisateur doit lire et veiller à bien
comprendre le manuel d’utilisation avant
d’employer ce produit.
GUARDE ESTE MANUAL
PARA FUTURAS CONSULTAS
CONSERVER CE MANUEL
POUR FUTURE RÉFÉRENCE
TABLE OF CONTENTS
****************
General Power Tool
Safety Warnings
..............................
2-3
Drill-Driver Safety Warnings
...............
4
Symbols
..............................................
5
Features
..............................................
6
Assembly
............................................
6
Operation
.........................................
6-8
Maintenance
.......................................
8
Troubleshooting
..................................
9
Illustrations
..................................
10-11
Parts Ordering and
Service
................................
Back page
TABLE DES MATIÈRES
****************
Règles de sécurité générales relatives
aux outils électriques
......................
2-3
Avertissements de sécurité relatifs
perceuse-tournevis
............................
4
Symboles
............................................
5
Caractéristiques
.................................
6
Assemblage
........................................
6
Utilisation
........................................
6-8
Entretien
.............................................
8
Dépannage
.........................................
9
Illustrations
..................................
10-11
Commande de pièces
et dépannage
....................
Page arrière
ÍNDICE DE CONTENIDO
****************
Advertencias de seguridad para
herramientas eléctrica
.....................
2-3
Advertencias de seguridad de
taladro-destornillador
.........................
4
Símbolos
............................................
5
Características
...................................
6
Armado
...............................................
6
Funcionamiento
...............................
6-8
Mantenimiento
....................................
8
Corrección de problemas
...................
9
Illustraciones
...............................
10-11
Pedidos de piezas
y servicio
.......................
Pág. posterior