Ryobi RMX001 Operation Manual
Ryobi RMX001 Manual
 |
View all Ryobi RMX001 manuals
Add to My Manuals
Save this manual to your list of manuals |
Ryobi RMX001 manual content summary:
- Ryobi RMX001 | Operation Manual - Page 1
RMX001 TABLE OF CONTENTS General Power Tool Safety Warnings 2-3 Concrete Mixer Safety Instructions 3-4 Symbols 5 Electrical 6-7 Features 8 Tools Needed 9 Loose Parts List 9 Assembly 10-13 Operation 14-18 Maintenance 18 Troubleshooting 19 Parts Ordering / Service - Ryobi RMX001 | Operation Manual - Page 2
listed below may result in electric shock, fire and/or serious injury. Save all warnings and instructions for future reference. The term "power tool" in the warnings refers to your mainsoperated (corded) power tool or battery-operated (cordless) power tool. WORK AREA - Ryobi RMX001 | Operation Manual - Page 3
unexpected situations. SERVICE Have your power tool serviced by a qualified repair person using only identical replacement parts. This will ensure that the safety of the power tool is maintained. CONCRETE MIXER SAFETY INSTRUCTIONS Know your power tool. Read operator's manual carefully. Learn - Ryobi RMX001 | Operation Manual - Page 4
CONCRETE MIXER SAFETY INSTRUCTIONS Always keep the drum's opening in view when filling the power supply cord is damaged, it must be replaced only by the manufacturer or by an authorized service center to avoid risk. Never leave tool running unattended. Unplug tool when leaving work area or when - Ryobi RMX001 | Operation Manual - Page 5
Safety Alert Indicates a potential personal injury hazard. Read Operator's Manual Eye and Breathing Protection To reduce the risk of injury, user must read and understand operator's manual before using this product. Always wear eye protection with side shields - Ryobi RMX001 | Operation Manual - Page 6
in contact with the drum or mixing materials while you are using the mixer. Failure to do so can result in serious personal injury. WARNING: the grounding wire. Check with a qualified electrician or service personnel if the grounding instructions are not completely understood, or if in doubt as - Ryobi RMX001 | Operation Manual - Page 7
of a wall-mounted outlet to prevent water from dripping onto the outlet or plug. The operator should arrange a "drip loop" in the cord connecting the mixer to the outlet. The "drip loop" is that part of the cord below the level of the outlet, or the connector if an extension cord - Ryobi RMX001 | Operation Manual - Page 8
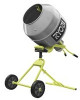
Load Speed 25 r/min (RPM) Mixing Tines Two (22 in. long) KNOW YOUR CONCRETE MIXER See Figure 3. The safe use of this product requires an understanding of the information on the tool and in this operator's manual as well as a knowledge of the project you are attempting. Before use of this product - Ryobi RMX001 | Operation Manual - Page 9
TOOLS NEEDED The following tools (not included or drawn to scale) are needed for assembly: FLAT HEAD SCREWDRIVER (LARGE) 17 mm AND 19 mm WRENCHES PLIERS LOOSE PARTS Some of the Loose Parts shown below are stored in the drum. Parts not drawn to scale: A B F G I C D M K L E H J N Fig - Ryobi RMX001 | Operation Manual - Page 10
to power supply until assembly is complete. Failure to comply could result in accidental starting and possible serious personal injury. WARNING: Do not lift the mixer without help. Hold it close to your body. Keep your knees bent and lift with your legs, not your back. Ignoring these precautions can - Ryobi RMX001 | Operation Manual - Page 11
Locate the following parts: Wheel 2 Cotter Pin in plastic bag (A 4 Washer (Large) in plastic bag (A 4 Raise the front leg and position props beneath it for support. Locate the two holes on the left end of the front leg. Install a cotter pin into the hole closest to the center of the front - Ryobi RMX001 | Operation Manual - Page 12
ASSEMBLY Pull the lock handle away from the pivot bracket and place it in the locked position. Slowly release the lock handle and allow it to enter the hole in the motor assembly that is closest to the motor. Insert the pivot pin through the holes in the pivot bracket and the motor assembly - Ryobi RMX001 | Operation Manual - Page 13
ASSEMBLY SECURING THE DRUM See Figure 12. CAUTION: Double check all setups. Make sure that the legs, pivot bracket, wheels, motor assembly, and handles are installed correctly prior to installing the drum. Locate the drum. Tighten the bolt at the rear of the pivot bracket to prevent the drum - Ryobi RMX001 | Operation Manual - Page 14
filling, mixing, and emptying the mixer. Failure to do so may cause refer to the material manufacturer's instructions. CIRCUIT BREAKER RESET BUTTON NOTICE service or a qualified service center for assistance. APPLICATIONS You may use this tool for the purposes listed below: Mixing stucco, cement - Ryobi RMX001 | Operation Manual - Page 15
NOTE: The drum opening should be in this position when emptying and cleaning the mixer. To raise the drum opening: Press down on the handles to raise the HANDLE ROTATING THE DRUM See Figure 17. To rotate the drum: Turn the mixer off. Loosen the bolt on the back of the pivot bracket. Firmly - Ryobi RMX001 | Operation Manual - Page 16
cause property damage or personal injury if spilled. WARNING: Mix and prepare materials according to the material manufacturer's instructions. NOTICE: Routinely make a visual inspection of the mixer and the material being mixed. Do not let materials dry and harden inside the drum or on any part - Ryobi RMX001 | Operation Manual - Page 17
drum opening and lock the drum in place. Clean the mixer as described later. CEMENT WARNING: Keep hands away from the drum while it is spinning. vary, refer to the material manufacturer's instructions. NOTICE: Routinely make a visual inspection of the mixer and the material being mixed. Do not - Ryobi RMX001 | Operation Manual - Page 18
OPERATION CLEANING THE DRUM See Figure 21. Unplug the mixer. Empty the drum. Unlock the drum. Lift the all missing or damaged parts are replaced. Please contact customer service or a qualified service center for assistance. GENERAL MAINTENANCE Avoid using solvents when cleaning plastic - Ryobi RMX001 | Operation Manual - Page 19
TROUBLESHOOTING PROBLEM POSSIBLE CAUSE SOLUTION Mixer won't start Power supply not connected Connect to tool and empty some or all of the batch load. Do not force the mixer. Mixer stops during operation Power supply is disconnected Reconnect power supply. Motor overloaded and circuit - Ryobi RMX001 | Operation Manual - Page 20
ésentées ci-dessous risque d'entraîner des décharges électriques, un incendie et/ou des blessures graves. Conserver les avertissements et les instructions à des fins de référence ultérieure. Le terme « outil motorisé », utilisé dans tous les avertissements ci-dessous désigne tout outil fonctionnant - Ryobi RMX001 | Operation Manual - Page 21
mort. Ne pas mélanger de nourriture. Les outils électriques et leurs accessoires ne sont pas conçus pour traiter les aliments. Suivre les instructions et les avertissements pour le matériau à mélanger. Le matériau à mélanger peut être dangereux. Toujours demander de l'aide s'il faut soulever - Ryobi RMX001 | Operation Manual - Page 22
cordon prolongateur est utilisé, s'assurer que sa capacité est suffisante pour supporter le courant de fonctionnement de l'outil. Un calibre de fil (A.W.G) éviter les mouvements et les dommages possibles. Conserver ces instructions. Les consulter fréquemment et les utiliser pour instruire les - Ryobi RMX001 | Operation Manual - Page 23
SYMBOLES Les termes de mise en garde suivants et leur signification ont pour but d'expliquer le degré de risques associé à l'utilisation de ce produit. SYMBOLE SIGNAL SIGNIFICATION DANGER : Indique une situation dangereuse qui, si elle n'est pas évitée, aura pour conséquences des blessures - Ryobi RMX001 | Operation Manual - Page 24
veiller à utiliser un cordon prolongateur d'une capacité suffisante pour supporter l'appel de courant de l'outil. Un cordon de capacité lorsqu'il est branché dans une prise de courant, vérifier la source d'alimentation. INSTRUCTIONS DE MISE À LA TERRE Voir la figure 1. Ce produit doit être fondé. - Ryobi RMX001 | Operation Manual - Page 25
CARACTÉRISTIQUES ÉLECTRIQUES Consulter un électricien qualifié ou le personnel de service si les instructions de mise à la terre ne sont pas bien comprises, ou en cas de doute au sujet de la mise à la terre. Tout cordon endommagé doit ê - Ryobi RMX001 | Operation Manual - Page 26
- Les roues en caoutchouc durable permettent de placer le produit sur des surfaces lisses ou rugueuses. TAMBOUR DENTS DE MÉLANGE CORDON D'ALIMENTATION BROCHE DE PIVOT SUPPORT DE PIVOT LEVIER DE VERROUILLAGE PIED AVANT ENSEMBLE DE MOTEUR POIGNÉES PIED ARRIÈRE ROUES 8 − Français Fig. 3 - Ryobi RMX001 | Operation Manual - Page 27
reté (grande 2 Goupille fendue 4 F - Tambour 1 Boulon (10 mm 1 G - Ensemble de moteur 1 Rondelle en arc 2 H - Poignées 2 Rondelle de blocage 1 I - Support de pivot 1 écrou (10 mm 1 J - Broche de pivot 1 B - Sac en plastique (B) K - Dent de mélange 2 Goupille de sûreté (petit - Ryobi RMX001 | Operation Manual - Page 28
écaution peut entraîner des problèmes lombaires. ASSEMBLAGE DU CADRE Voir les figures 6 et 7. Localiser les pièces suivantes : Pied avant 1 Pied arrière 1 Support de pivot 1 Boulon (17 mm) dans un sac en plastique (C 1 Boulon (10 mm) dans un sac en plastique (A 1 Écrou (10 mm) dans un sac en - Ryobi RMX001 | Operation Manual - Page 29
suivantes : Roue 2 Goupille fendue dans un sac en plastique (A 4 Rondelle (grande) dans un sac en plastique (A 4 Soulever le pied avant et placer un support dessous. Repérer les deux trous situés sur l'extrémité gauche du pied avant. Installer une goupille fendue dans le trou qui se trouve - Ryobi RMX001 | Operation Manual - Page 30
entrer dans le trou de l'assemblage du moteur qui se trouve le plus près du moteur. Insérer la goupille pivotante dans les trous du support pivotant et l'assemblage du moteur, puis la sécuriser avec la cheville. LEVIER DE VERROUILLAGE FIXATION DES POIGNÉES Voir la figure 11. Localiser les pi - Ryobi RMX001 | Operation Manual - Page 31
pivotant, les roues, l'assemblage du moteur et les poignées avant d'installer le tambour. Trouver le tambour. Serrer le boulon à l'arrière du support pivotant pour éviter qu'il tourne. Avec l'aide d'une deuxième personne, placer le tambour sur l'arbre du moteur. NOTE : Le tambour est lourd - Ryobi RMX001 | Operation Manual - Page 32
maté-riaux. Comme les temps de durcissement varient, consulter les instructions du fabricant des matériaux. AVERTISSEMENT : Lorsque le tambour mé es n'ont pas été remplacées. Se il vous plaît communiquer avec le service à la clientèle ou un centre de réparations qualifié. APPLICATIONS Cet outil - Ryobi RMX001 | Operation Manual - Page 33
de trébuchement. Appuyer sur les poignées pour soulever l'ouverture du tambour. Verrouiller le tambour en place. Serrer le boulon à l'arrière du support pivotant pour éviter que le tambour tourne. Incliner la machine vers soi, jusqu'à ce qu'elle soit en équilibre sur les roues, puis rouler - Ryobi RMX001 | Operation Manual - Page 34
pourraient endommager les biens ou blesser quelqu'un si elles sont renversées. AVERTISSEMENT : Mélanger et préparer les matériaux selon les instructions du fabricant du matériau. AVIS : Effectuer périodiquement une inspection visuelle du mélangeur et des matériaux à mélanger. Ne pas laisser les mat - Ryobi RMX001 | Operation Manual - Page 35
maté-riaux. Comme les temps de durcissement varient, consulter les instructions du fabricant des matériaux. AVIS : Effectuer périodiquement une et vers l'espace de travail. Serrer le boulon à l'arrière du support pivotant pour éviter que le tambour tourne. AVIS : Toujours avoir vue sur l'ouverture - Ryobi RMX001 | Operation Manual - Page 36
produit tant que toutes les pièces manquantes ou endommagées n'ont pas été remplacées. Veuillez communiquez avec le service à la clientèle ou avec un centre de service autorisé pour obtenir de l'assistance. ENTRETIEN GÉNÉRAL Éviter d'utiliser des solvants pour le nettoyage des pièces en plastique - Ryobi RMX001 | Operation Manual - Page 37
DÉPANNAGE PROBLÈME CAUSE POSSIBLE SOLUTION Le mélangeur ne démarre pas Alimentation débranchée Raccorder à une alimentation électrique Le commutateur marche/arrêt est à la Mettre le commutateur marche/arrêt à la position arrêt position marche Le moteur est surchargé et le disjoncteur - Ryobi RMX001 | Operation Manual - Page 38
ADVERTENCIAS DE SEGURIDAD PARA HERRAMIENTAS ELÉCTRICA ADVERTENCIA: Lea todas las advertencias, instrucciones, ilustraciones y especificaciones proporcionadas con esta herramienta eléctrica. No seguir las instrucciones indicadas a continuación puede provocar descargas eléctricas, incendios o - Ryobi RMX001 | Operation Manual - Page 39
LA MEZCLADORA DE HORMIGÓN Familiarícese con su herramienta eléctrica. Lea No use esta herramienta para mezclar materiales cuidadosamente el manual del operador. Aprenda sus inflamables o explosivos. El fuego o una explosión usos y limitaciones, así como los posibles peligros pueden causar - Ryobi RMX001 | Operation Manual - Page 40
INSTRUCCIONES DE SEGURIDAD DE LA MEZCLADORA DE HORMIGÓN Asegúrese de que todos los ajustes queden firmes y que el área de trabajo esté libre de her-ramientas y otros obstáculos antes de operar la mezcladora. Encienda el motor antes de llenar la mezcladora de hormigón. Si sigue esta regla, - Ryobi RMX001 | Operation Manual - Page 41
Amperes Hertz Minutos Corriente alterna Velocidad en vacío Por minuto Para reducir el riesgo de lesiones, el usuario debe leer y comprender el manual del operador antes de usar este producto. Siempre póngase protección ocular con protección lateral con la marca de cumplimiento de la norma ANSI - Ryobi RMX001 | Operation Manual - Page 42
ASPECTOS ELÉCTRICOS CORDONES DE EXTENSIÓN Sólo utilice cordones de extensión de 3 conductores con clavijas de tres patillas y receptáculos de tres polos que acepten la clavija del cordón de la herramienta. Al utilizar una herramienta eléctrica a una distancia considerable del suministro de - Ryobi RMX001 | Operation Manual - Page 43
ASPECTOS ELÉCTRICOS Consulte a un electricista calificado o técnico de servicio si no ha comprendido completamente las instrucciones de conexión a tierra o si no está seguro si la herramienta está bien conectada a tierra. Repare o reemplace de inmediato todo cordón dañado o gastado. Este producto - Ryobi RMX001 | Operation Manual - Page 44
DE HORMIGÓN Vea la figura 3. El uso seguro que este producto requiere la comprensión de la información impresa en la herramienta y en el manual del operador así como ciertos conocimientos sobre el proyecto a realizar. Antes de usar este producto, familiarícese con todas las características de - Ryobi RMX001 | Operation Manual - Page 45
HERRAMIENTAS NECESARIAS Para armar la unidad se necesitan las siguientes herramientas (no incluido o dibujado para escalar): DESTORNILLADOR DE PUNTA PLANA (GRANDE) PINZAS 17 mm Y 19 mm LLAVES Fig. 4 LISTA DE PIEZAS SUELTAS Algunas partes sueltas que se muestran a continuación están dentro del - Ryobi RMX001 | Operation Manual - Page 46
ARMADO DESEMPAQUETADO Este producto requiere armarse. Retire la mezcladora del embalaje con cuidado y colóquela en una superficie de trabajo nive-lada. NOTA: Esta herramienta es pesada. Para evitar sufrir lesiones en la columna, levante con las piernas, no con la espalda, y obtenga ayuda cuando - Ryobi RMX001 | Operation Manual - Page 47
ARMADO Alinee los orificios de las patas. Inserte un perno de 10 mm en la arandela de arco y los orificios de las patas. Instale la arandela de arco, la arandela de seguridad y la tuerca en el perno. Ajuste firmemente. Deslice el soporte pivote en la parte superior de la pata delantera. - Ryobi RMX001 | Operation Manual - Page 48
ARMADO Alinee los orificios del ensamblaje del motor con el orificio y el mango de seguridad del soporte pivote. Baje el ensamblaje del motor para colocarlo en su lugar. Tire el mango de seguridad hacia fuera del soporte pivote y colóquelo en la posición bloqueada. Libere el mango de - Ryobi RMX001 | Operation Manual - Page 49
ARMADO CÓMO COLOCAR EL TAMBOR Vea la figura 12. PRECAUCIÓN: Revise dos veces toda la configuración de la herramienta. Asegúrese de que las patas, el soporte pivote, las ruedas, el ensamblaje del motor y los mangos estén instalados correctamente antes de colocar el tambor. Agarre el tambor. - Ryobi RMX001 | Operation Manual - Page 50
FUNCIONAMIENTO PELIGRO: Riesgo de explosión. No use esta herramienta para mezclar materiales inflamables o explosivos. El fuego o una explosión pueden causar quemaduras graves e incluso la muerte. ADVERTENCIA: No permita que su familarización con las herramientas lo vuelva descuidado. Tenga - Ryobi RMX001 | Operation Manual - Page 51
FUNCIONAMIENTO CÓMO SUBIR Y BAJAR LA ABERTURA DEL TAMBOR Vea las figura 15 y 16. ADVERTENCIA: Al cambiar el ángulo del tambor, mantenga las manos y los cables alejados de los puntos de pellizco. Si no tiene en cuenta esta advertencia, podría agarrarse los dedos o dañar los cables. Para bajar la - Ryobi RMX001 | Operation Manual - Page 52
FUNCIONAMIENTO AVISO: No incline el tambor en exceso. Tenga cuidado al mover la mezcladora más allá de los límites y en terrenos desparejos. CÓMO AGREGAR O MEZCLAR MATERIALES Vea las figuras 18 y 19. ADVERTENCIA: Para reducir el riesgo de que la herramienta vuelque, use la mezcladora en una - Ryobi RMX001 | Operation Manual - Page 53
FUNCIONAMIENTO Coloque material de mezcla seco y húmedo en el tambor con cuidado. Consulte las instrucciones del fabricante del material para obtener más detalles. Los tiempos de mezcla pueden variar. NOTA: La mezcladora tiene una capacidad de carga de 122,5 kg (270 lb o 2,5 ft³). No sobrecargue - Ryobi RMX001 | Operation Manual - Page 54
FUNCIONAMIENTO CÓMO LIMPIAR EL TAMBOR Vea la figura 21. Desenchufe la mezcladora. Vacíe el tambor. Desbloquee el tambor. Levante los mangos para bajar la abertura del tambor. Con una manguera de jardín, rocíe agua limpia dentro del tambor y quite el material sobrante. NOTA: Si es - Ryobi RMX001 | Operation Manual - Page 55
SOLUCIÓN DE PROBLEMAS PROBLEMA CAUSA POSIBLE SOLUCIÓN La mezcladora no arranca. El suministro de alimentación está Conecte el suministro de alimentación desconectado El interruptor de encendido/apagado está Coloque el interruptor de encendido/ en la posición de apagado apagado en la posición - Ryobi RMX001 | Operation Manual - Page 56
(0.14 m3) CONCRETE MIXER MANUEL D'UTILISATION / MÉLANGEUR DE BÉTON DE 0,14 m3 (5 cu. ft.) MANUAL DEL OPERADOR/ MEZCLADORA DE HORMIGÓN DE 0,14 m3 (5 cu. ft.) RMX001 To request service, purchase replacement parts, locate an Authorized Service Center and obtain Customer or Technical Support: Visit www
-
 1
1 -
 2
2 -
 3
3 -
 4
4 -
 5
5 -
 6
6 -
 7
7 -
8
-
9
-
10
-
11
-
12
-
13
-
14
-
15
-
16
-
17
-
18
-
19
-
20
-
21
-
22
-
23
-
24
-
25
-
26
-
27
-
28
-
29
-
30
-
31
-
32
-
33
-
34
-
35
-
36
-
37
-
38
-
39
-
40
-
41
-
42
-
43
-
44
-
45
-
46
-
47
-
48
-
49
-
50
-
51
-
52
-
53
-
54
-
55
-
56
 |
 |

OPERATOR’S MANUAL
MANUEL D’UTILISATION
MANUAL DEL OPERADOR
5 cu. ft. (0.14 m
3
) CONCRETE MIXER
MÉLANGEUR DE BÉTON
DE 0,14 m
3
(5 cu. ft.)
MEZCLADORA DE HORMIGÓN
DE 0,14 m
3
(5 cu. ft.)
RMX001
WARNING:
To reduce the
risk of injury, the user must read and
understand the operator’s manual
before using this product.
SAVE THIS MANUAL FOR
FUTURE REFERENCE
ADVERTENCIA:
Para reducir
el riesgo de lesiones, el usuario debe leer
y comprender el manual del operador
antes de usar este producto.
AVERTISSEMENT :
Pour
réduire les risques de blessures,
l’utilisateur doit lire et veiller à bien
comprendre le manuel d’utilisation avant
d’employer ce produit.
GUARDE ESTE MANUAL
PARA FUTURAS CONSULTAS
CONSERVER CE MANUEL
POUR FUTURE RÉFÉRENCE
TABLE OF CONTENTS
****************
General Power Tool
Safety Warnings
..............................
2-3
Concrete Mixer
Safety Instructions
..........................
3-4
Symbols
..............................................
5
Electrical
..........................................
6-7
Features
..............................................
8
Tools Needed
.....................................
9
Loose Parts List
..................................
9
Assembly
.....................................
10-13
Operation
.....................................
14-18
Maintenance
.....................................
18
Troubleshooting
...............................
19
Parts Ordering / Service
.....
Back Page
TABLE DES MATIÈRES
****************
Avertissements de sécurité
relatives aux outils électriques
........
2-3
Consignes de sécurité
pour le mélangeur de béton
............
3-4
Symboles
............................................
5
Caractéristiques électriques
............
6-7
Caractéristiques
.................................
8
Outils nécessaires
..............................
9
Liste des pièces détachées
................
9
Assemblage
.................................
10-13
Utilisation
.....................................
14-18
Entretien
...........................................
18
Dépannage
.......................................
19
Commande de pièces /
réparation
.........................
Page arrière
ÍNDICE DE CONTENIDO
****************
Advertencias de seguridad
para herramientas eléctrica
............
2-3
Instrucciones de seguridad
de la mezcladora de hormigón
.......
3-4
Símbolos
............................................
5
Aspectos eléctricos
.........................
6-7
Características
...................................
8
Herramientas necesarias
....................
9
Lista de piezas sueltas
.......................
9
Armado
........................................
10-13
Funcionamiento
...........................
14-18
Mantenimiento
..................................
18
Solución de problemas
....................
19
Pedidos de piezas /
servicio
..........................
Pág. posterior