Ryobi RTS21 User Manual
Ryobi RTS21 Manual
 |
View all Ryobi RTS21 manuals
Add to My Manuals
Save this manual to your list of manuals |
Ryobi RTS21 manual content summary:
- Ryobi RTS21 | User Manual - Page 1
OPERATOR'S MANUAL 10 in. TABLE SAW RTS21/RTS21G Your table saw has been engineered and manufactured to our high standard for dependability, ease of operation, and operator safety. When properly cared for, it will give you years of rugged, trouble-free performance. WARNING: To reduce the risk of - Ryobi RTS21 | User Manual - Page 2
...38 Troubleshooting...38-39 Parts Ordering/Service...Back Page RYOBI® power tool which does not work properly due to defective workmanship or materials by returning the power tool to the dealer from which it was purchased. To receive a replacement power tool or requested warranty service - Ryobi RTS21 | User Manual - Page 3
INSTRUCTIONS KNOW YOUR POWER TOOL. Read the operator's manual carefully. Learn the saw wire gauge size (A.W.G.) of part that is damaged must be properly repaired or replaced by an authorized service center to avoid risk of personal injury. USE THE RIGHT DIRECTION OF FEED. Feed work into a blade - Ryobi RTS21 | User Manual - Page 4
IT ON AND OFF. Have defective switches replaced by an authorized service center. USE ONLY CORRECT BLADES. Do not use blades with incorrect size holes. Never use blade washers or blade bolts that are defective or incorrect. The maximum blade capacity of your saw is 10 in. (254 mm). BEFORE MAKING - Ryobi RTS21 | User Manual - Page 5
all the way past the saw blade using a push stick. e) Not ripping work that is twisted or warped or does not have a straight edge to guide along the fence. IF THE POWER SUPPLY CORD IS DAMAGED, it must be replaced only by the manufacturer or by an authorized service center to avoid risk. AVOID - Ryobi RTS21 | User Manual - Page 6
injury, user must read and understand operator's manual before using this product. Eye Protection Always wear eye protection with side shields marked to comply with ANSI Z87.1. No Hands Symbol Failure to keep your hands away from the blade will result in serious personal injury. Wet Conditions - Ryobi RTS21 | User Manual - Page 7
16.0 Cord Length Wire Size (A.W.G.) 25' 16 16 support one power tool may not be able to support two or three tools. GROUNDING INSTRUCTIONS service personnel if the grounding instructions are not completely understood, or if in doubt as to whether the tool is properly grounded. Repair or replace - Ryobi RTS21 | User Manual - Page 8
be or has been cut by the blade. Set The distance that the tip of the saw blade tooth is bent (or set) outward from the face of the blade. Snipe (planers) Depression made at either end of a workpiece by cutter blades when the workpiece is not properly supported. Taper Cut A cut where the material - Ryobi RTS21 | User Manual - Page 9
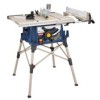
Depth at 0 3 in. Cutting Depth at 45 2-1/2 in. ANTI-KICKBACK PAWLS MITER GAUGE RIVING KNIFE BLADE GUARD RIP FENCE SLIDING TABLE EXTENSION OUTFEED SUPPORT FRONT RAIL BLADE WRENCH STORAGE LOCKING LEVER SCALE TABLE LOCKING LEVER STORAGE BRACKET(S) HEIGHT/BEVEL ADJUSTING HANDWHEEL SWITCH - Ryobi RTS21 | User Manual - Page 10
tool gives the operator additional support when cutting long workpieces. RIP FENCE - A sturdy metal fence guides the workpiece and is secured with the locking handle. RIVING KNIFE - A removable metal piece of the blade guard assembly, slightly thinner than the saw blade, which helps keep the kerf - Ryobi RTS21 | User Manual - Page 11
manual for the basic cuts: cross cuts, miter cuts, bevel cuts, and compound cuts. The rip fence is used to position work for lengthwise cuts. A scale on the front rail shows the distance between the rip fence and the blade. It is very important to use the blade guard assembly for all through-sawing - Ryobi RTS21 | User Manual - Page 12
For maximum performance, it is recommended that you use the 24-tooth, 10 in. carbide-tipped combination blade provided with your saw. Additional blade styles of the same high quality are available for specific operations such as ripping. Your local dealer can provide you with complete information - Ryobi RTS21 | User Manual - Page 13
LOOSE PARTS The following items are included with your table saw: N K A C B H I D M F P E L I Q O J G A. Anti-Kickback Pawls 1 B. Blade Guard 1 C. Miter Gauge 1 D. Blade Wrench 2 E. Handle Assembly 1 F. Rip Fence 1 G. Push Stick 1 H. Indicator 1 Fig. 5 I. Screw 2 J. Stand - Ryobi RTS21 | User Manual - Page 14
and the motor by first beveling the blade (see page 25). The saw is factory set for accurate cutting. After assembling it, check for accuracy. If shipping has influenced the settings, refer to specific procedures explained in this manual. If any parts are damaged or missing, please call 1-800 - Ryobi RTS21 | User Manual - Page 15
top of the leg stand. Insert the screw on the locking knob into the hole and turn the locking knob clockwise to secure the table saw base to the leg stand. Repeat with the other three locking knobs. TO INSTALL THE HANDLE See Figure 9. Hold the nylon nut securely and turn - Ryobi RTS21 | User Manual - Page 16
TO REMOVE/REPLACE THE THROAT PLATE See Figure 10. Lower the blade by turning the height/bevel adjusting handwheel counterclockwise. To remove the throat plate, place your index finger in the hole and lift the front end pulling the throat plate out toward the front of the saw. To reinstall - Ryobi RTS21 | User Manual - Page 17
See Figures 13 - 15. WARNING: Replace dull or damaged anti-kickback pawls. Dull or damaged pawls may not stop a kickback increasing the risk of serious personal injury. Anti-kickback pawls should only be installed for through cuts. Unplug the saw. Raise the saw blade by turning the height/bevel - Ryobi RTS21 | User Manual - Page 18
, loosen the screws holding the mounting bracket. Reposition the riving knife left or right as needed to align the riving knife with the saw blade. Once properly aligned, securely retighten all screws. Check again for squareness and continue to adjust if needed. 18 CORRECT INCORRECT Fig. 15 - Ryobi RTS21 | User Manual - Page 19
the front and back table locking levers. Insert sliding table assembly into table locking levers. Push the table assembly until it rests against the saw table and is completely closed. Install phillips head screw into hole on the bottom of the rear extension rod to hold sliding table assembly - Ryobi RTS21 | User Manual - Page 20
designed for the saw's accessories. When not in use, store the accessories securely by snapping each accessory in place. To store the leg stand, close the stand and secure in back of saw cabinet using hook and look straps. BLADE WRENCHES PUSH STICK STORAGE HOOK RIP FENCE MITER GAUGE Fig - Ryobi RTS21 | User Manual - Page 21
result in serious personal injury. WARNING: Although many of the illustrations in this manual are shown with the blade guard removed for clarity, do not operate the saw without the blade guard unless specifically instructed to do so. APPLICATIONS You may use this tool for the purposes listed below - Ryobi RTS21 | User Manual - Page 22
your hands do not come within 3 inches of the saw blade. They can be made in various sizes and shapes from scrap wood and used in a saw or workpiece. AUXILIARY FENCE An auxiliary fence is a device used to close the gap between the rip fence and the saw table. Always make and use and auxiliary fence - Ryobi RTS21 | User Manual - Page 23
be cut in the stock. Feed the stock only to the mark previously made at 6 in. Turn the saw OFF and allow the blade to completely stop rotating before removing the stock. Reset the rip fence and cut spaced rips into the workpiece to allow approximately 1/4 in. fingers and 1/8 in. spaces between the - Ryobi RTS21 | User Manual - Page 24
against the rip fence. Miter cuts are made with the wood at any angle to the blade other than 90°. The blade is vertical. Miter read and understand all sections of this operator's manual before attempting any operation. RIP CUT MITER CUT BEVEL CROSS support for the wood as it comes out of the saw. 24 - Ryobi RTS21 | User Manual - Page 25
by pushing the bevel lock lever down. TO ADJUST THE BEVEL INDICATOR See Figure 29. If the bevel indicator is not at zero when the saw blade is at 90°, adjust the indicator by loosening the screw and setting it at 0° on the bevel scale. Retighten the screw. GULLET TO DECREASE ANGLE - Ryobi RTS21 | User Manual - Page 26
the front rail to align the fence to the saw table. Push the locking lever down to align and secure the fence. Check for a smooth gliding action. If adjustments are needed, see To Check the Alignment of the Rip Fence to the Blade in the Adjustment section of this manual. Make two or three test - Ryobi RTS21 | User Manual - Page 27
should be located in the groove on the right so that the blade is tilted away from the miter gauge and your hands. The miter TABLE EXTENSION See Figure 32. Increase the length of the saw table by using the table extension. Set the rip fence to 14 in. Pull the front table locking lever toward - Ryobi RTS21 | User Manual - Page 28
the front of the saw. Turn adjusting bolt left or right until the blade is square. Tighten the locking bolts. Check again for squareness and continue to adjust if needed. WARNING: To reduce the risk of injury from kickback, align the rip fence to the blade following any blade adjustments. Always - Ryobi RTS21 | User Manual - Page 29
cause serious personal injury. SWITCH KEY Remove the rip fence. Set the blade to the correct depth for the workpiece. Set the miter gauge to 0° and tighten the lock knob. Make sure the wood is clear of the blade before turning on the saw. SWITCH IN LOCKED POSITION Fig. 37 To turn - Ryobi RTS21 | User Manual - Page 30
. Do not attempt a free hand taper cut on this saw. Failure to follow these instructions could result in serious personal injury. Set the blade to the correct depth for the workpiece. Position the rip fence the desired distance from the blade for the cut and securely lock the handle. Make - Ryobi RTS21 | User Manual - Page 31
correct depth for the workpiece. Position the rip fence the desired distance from the blade for the cut and securely lock the handle. Make sure the wood is clear of the blade before turning on the saw. When ripping a long workpiece, place a support the same height as the table surface behind - Ryobi RTS21 | User Manual - Page 32
guide it. Make sure the edge of the workpiece remains in solid contact with both the rip fence and the surface of the table. If ripping a narrow piece, use a push stick and/or push blocks to move the piece through the cut and past the blade. When the cut is made, turn the saw - Ryobi RTS21 | User Manual - Page 33
depth for the workpiece. Depending on the shape and size of the wood, use either the rip fence or miter gauge. Plug the saw into the power source and turn the saw on. Let the blade build up to full speed before moving the workpiece into the blade. Always use push blocks, push sticks, and/or - Ryobi RTS21 | User Manual - Page 34
make sure it turns freely then lower the blade. Depending on the shape and size of the wood, use either the rip fence or miter gauge. Turn the saw on. NOTE: Make sure the wood does not touch the blade before you turn on the saw. Let the blade build up to full speed before feeding the - Ryobi RTS21 | User Manual - Page 35
sure it turns freely. Lower the saw blade and reinstall the throat plate. NOTE: To replace the blade with an accessory blade, follow the instructions provided with the accessory. BLADE WRENCH ARBOR SHAFT BLADE THROAT PLATE 35 BLADE WRENCH Fig. 47 BLADE NUT BLADE WASHER Fig. 48 RIVING KNIFE - Ryobi RTS21 | User Manual - Page 36
blade on the right. The edge of the square and the saw blade should be parallel. NOTE: Make sure that the square contacts the flat part of the saw blade, not the blade service center. 0° ADJUSTMENT SCREW BLADE COMBINATION SQUARE HANDLE BEVEL INDICATOR BEVEL LOCKING LEVER Fig. 50 BLADE - Ryobi RTS21 | User Manual - Page 37
cuts on scrap wood. If the cuts are not true, repeat the process. BLADE LOCKING LEVER RIP FENCE BOLTS Fig. 52 MAINTENANCE WARNING: When servicing, use only identical replacement parts. Use of any other parts may create a hazard or cause product damage. WARNING: Always wear eye protection with - Ryobi RTS21 | User Manual - Page 38
recommended can result in serious personal injury. TROUBLESHOOTING PROBLEM CAUSE SOLUTION Excess vibration. Blade is out of balance. Blade is damaged. Saw is not mounted securely. Work surface is uneven. Blade is warped. Replace blade. Replace blade. Tighten all hardware. Reposition on flat - Ryobi RTS21 | User Manual - Page 39
TROUBLESHOOTING PROBLEM Saw does not make accurate 90˚ or 45˚ cuts. Height/bevel adjusting handwheel is hard to turn. Saw does not start. Blade makes poor cuts. Blade does not lower when turning height/bevel adjusting handwheel. Motor labors in rip cut. CAUSE SOLUTION Positive stops inside - Ryobi RTS21 | User Manual - Page 40
filter out microscopic particles. • PARTS AND SERVICE Prior to requesting service or purchasing replacement parts, please obtain your model and serial number from the product data plate. • MODEL NUMBER • SERIAL NUMBER • HOW TO OBTAIN REPLACEMENT PARTS: Replacement parts can be purchased online at
-
 1
1 -
 2
2 -
 3
3 -
 4
4 -
 5
5 -
 6
6 -
 7
7 -
8
-
9
-
10
-
11
-
12
-
13
-
14
-
15
-
16
-
17
-
18
-
19
-
20
-
21
-
22
-
23
-
24
-
25
-
26
-
27
-
28
-
29
-
30
-
31
-
32
-
33
-
34
-
35
-
36
-
37
-
38
-
39
-
40
 |
 |

OPERATOR’S MANUAL
10 in. TABLE SAW
RTS21/RTS21G
SAVE THIS MANUAL FOR FUTURE REFERENCE
Your table saw has been engineered and manufactured to our high standard for dependability, ease of operation, and
operator safety. When properly cared for, it will give you years of rugged, trouble-free performance.
WARNING:
To reduce the risk of injury, the user must read and understand the operator’s manual before using
this product.
Thank you for your purchase.