Ryobi RTS21 User Manual 5
Ryobi RTS21 Manual
 |
View all Ryobi RTS21 manuals
Add to My Manuals
Save this manual to your list of manuals |
Ryobi RTS21 manual content summary:
- Ryobi RTS21 | User Manual 5 - Page 1
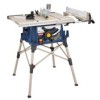
OPERATOR'S MANUAL 10 in. TABLE SAW RTS20 Your table saw has been engineered and manufactured to our high standard for dependability, ease of operation, and operator safety. When properly cared for, it will give you years of rugged, trouble-free performance. WARNING: To reduce the risk of injury, the - Ryobi RTS21 | User Manual 5 - Page 2
Glossary of Terms...9 Features...10-13 Tools Needed ...13 Loose Parts...14 Assembly...15-21 Operation...22-35 Adjustments...36-38 Maintenance...38 Accessories...39 Troubleshooting...39-40 Parts Ordering/Service...Back Page INTRODUCTION This tool has many features for making its - Ryobi RTS21 | User Manual 5 - Page 3
any other conditions that may affect its operation. A guard or other part that is damaged must be properly repaired or replaced by an authorized service center to avoid risk of personal injury. USE THE RIGHT DIRECTION OF FEED. Feed work into a blade or cutter against the direction of rotation of - Ryobi RTS21 | User Manual 5 - Page 4
guide when ripping. SUPPORT LARGE PANELS. To minimize risk of blade pinching and kickback, always support large panels. REMOVE ALL FENCES AND AUXILIARY TABLES before transporting saw. Failure to do so can result in an accident causing possible serious personal injury. ALWAYS USE BLADE GUARD - Ryobi RTS21 | User Manual 5 - Page 5
"freehand" which means using only your hands to support or guide the workpiece. Always use either the rip fence or miter gauge to position and guide the work. NEVER stand or have any part of your body in line with the path of the saw blade. NEVER reach behind, over, or within three inches - Ryobi RTS21 | User Manual 5 - Page 6
you to operate the tool better and safer. Safety Alert Read Operator's Manual Eye Protection No Hands Symbol Indicates a potential personal injury hazard. To to comply with ANSI Z87.1. Failure to keep your hands away from the blade will result in serious personal injury. V A Hz W min no .../min - Ryobi RTS21 | User Manual 5 - Page 7
CENTER for repair. When servicing, use only identical replacement parts. WARNING: To avoid serious personal injury, do not attempt to use this product until you read thoroughly and understand completely the operator's manual. If you do not understand the warnings and instructions in the operator - Ryobi RTS21 | User Manual 5 - Page 8
16 16 14 12 10 - **Used on 12 gauge - 20 amp circuit. NOTE: AWG = American Wire Gauge When working with the tool outdoors, use an extension service personnel if the grounding instructions are not completely understood, or if in doubt as to whether the tool is properly grounded. Repair or replace - Ryobi RTS21 | User Manual 5 - Page 9
workpiece by holding it securely against the table or fence during any ripping operation. FPM or SPM Feet per minute (or strokes per minute), used in reference to blade movement. Freehand Performing a cut without the workpiece being guided by a fence, miter gauge, or other aids. Gum A sticky, sap - Ryobi RTS21 | User Manual 5 - Page 10
Depth at 0 3-1/4 in. Cutting Depth at 45 2-1/2 in. ANTI-KICKBACK PAWLS OUTFEED SUPPORT MITER GAUGE BLADE SPREADER/ GUARD RIVING KNIFE BLADE WRENCH STORAGE RIP FENCE SLIDING TABLE EXTENSION SCALE TABLE LOCKING LEVER LOCKING LEVER FRONT RAIL STORAGE BRACKET(S) BEVEL SCALE BEVEL LOCKING - Ryobi RTS21 | User Manual 5 - Page 11
exact angle for a miter cut. MITER GAUGE GROOVES - The miter gauge rides in the grooves on the saw table. OUTFEED SUPPORT - This table extension at the back of the tool gives the operator additional support when cutting long workpieces. RIP FENCE - A sturdy metal fence guides the workpiece and is - Ryobi RTS21 | User Manual 5 - Page 12
manual for the basic cuts: cross cuts, miter cuts, bevel cuts, and compound cuts. The rip fence is used to position work for lengthwise cuts. A scale on the front rail shows the distance between the rip fence and the blade. It is very important to use the blade guard assembly for all through-sawing - Ryobi RTS21 | User Manual 5 - Page 13
in. carbide-tipped combination blade provided with your saw. Additional blade styles of the same blades rated less than the speed of this tool. Failure to heed this warning could result in personal injury. TOOLS NEEDED The following tools (not included or drawn to scale) are needed for assembly - Ryobi RTS21 | User Manual 5 - Page 14
-Kickback Pawls 1 B. Blade Guard 1 C. Miter Gauge 1 D. Blade Wrench 2 E. Handle Assembly 1 F. Rip Fence 1 G. Push Stick 1 Fig. 5 H. Indicator 1 I. Screw 2 J. Quick Stand™ (Leg Stand 1 K. Sliding Table Assembly 1 L. Dust Bag 1 M. Hex Key (3 mm, 5 mm 2 N. Switch Key 1 O. End Cap - Ryobi RTS21 | User Manual 5 - Page 15
and the motor by first beveling the blade (see page 26). The saw is factory set for accurate cutting. After assembling it, check for accuracy. If shipping has influenced the settings, refer to specific procedures explained in this manual. If any parts are damaged or missing, please call 1-800 - Ryobi RTS21 | User Manual 5 - Page 16
ASSEMBLY RED INDICATOR V SLOT Fig. 6 MOUNTING THE TABLE SAW BASE TO THE QUICK STAND™ See Figure 8. Place the table saw base on the leg stand. Position the locking knob over the holes in the top of the leg stand. Insert the screw on the locking knob into the hole and turn the locking knob - Ryobi RTS21 | User Manual 5 - Page 17
ASSEMBLY TO REMOVE/REPLACE THE THROAT PLATE See Figure 10. Lower the blade by turning the height/bevel adjusting handwheel counterclockwise. To remove the throat plate, place your index finger in the hole and lift the front end pulling the throat plate out toward the front of the saw. To - Ryobi RTS21 | User Manual 5 - Page 18
tightened. Do not overtighten. Reinstall the throat plate. Check all clearances for free blade rotation. TO INSTALL THE ANTI-KICKBACK PAWLS AND BLADE GUARD See Figures 13 - 15. BLADE WRENCH PAWL HANDLE BUTTON ANTI-KICKBACK PAWLS BLADE GUARD WARNING: Replace dull or damaged anti-kickback pawls - Ryobi RTS21 | User Manual 5 - Page 19
the Spreader/Riving Knife and Saw Blade. Check the blade guard assembly for clearances and free movement. TO CHECK AND ALIGN THE SPREADER/RIVING KNIFE AND SAW BLADE See Figure 16. To check alignment of the spreader/riving knife: Unplug the saw. Raise the saw blade by turning the height/bevel - Ryobi RTS21 | User Manual 5 - Page 20
THE SLIDING TABLE ASSEMBLY See Figures 17 - 18. To install sliding table assembly: Locate the sliding table assembly. Unlock the front and back table locking levers. Insert sliding table assembly into table locking levers. Push the table assembly until it rests against the saw table and is - Ryobi RTS21 | User Manual 5 - Page 21
the dust chute on the back of the table saw. NOTE: For efficient operation, empty the dust bag before it is half full. This will permit better air flow through the bag. DUST CHUTE BLADE WRENCHES ELBOW DUST BAG Fig. 19 TO STORE THE TABLE SAW ACCESSORIES See Figures 20 - 21. The table saw has - Ryobi RTS21 | User Manual 5 - Page 22
to resist kickback should it occur. Never stand directly in line with the blade. Use of a featherboard will help hold the workpiece securely against the saw table or fence. Clean the saw, blade guard, under the throat plate, and any areas where saw dust or scrap workpieces may gather. Use the - Ryobi RTS21 | User Manual 5 - Page 23
and resting firmly on the saw table. From the back side of the rip fence, secure the wood to the fence using 1-3/4 in. wood screws. HOW TO MAKE A JIG (FOR RIP CUTTING NARROW WORKPIECE) See Figure 24. If ripping a narrow workpiece places the hands too close to the blade, it will be necessary to - Ryobi RTS21 | User Manual 5 - Page 24
securely against the table or fence. Featherboards are miter cuts). Prepare the saw for ripping as discussed on page 31. Set the rip fence to allow approximately a 1/4 in. "finger" to be cut in the stock. Feed the stock only to the mark previously made at 6 in. Turn the saw OFF and allow the blade - Ryobi RTS21 | User Manual 5 - Page 25
wood rides firmly against the rip fence. Miter cuts are made with the wood at any angle to the blade other than 90°. The blade is vertical. Miter cuts tend to "creep" during cutting. This can be controlled by holding the workpiece securely against the miter gauge. Bevel cuts are made with an - Ryobi RTS21 | User Manual 5 - Page 26
the bevel lock lever to the left. TO ADJUST THE BEVEL INDICATOR See Figure 30. If the bevel indicator is not at zero when the saw blade is at 90°, adjust the indicator by loosening the screw and setting it at 0° on the bevel scale. Retighten the screw. GULLET TO INCREASE ANGLE - Ryobi RTS21 | User Manual 5 - Page 27
the table, tighten the clamp screw on the rear of the rip fence by turning it clockwise. TO SET THE RIP FENCE SCALE INDICATOR TO THE BLADE See Figure 31. Use the indicator on the rip fence to position the fence along the scale on the front rail. NOTE: The anti-kickback pawls and blade guard assembly - Ryobi RTS21 | User Manual 5 - Page 28
for cutting long workpieces. With the table saw in the OFF position, stand behind the saw. Grasp the outfeed support with both hands and pull it until it is fully extended. MITER GAUGE MITER GAUGE BODY MITER GAUGE REVERSED SLIDING TABLE EXTENSION OUTFEED SUPPORT LOCK KNOB Fig. 32 Fig. 33 - Ryobi RTS21 | User Manual 5 - Page 29
reduce the risk of injury from kickback, align the rip fence to the blade following any blade adjustments. Always make sure the rip fence is parallel to the blade before beginning any operation. ADJUSTING SCREWS (2) RIGHT MITER GAUGE GROOVE COMBINATION SQUARE COMBINATION SQUARE Fig. 36 Fig. 37 - Ryobi RTS21 | User Manual 5 - Page 30
39 - 40. SWITCH ON SWITCH OFF Fig. 39 WARNING: Make sure the blade guard assembly is installed and working properly to avoid serious possible injury. SWITCH KEY WARNING: Using the rip fence as a cutoff gauge when cross cutting will result in kickback which can cause serious personal injury - Ryobi RTS21 | User Manual 5 - Page 31
cut is made, turn the saw off. Wait for the blade to come to a complete stop before removing the workpiece. MAKING A MITER CUT See Figure 42. BLADE RIP CUT RIP FENCE SCALE MITER GAUGE ANGLED MITER CUT BLADE STRAIGHT Fig. 41 WARNING: Make sure the blade guard assembly is installed and working - Ryobi RTS21 | User Manual 5 - Page 32
the blade guard assembly is installed and working properly to avoid serious personal injury. VIEWED FROM THE FRONT, BELOW THE TABLE SAW TO LOOSEN BEVEL LOCKING LEVER HEIGHT/BEVEL ADJUSTING HANDWHEEL TO TIGHTEN BLADE ANGLED Fig. 43 BEVEL CROSS CUT MITER GAUGE STRAIGHT WARNING: The rip fence - Ryobi RTS21 | User Manual 5 - Page 33
made, turn the saw off. Wait for the blade to come to a complete stop before removing the workpiece. MAKING A COMPOUND (BEVEL) MITER CUT See Figure 46. WARNING: Make sure the blade guard assembly is installed and working properly to avoid possible serious injury. Remove the rip fence. Unlock the - Ryobi RTS21 | User Manual 5 - Page 34
blade guard assembly is installed and working properly to avoid possible serious injury. SUPPORT WARNING: Never make freehand cuts (cuts without the miter gauge or rip fence). Unguided workpieces can result in serious injury. Place a support the same height as the top of the saw table behind - Ryobi RTS21 | User Manual 5 - Page 35
procedure (see the Accessories section of this manual and check with the retailer where the table saw was purchased). All blades and dado sets must not be rated less than the speed of this tool. This saw is designed for 5/8 in. dado cuts. With the purchase of an optional dado throat plate, it can be - Ryobi RTS21 | User Manual 5 - Page 36
table saw has saw blade and reinstall the throat plate. NOTE: To replace the blade with an accessory blade, follow the instructions provided with the accessory. BLADE WRENCH BLADE WRENCH ARBOR SHAFT BLADE Fig. 50 BLADE WASHER BLADE NUT THROAT PLATE Fig. 51 SPREADER / RIVING KNIFE BLADE - Ryobi RTS21 | User Manual 5 - Page 37
factory and, unless damaged in shipping, should not require setting during assembly. After extensive use, they may need to be checked. Unplug the saw. Raise the blade. Remove the blade guard assembly. If the blade is not perfectly vertical (0°): Unlock the bevel locking lever. Loosen the - Ryobi RTS21 | User Manual 5 - Page 38
check all clamps, nuts, bolts, and screws for tightness and condition. Make sure the throat plate is in good condition and in position. Check the blade guard assembly. To maintain the table surfaces, fence, and rails, periodically apply paste wax to them and buff to provide smooth functioning - Ryobi RTS21 | User Manual 5 - Page 39
attachments or accessories not recommended can result in serious personal injury. TROUBLESHOOTING PROBLEM CAUSE SOLUTION Excess vibration. Blade is out of balance. Blade is damaged. Saw is not mounted securely. Work surface is uneven. Blade is warped. Replace blade. Replace blade. Tighten all - Ryobi RTS21 | User Manual 5 - Page 40
damaged. Adjust positive stops. Adjust the miter gauge. Clean the gears or screw post. Plug in motor cord or wall cord. Replace circuit fuse. Reset circuit breaker. Have the cord or switch replaced at your nearest authorized service center. Blade is dull or dirty. Blade is wrong type for cut being - Ryobi RTS21 | User Manual 5 - Page 41
NOTES 41 - Ryobi RTS21 | User Manual 5 - Page 42
, such as those dust masks that are specially designed to filter out microscopic particles. • PARTS AND SERVICE Prior to requesting service or purchasing replacement parts, please obtain your model and serial number from the product data plate. • MODEL NUMBER RTS20 • SERIAL NUMBER • HOW
-
 1
1 -
 2
2 -
 3
3 -
 4
4 -
 5
5 -
 6
6 -
 7
7 -
8
-
9
-
10
-
11
-
12
-
13
-
14
-
15
-
16
-
17
-
18
-
19
-
20
-
21
-
22
-
23
-
24
-
25
-
26
-
27
-
28
-
29
-
30
-
31
-
32
-
33
-
34
-
35
-
36
-
37
-
38
-
39
-
40
-
41
-
42
 |
 |
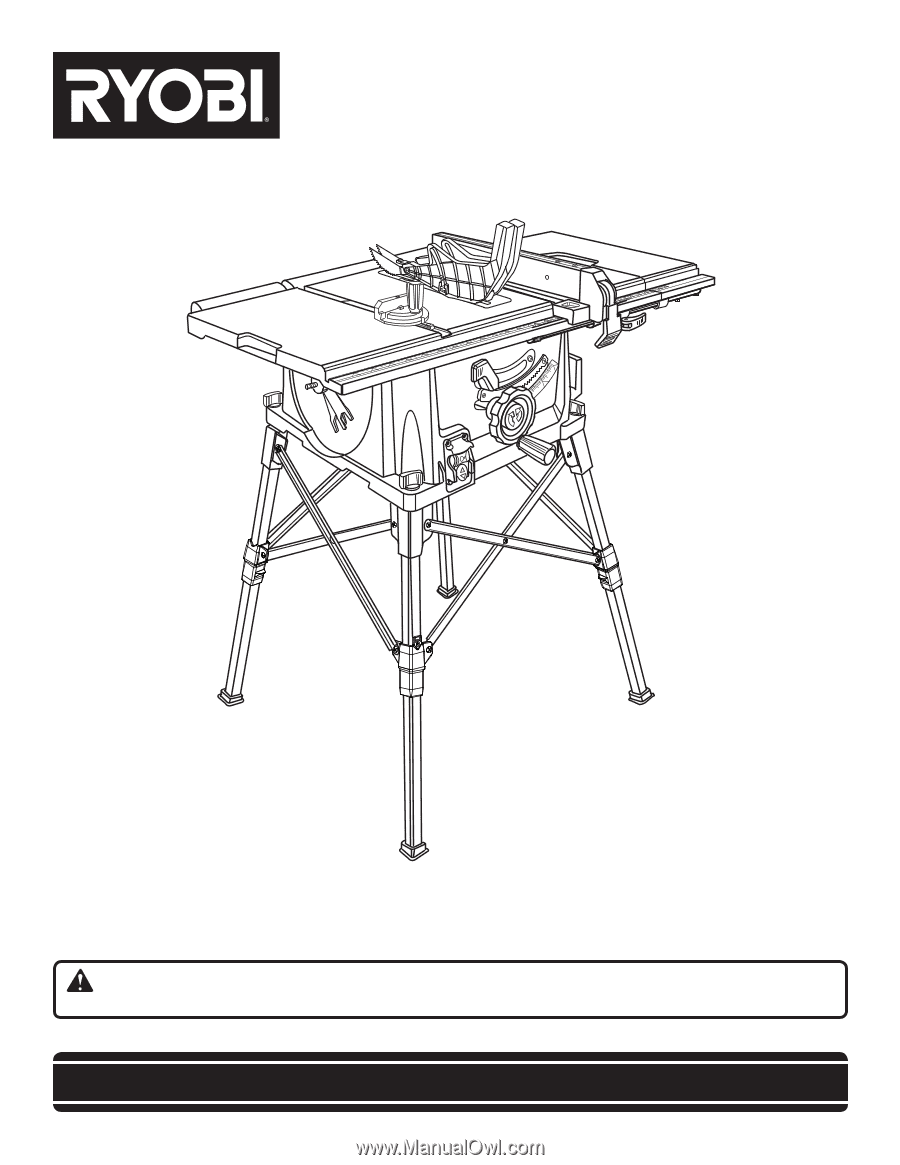
OPERATOR’S MANUAL
10 in. TABLE SAW
RTS20
SAVE THIS MANUAL FOR FUTURE REFERENCE
You
r table saw h
as been engineered and manufactured to our high standard for dependability, ease of operation, and
operator safety. When properly cared for, it will give you years of rugged, trouble-free performance.
WARNING:
To reduce the risk of injury, the user must read and understand the operator’s manual before using
this product.
Thank you for your purchase.