Ryobi SC164VS English Manual
Ryobi SC164VS Manual
 |
View all Ryobi SC164VS manuals
Add to My Manuals
Save this manual to your list of manuals |
Ryobi SC164VS manual content summary:
- Ryobi SC164VS | English Manual - Page 1
OPERATOR'S MANUAL 16 in. SCROLL SAW VARIABLE SPEED SC164VS 15 0 Your scroll saw has been engineered and manufactured to our high standard for dependability, ease of operation, and operator safety. When properly cared for, it will give you years of rugged, trouble-free performance. WARNING: To reduce - Ryobi SC164VS | English Manual - Page 2
on to www.ryobitools.com. When you request warranty service, you must also present proof of purchase documentation, which includes the date of purchase (for example, a bill of sale). We will repair any faulty workmanship, and either repair or replace any defective part, at our option. We will do so - Ryobi SC164VS | English Manual - Page 3
servic- ing, or when changing attachments, blades, bits, cutters, etc., all tools should be disconnected from power source. READ ALL INSTRUCTIONS KNOW YOUR POWER TOOL. Read the operator's manual WORKSHOP CHILDPROOF with padlocks, master switches, or by removing starter keys. DON'T FORCE THE TOOL - Ryobi SC164VS | English Manual - Page 4
. WHEN SERVICING use only identical replacement parts. Use of any other parts may create a hazard or cause product damage. USE ONLY RECOMMENDED ACCESSORIES listed in this manual or addendums. Use of accessories that are not listed may cause the risk of personal injury. Instructions for safe use - Ryobi SC164VS | English Manual - Page 5
construction Revolutions, strokes, surface speed, orbits etc., per minute Wet Conditions Alert Do not expose to rain or use in damp locations. Read The Operator's Manual Eye Protection To reduce the risk of injury, user must read and understand operator's manual before using this product. Always - Ryobi SC164VS | English Manual - Page 6
CENTER for repair. When servicing, use only identical replacement parts. WARNING: To avoid serious personal injury, do not attempt to use this product until you read thoroughly and understand completely the operator's manual. If you do not understand the warnings and instructions in the operator - Ryobi SC164VS | English Manual - Page 7
conductor to a live terminal. Check with a qualified electrician or service personnel if the grounding instructions are not completely understood, or if in doubt as to whether the product is properly grounded. Repair or replace a damaged or worn cord immediately. This product is intended for - Ryobi SC164VS | English Manual - Page 8
is bent (or set) outward from the face of the blade. Snipe (planers) Depression made at either end of a workpiece by cutter blades when the workpiece is not properly supported. Through Sawing Any cutting operation where the blade extends completely through the thickness of the workpiece. Throw-Back - Ryobi SC164VS | English Manual - Page 9
No Load Speed 400-1,600 r/min. (SPM) Net Weight 28 lbs. BLADE TENSION KNOB SAWDUST BLOWER DROP FOOT LOCK KNOB SAW BLADE THROAT PLATE BLADE CLAMP SCREWS 30 DROP 15 FOOT 0 BEVEL SCALE TABLE LOCK KNOB SAW TABLE SWITCH AND SWITCH KEY SAWDUST EXHAUST VARIABLE SPEED KNOB MOTOR Fig. 2 9 - Ryobi SC164VS | English Manual - Page 10
to attach any 1-1/4 in. (32 mm) vacuum hose for easy sawdust collection. SAW TABLE WITH THROAT PLATE Your scroll saw has an aluminum saw table with tilt control for maximum accuracy. The throat plate, inserted in the saw table, allows for blade clearance. SWITCH AND SWITCH KEY Your scroll saw has - Ryobi SC164VS | English Manual - Page 11
• 3 mm T-Handle Hex Key • 4 mm Hex Key • Blade(s) • Plastic Tubing LOOSE PARTS 4 mm HEX KEY BLADE 3 mm T-HANDLE HEX KEY PLASTIC TUBING Fig. 4 WARNING: The use of attachments or accessories not listed might be hazardous and could cause serious personal injury. 11 - Ryobi SC164VS | English Manual - Page 12
assistance. WARNING: If any parts are damaged or missing, do not operate this product until the parts are replaced. Failure to heed this warning the washers and nuts from the underside of the bench. Supporting surface where scroll saw is mounted should be examined carefully after mounting to insure - Ryobi SC164VS | English Manual - Page 13
ASSEMBLY CLAMPING SCROLL SAW TO WORKBENCH See Figure 5. If the scroll saw is to be used in a portable application, it is recommended that you fasten it permanently to a mounting board that can easily be clamped to a workbench or other supporting surface. The mounting board should be of sufficient - Ryobi SC164VS | English Manual - Page 14
perpendicular or at right angle to the blade. Place a small square on the saw table next to the blade. Loosen the screw holding the scale indicator. Move indicator to the 0° mark and securely tighten screw. Remember, the bevel scale is a convenient guide but should not be relied upon for - Ryobi SC164VS | English Manual - Page 15
OPERATION OF THE SCROLL SAW Before starting a cut, watch the saw run. If you experience excessive vibration or unusual noise, stop immediately. Turn the saw off, remove the switch key, and unplug the saw. Do not restart until locating and correcting the problem. NOTE: After the saw is turned ON - Ryobi SC164VS | English Manual - Page 16
the workpiece. Bolt saw to the support surface to prevent slipping, walking or sliding during operations like cutting long, heavy boards. Turn saw off, remove switch key, and unplug cord from the power source before moving the saw. Do not remove jammed cutoff pieces until blade has come to - Ryobi SC164VS | English Manual - Page 17
amount of tension. Replace the throat plate. NOTE: If the blade touches the drop foot on either side then the drop foot must be adjusted. See section on Drop Foot. DROP FOOT LOCK KNOB BLADE CLAMP SCREW SAW BLADE THROAT PLATE SAW BLADE BLADE CLAMP SCREW Fig. 11 PLAIN END BLADES Turn off and - Ryobi SC164VS | English Manual - Page 18
results. Scroll saw blades generally stay sharp for 1/2 hour to 2 hours of cutting, depending on type of material and speed of operation. In cutting wood, best results are achieved when cutting wood less than one inch thick. When cutting wood thicker than one inch, the user must guide the - Ryobi SC164VS | English Manual - Page 19
wood. You must attach the stacked pieces of wood to each other so they will move on the table as a single piece of material. WORKPIECE WOOD PIECES 30 30 DRILL HOLE INTERIOR CUT 15 0 Fig. 13 TAPE 15 0 Fig. 14 MAINTENANCE WARNING: When servicing, use only identical replacement parts. Use of any - Ryobi SC164VS | English Manual - Page 20
on the other side of the saw in this same manner. MOTOR BRUSHES See Figure 16. The saw has externally accessible motor brush assemblies that should be checked periodically for wear. When one of the two brushes becomes worn, replace both brushes. Unplug the saw from the power source. Carefully - Ryobi SC164VS | English Manual - Page 21
TROUBLESHOOTING PROBLEM Motor will not run. CAUSE 1. Problem with ON-OFF switch, power cord, or outlet. 2. Motor defective. Blades breaking. 1. Too much tension. 2. Feeding too quickly. 3. Wrong blade. 4. Blade twisting in wood. Vibration (there is always some vibration when the saw is running - Ryobi SC164VS | English Manual - Page 22
OPERATOR'S MANUAL 16 in. SCROLL SAW VARIABLE SPEED SC164VS WARNING: Some dust created by power sanding, sawing, grinding, drilling, and other construction activities contains chemicals known to cause cancer, birth defects or other reproductive harm. Some examples of these chemicals are: • lead
-
 1
1 -
 2
2 -
 3
3 -
 4
4 -
 5
5 -
 6
6 -
 7
7 -
8
-
9
-
10
-
11
-
12
-
13
-
14
-
15
-
16
-
17
-
18
-
19
-
20
-
21
-
22
 |
 |
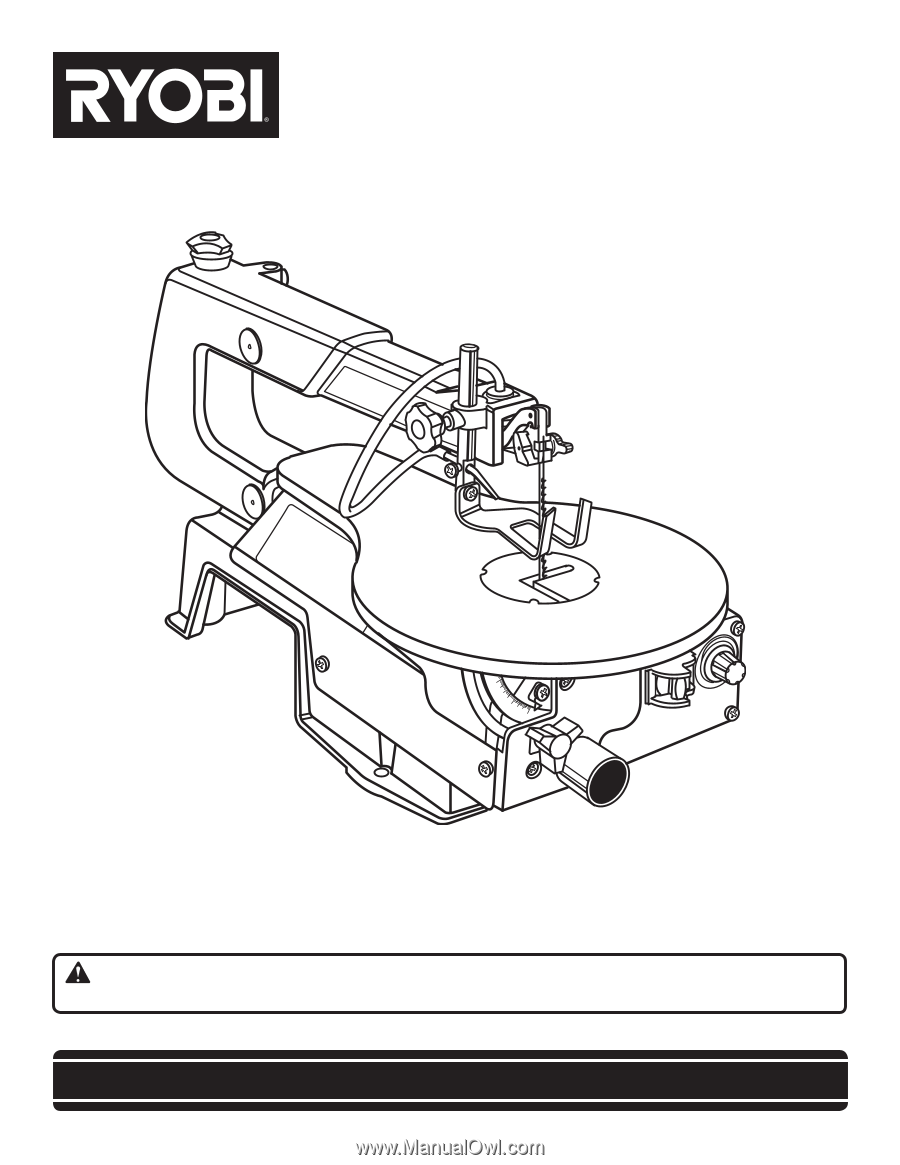
OPERATOR’S MANUAL
16 in. SCROLL SAW
VARIABLE SPEED
SC164VS
0
30
15
Your scroll saw has been engineered and manufactured to our high standard for dependability, ease of operation, and
operator safety. When properly cared for, it will give you years of rugged, trouble-free performance.
WARNING:
To reduce the risk of injury, the user must read and understand the operator’s manual before using
this product.
Thank you for your purchase.
SAVE THIS MANUAL FOR FUTURE REFERENCE