Ryobi TS1342L English Manual
Ryobi TS1342L Manual
 |
View all Ryobi TS1342L manuals
Add to My Manuals
Save this manual to your list of manuals |
Ryobi TS1342L manual content summary:
- Ryobi TS1342L | English Manual - Page 1
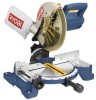
OPERATOR'S MANUAL 10 in. Compound Miter Saw TS1342L - Double Insulated Your miter saw has been engineered and manufactured to our high standard for dependability, ease of operation, and operator safety. When properly cared for, it will give you years of rugged, trouble-free performance. WARNING: To - Ryobi TS1342L | English Manual - Page 2
Safety Rules...3-4 Specific Safety Rules...4-5 Symbols...6-7 Electrical...8 Glossary of Terms...9 Features...10-12 Tools Needed...12 Loose Parts...13 Assembly...13-20 Operation...21-27 Adjustments...28 Maintenance...29-30 Parts Ordering / Service...32 INTRODUCTION This tool - Ryobi TS1342L | English Manual - Page 3
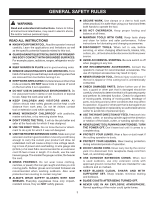
, fire and/or serious personal injury. READ ALL INSTRUCTIONS KNOW YOUR POWER TOOL. Read the operator's manual carefully. Learn the applications and limitations as well as the specific potential hazards related to this tool. GUARD AGAINST ELECTRICAL SHOCK by preventing body contact with grounded - Ryobi TS1342L | English Manual - Page 4
injury. Instructions for safe use of accessories are included with the accessory. DOUBLE CHECK ALL SETUPS. Make sure blade is tight and not making contact with saw or workpiece before connecting to power supply. SPECIFIC SAFETY RULES FIRMLY CLAMP OR BOLT your tool to a workbench or table at - Ryobi TS1342L | English Manual - Page 5
power (or unplug tool as applicable) before changing blade or servicing. h) No load speed. AVOID direct eye exposure when using the laser guide. This saw can tip over if the saw head is released suddenly and the saw is not secured to a work surface. ALWAYS secure this saw to a stable work - Ryobi TS1342L | English Manual - Page 6
speed, orbits etc., per minute Wet Conditions Alert Read The Operator's Manual Eye Protection Do not expose to rain or use in damp locations. To reduce the risk of injury, user must read and understand operator's manual before using this product. Always wear safety goggles or safety glasses with - Ryobi TS1342L | English Manual - Page 7
you read thoroughly and understand completely the operator's manual. If you do not understand the warnings and instructions in the operator's manual, do not use this product. Call Ryobi customer service for assistance. WARNING: The operation of any power tool can result in foreign objects being - Ryobi TS1342L | English Manual - Page 8
obstructions while you are working with a power tool. Failure to do so can result in serious personal injury. WARNING: Check extension cords before each use. If damaged replace immediately. Never use tool with a damaged cord since touching the damaged area could cause electrical shock resulting in - Ryobi TS1342L | English Manual - Page 9
help control the workpiece by guiding it securely against the table or fence during any ripping operation. FPM or SPM Feet per minute (or strokes per minute), used in reference to blade movement. Freehand Performing a cut without the workpiece being guided by a fence, miter gauge, or other aids. Gum - Ryobi TS1342L | English Manual - Page 10
blade wrench Upper Blade Guard "D" Handle DUST BAG Bevel Lock Knob Bevel Scale MITER Fence Miter Table BASE Switch Trigger Lower blade guard throat plate "NO HANDS ZONE" LABEL "NO HANDS ZONE" BOUNDARY LINE Miter Scale MITER LOCK PLATE CONTROL ARM Positive Stop(s) WORK CLAMP 10 Miter Lock - Ryobi TS1342L | English Manual - Page 11
BRAKE An electric brake has been provided to quickly stop blade rotation after the switch is released. LASER GUIDE For more accurate cuts, a laser guide is included with your miter saw. When used properly, the laser guide makes accurate, precision cutting simple and easy. MITER FENCE The miter fence - Ryobi TS1342L | English Manual - Page 12
the workpiece. SPINDLE LOCK BUTTON See Figure 3. The spindle lock button locks the spindle stopping the blade from rotating. Depress and hold the lock button while installing, changing, or removing blade. SWITCH TRIGGER See Figure 4. To prevent unauthorized use of the compound miter saw, disconnect - Ryobi TS1342L | English Manual - Page 13
LOOSE PARTS The following items are included with the tool: Miter Lock Handle Dust Bag Work Clamp DUST BAG Blade Wrench Operator's Manual MITER LOCK HANDLE BLADE WRENCH WORK CLAMP Fig. 6 WARNING: The use of attachments or accessories not listed might be hazardous and could cause - Ryobi TS1342L | English Manual - Page 14
compound miter saw without checking for interference between the blade and the miter fence. Damage could result to the blade if it strikes the miter fence during operation of the saw. WARNING: This saw can tip over if the saw head is released suddenly and the saw is not secured to a work surface - Ryobi TS1342L | English Manual - Page 15
dust bag for emptying, simply reverse the above procedure. WORK CLAMP See Figure 10. The work clamp provides greater control by clamping the workpiece to the fence or the saw table. It also prevents the workpiece from creeping toward the saw blade. This is very helpful when cutting compound miters - Ryobi TS1342L | English Manual - Page 16
saw blade inside lower blade guard and onto spindle. The blade teeth point downward at the front of saw as shown in figure 12. Replace laser guide. The double "D" flats on the blade washers align with the flats on the spindle. Depress spindle lock button and replace blade bolt. Note: The blade - Ryobi TS1342L | English Manual - Page 17
using the laser guide, you will be able to remove, cut, or leave your mark on the work surface. Practice will teach you the correct position for aligning the laser line with your mark. blade BOLT (hex. hd) LASER GUIDE Blade SCREW Blade Blade BOLT cover Inner Blade Washer Lower blade guard - Ryobi TS1342L | English Manual - Page 18
in this manual show only portions of the compound miter saw. This is intentional so that we can clearly show points being made in the illustrations. Never operate the saw without all guards securely in place and in good operating condition. SQUARING THE MITER TABLE TO THE FENCE See Figures - Ryobi TS1342L | English Manual - Page 19
miter lock plate and securely tighten the miter lock handle. Lay a framing square flat on the miter table. Place one leg of the square against the fence. Slide the other leg of the square against the flat part of saw blade. Note: Make sure that the square contacts the flat part of the saw blade - Ryobi TS1342L | English Manual - Page 20
The saw has two scale indicators, one on the bevel scale and one on the miter scale. After squaring adjustments have been made, it may be necessary to loosen the indicator screws and reset them to zero. BEVEL LOCK KNOB miter FENCE Blade Miter lock plate Combination SQUARE MITER TABLE Miter lock - Ryobi TS1342L | English Manual - Page 21
shields when operating power tools. Failure to do so could result in objects being thrown into your eyes resulting in possible serious injury. CUTTING WITH YOUR Compound MITER SAW WARNING: When using a work clamp or C-clamp to secure the workpiece, clamp workpiece on one side of the blade only. The - Ryobi TS1342L | English Manual - Page 22
, support the opposite end of the stock with a roller stand or with a work surface level with the saw table. See Figure 30. Align cutting line on workpiece with edge of saw blade. Grasp the stock firmly with one hand and secure it against the fence. Use the optional work clamp or a C-clamp to - Ryobi TS1342L | English Manual - Page 23
trigger and allow the saw blade to stop rotating before raising the blade out of workpiece. Wait until the electric brake stops blade from turning before removing the workpiece from miter table. to Compound Miter Cut See Figure 28. A compound miter cut is a cut made using a miter angle and a bevel - Ryobi TS1342L | English Manual - Page 24
be placed along the workpiece so it does not sag. The support should let the workpiece lay flat on the base of the saw and work table during the cutting operation. Use the optional work clamp or a C-clamp to secure the workpiece. 45° x 45° COMPOUND MITER CUT Fig. 29 Long workpiece Workpiece - Ryobi TS1342L | English Manual - Page 25
OPERATION CUTTING COMPOUND MITERS To aid in making the correct settings, the compound angle setting chart below has been provided. Since compound 3.53° B- 2.94° M- 44.56° M- 35.58° B- 7.05° B- 5.86° M- 44.01° M- 35.06° B- 10.55° B- 8.75° M- 43.22° M- 34.32° B- 14.00° B- 11.60° M- 42.19° M- 33.36° - Ryobi TS1342L | English Manual - Page 26
is placed flat on the miter table using the compound features of your miter saw. 52° 38° ceiling w a l l Fence inside corner Top edge against fence = LEFT SIDE, INSIDE CORNER RIGHT SIDE, OUTSIDE CORNER MITER Table Fence outside corner BOTTOM edge against fence = RIGHT SIDE, INSIDE CORNER - Ryobi TS1342L | English Manual - Page 27
OPERATION Bevel Angle Setting 33.85° 33.85° 33.85° 33.85° Type of Cut Left side, inside corner 1. Top edge of molding against fence 2. Miter table set right 31.62° 3. Save left end of cut Right side, inside corner 1. Bottom edge of molding against fence 2. Miter table set left 31.62° 3. Save left - Ryobi TS1342L | English Manual - Page 28
miter table as described in the Assembly section of this manual. Retighten bevel lock knob. Next, retighten lock nut securing the positive stop adjustment screw. Recheck blade-to-table alignment. Note: The above procedure can be used to check blade squareness of the saw blade to the miter table - Ryobi TS1342L | English Manual - Page 29
: When servicing, use only identical replacement parts. Use of any other parts may create a hazard or cause product damage. Brush Cap Brush Assembly WARNING: Always wear safety goggles or safety glasses with side shields during power tool operation or when blowing dust. If operation is dusty - Ryobi TS1342L | English Manual - Page 30
the laser guide is mounted on the saw. After cleaning the laser guide and replacing the batteries, secure the laser guide cover to laser guide support using the two screws. For proper assembly, be sure to align the key on the laser guide cover with the key slot in the laser guide support. Tighten - Ryobi TS1342L | English Manual - Page 31
NOTES 31 - Ryobi TS1342L | English Manual - Page 32
OPERATOR'S MANUAL 10 in. Compound Miter Saw TS1342L - Double Insulated WARNING: Some dust created by power sanding, sawing, PARTS When ordering repair parts, always give the following information: • MODEL NUMBER TS1342L • SERIAL NUMBER Ryobi® is a registered trademark of Ryobi Limited used
-
 1
1 -
 2
2 -
 3
3 -
 4
4 -
 5
5 -
 6
6 -
 7
7 -
8
-
9
-
10
-
11
-
12
-
13
-
14
-
15
-
16
-
17
-
18
-
19
-
20
-
21
-
22
-
23
-
24
-
25
-
26
-
27
-
28
-
29
-
30
-
31
-
32
 |
 |

SAVE THIS MANUAL FOR FUTURE REFERENCE
OPERATOR’S MANUAL
10 in. Compound Miter Saw
TS1342L - Double Insulated
Your miter saw has been engineered and manufactured to our high standard for dependability, ease of operation, and
operator safety. When properly cared for, it will give you years of rugged, trouble-free performance.
WARNING:
To reduce the risk of injury, the user must read and understand the operator’s manual before using
this product.
Thank you for your purchase.