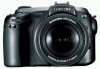
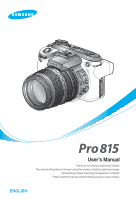
Samsung 120815 User Manual
Samsung 120815 - Digimax Pro 815 8MP Digital Camera Manual
 |
UPC - 044701005667
View all Samsung 120815 manuals
Add to My Manuals
Save this manual to your list of manuals |
Samsung 120815 manual content summary:
- Samsung 120815 | User Manual - Page 1
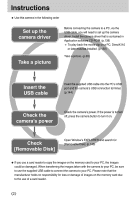
User's Manual Thank you for buying a Samsung Camera. This manual will guide you through using the camera, including capturing images, downloading images and using the application software. Please read this manual carefully before using your new camera. ENGLISH - Samsung 120815 | User Manual - Page 2
Instructions ƈ Use this camera in the following order Set up the camera driver Take a picture Before connecting the camera to a PC, via the USB cable, you will need to set up the camera driver. Install the camera driver that is contained in Application software CD-ROM. (p.138) ſ To play back the - Samsung 120815 | User Manual - Page 3
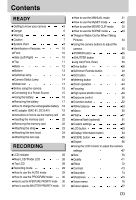
using the camera 15 ƈConnecting to a Power Source 15 ƈUsing the battery 16 ƈRemoving the battery 17 ƈHow to charge the rechargeable battery 18 ƈAC adapter (SAC-81, DC 8.4V) 19 ƈInstructions on how to use the memory card 20 ƈInserting the memory card 22 ƈRemoving the memory card 22 - Samsung 120815 | User Manual - Page 4
indicator 130 ƃBefore contacting a service centre 131 ƃSpecifications 134 SOFTWARE ƃSoftware Notes 136 ƃSystem Requirements 136 ƃAbout the software 137 ƃSetting up the application software 138 ƃStarting PC mode 144 ƃRemoving the USB Driver for Windows 98SE 147 ƃRemovable Disk 149 - Samsung 120815 | User Manual - Page 5
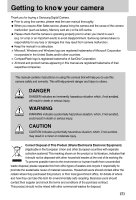
Getting to know your camera Thank you for buying a Samsung Digital Camera. ƃ Prior to using this camera, please read the user manual thoroughly. ƃ When you require After Sales service, please bring the camera and the cause of the camera malfunction (such as battery, Memory card etc.) to the A/S - Samsung 120815 | User Manual - Page 6
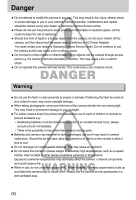
must contact your dealer or Samsung Camera Service centre. Do not continue to use the camera as this may cause a fire or electric shock. ƈ Do not insert or drop metallic or inflammable foreign objects into the camera through access points e.g. the memory card slot and battery chamber. This may cause - Samsung 120815 | User Manual - Page 7
body. Do not drop or press the lens by force. It may cause a camera malfunction. ƈ Do not pull the lens by hand or do not rotate the zoom ring quickly. It may cause a camera malfunction. Please be careful when using the lens. ƈ Do not extract the external flash from the camera by force. It may cause - Samsung 120815 | User Manual - Page 8
Camera case Remote control User manual, Warranty card Camera strap Software (p.137) DPOF compatible printer (see p.103) CF (CompactFlash) card (p.20) Flash plate Exclusive bounce flash Lens adapter Lens hood Lens cap AC adapter ŝ8Ş AC cord Battery charger Rechargeable battery (SLB-1974 - Samsung 120815 | User Manual - Page 9
) USB cable AV cable System Requirements For Windows ҮPC with processor better than Pentium II 450MHz (Pentium 700MHz or better is recommended) ҮWindows 98/ 98SE/ 2000/ ME/ XP Ү space ҮUSB port ҮCD-ROM drive External monitor Yellow cable - Video, White/ Red colour - Stereo voice (see p.121) ŝ9Ş - Samsung 120815 | User Manual - Page 10
lamp Microphone Lens Side (Left/ Right) AF lock(AF-L) button Pop-up flash (OPEN) button/ Flash compensation button High Speed shutter (HS) button Remote control sensor Flash Focus area selection (AF-A) button Focus mode selection button Speaker Connector cover Side (Left) ŝ10Ş Memory card slot - Samsung 120815 | User Manual - Page 11
Identification of features Top Flash Hot shoe Flash status lamp ISO button Metering button Top LCD Hot shoe cap Zoom ring Zoom scale indicator Focus ring EVC (Exposure Value Compensation) ring Shutter button Drive button Mode dial Speaker Power button/ Power lamp Self-timer button ŝ11Ş - Samsung 120815 | User Manual - Page 12
WV Connector cover SCENE/ Delete button Rear Jog dial (JOG 2) AE Lock (AE-L) button/ Thumbnail button Strap eyelet Card in use lamp Digital zoom/ Enlargement button Memory card slot cover 5-function button Play mode button Connectors Memory card slot AV port USB connector port DC-in port ŝ12 - Samsung 120815 | User Manual - Page 13
Identification of features Bottom Battery chamber cover & lock Tripod socket Battery chamber Diopter adjustment ring Battery chamber Battery holder ŝ13Ş - Samsung 120815 | User Manual - Page 14
seconds later a second picture will be taken. ƈ Camera Status Lamp Lamp Power lamp Flash status lamp Card in use lamp Colour Green Red Red Status On complete (Pressing the shutter button half way down) The flash is being charged When the memory card is being used PC mode - When the data is - Samsung 120815 | User Manual - Page 15
SLB-1974 Lithium Ion 7.4V, 1900mAh Approx. 180MIN (Using the SBC-L4) ſ To buy the exclusive AC adapter (SAC-81, DC 8.4V 1.5A), contact your nearest Samsung dealer or Samsung service centre. CAUTION ƃ Please ensure that you use the exclusive battery with the correct specification for the camera - Samsung 120815 | User Manual - Page 16
Before using the camera Using the battery : If the camera does not turn on after you have inserted battery, please check whether the battery is inserted with the correct polarity (+/-). 1. Turn the battery chamber lock in the direction of the arrow (OPEN) and open the battery chamber cover. 2. - Samsung 120815 | User Manual - Page 17
experience reduced battery life. ƃ The battery will usually recover at normal temperatures. ƃ During extended use of the camera, the camera body may become warm. This is perfectly normal. ƃ If the battery has low capacity, the camera power will not be turned on. In this case, change the battery with - Samsung 120815 | User Manual - Page 18
using the camera ƈ How to charge the rechargeable battery 1. Plug the AC cord's power plug into the wall outlet and insert the AC cord into the charger. 2. Place the battery in the charger as shown. ſ If the charging LED doesn't blink as red or blinks as yellow, please check whether the battery is - Samsung 120815 | User Manual - Page 19
this is not camera malfunction. ƃ Samsung warrants the charger for a period of one year and the Lithium Ion battery for a camera nor adapter comes into contact with water or metallic materials. ƃ Please ensure that you use an AC adapter (SAC-81, DC 8.4V) with the correct specification for the camera - Samsung 120815 | User Manual - Page 20
the memory card in its case when not in use. ƃ During and after periods of extended use, you may notice that the memory card is warm. This is perfectly normal. ƃ Do not use a memory card that is used in another digital camera. To use the memory card in this camera, first format the memory card by - Samsung 120815 | User Manual - Page 21
Before using the camera INFORMATION ƃ When the memory card slot cover opens, the camera can't be turned on by pressing the power button. ƃ Don't remove the memory card when the Card in use lamp is blinking as this may cause damage to data in the memory card. ƃ If the memory card slot cover is opened - Samsung 120815 | User Manual - Page 22
then insert it correctly. Do not insert the memory card the wrong way round. Doing so may damage the memory card slot. Removing the memory card 1. Turn off the camera power by using the power button. Open the memory card slot cover. Press the memory card eject lever and the lever will pop up. Press - Samsung 120815 | User Manual - Page 23
Before using the camera Attaching the strap 1. Thread the strap through the strap eyelet on the camera as shown alongside. 2. Thread the strap back through the strap ring as shown alongside. 3. Fasten the strap as shown. 4. Repeat steps 1 ~ 3 to attach the other - Samsung 120815 | User Manual - Page 24
or bright lighting conditions, the image quality may be deteriorated caused by unnecessary light. In this case, use the lens hood. 1. Attach the lens adapter to the camera by turning the lens adapter clockwise as shown alongside. ſ You can use a general purpose filter (Ґ72mm) after attaching the - Samsung 120815 | User Manual - Page 25
Before using the camera Attaching the lens cap ƈ When you don't use the camera, attach the lens cap. You can attach the lens cap as show below. ŝ25Ş - Samsung 120815 | User Manual - Page 26
LCD. ؓ ؒؑ ؐ ۇۆ [ Image & Full status ] No. Description 1 Drive modes 2 Image size 3 Self-timer/ Remote control 4 Metering 5 Battery status 6 High speed shutter mode/Camera shake warning 7 Voice memo 8 Contrast 9 Saturation 10 Image quality 11 Sharpness 12 - Samsung 120815 | User Manual - Page 27
LCD indicator 14 Direct MF 15 Focal length/ Digital zoom 16 Exposure compensation 17 Flash power compensation 18 Date imprint 19 Flash 20 Macro 21 White balance 22 ISO 23 Aperture value 24 Shutter speed 25 Colour space 26 Recording mode 27 Number of available shots remaining - Samsung 120815 | User Manual - Page 28
No. Description 1 Recording mode 2 ISO 3 Shutter speed 4 Camera shake warning 5 Exposure lock 6 Aperture value 7 Saturation 8 Sharpness 9 Image size 10 Image quality 11 Number of shots remaining 12 Drive mode 13 Metering 14 Battery status 15 Macro 16 Focal length ŝ28 - Samsung 120815 | User Manual - Page 29
23 Flash p.47~48 p.73 p.50 p.58 p.40~41 p.53~54 p.57~60 Recording mode ƈ How to use the AUTO ( ) mode Please select this mode for quick and easy picture taking with minimal user interaction. 1. Insert the battery and memory card. (p.16, 22) 2. Press the power button to turn on the camera - Samsung 120815 | User Manual - Page 30
Recording mode ƈ How to use the PROGRAM mode ( ) Selecting the program mode will configure the camera with optimal settings. You can still manually configure all functions except the aperture value and shutter speed. Step 1~2 are the same as those for AUTO mode. 3. Select the PROGRAM mode by - Samsung 120815 | User Manual - Page 31
on the brightness of the object by automatic aperture value setting in the camera. Steps 1~2 are the same as those for AUTO mode. 3. active' effect. [ Shutter Priority mode ] ƈ How to use the MANUAL mode ( ) The user can manually set both the aperture value and the shutter speed. Steps 1~2 are - Samsung 120815 | User Manual - Page 32
This mode allows users to save frequently used a confirmation window will display. Select the [Yes] menu and press the OK button to load the camera configuration saved recorded for as long as the available recording time of the memory capacity allows. (A movie clip sets as 640X480 movie size and - Samsung 120815 | User Manual - Page 33
Please see page 65 for detailed descriptions for each scene. 6. The current scene icon is displayed at the top right of the LCD. 7. Point the camera towards the subject and compose the image by using the LCD. 8. Press the shutter button to capture an image. [ SCENE mode ] [ Night scene mode ] ŝ33 - Samsung 120815 | User Manual - Page 34
camera shake warning indicator ( ) may appear on the LCD. In this case, use a tripod, support the camera on a solid surface or change the flash mode to flash Avoid obstructing the lens or the flash when you capture an image. ƈ Using the Rear LCD extensively will drain the battery. We recommend - Samsung 120815 | User Manual - Page 35
MANUAL, MySET, MOVIE CLIP, SCENE) mode can be set up by using the camera buttons. POWER button ƃ Used for turning the camera's power on or off. ƃ If there is no operation during the specified time, the camera's power will be turned off automatically to save battery in the memory allows. the flash. - - Samsung 120815 | User Manual - Page 36
: Use this menu if it is hard to decide exposure of the object. The camera will take 3 or 5 shots with settings at, below and above the set exposure. : Use this menu if it is hard to decide distance of the object. The camera will take 3 or 5 shots at different focal points. ƃ White Balance Bracket ( - Samsung 120815 | User Manual - Page 37
Drive button ƈ How to set the drive mode ƃ Selecting the various modes available 1. Press the Drive button and drive mode icon will display on the LCD. 2. Select a desired drive mode by rotating the Rear jog dial (JOG 2). [ Still image mode ] [ Drive mode menu ] ƃ How to set the AEB 1. Select the - Samsung 120815 | User Manual - Page 38
Drive button 2. Select a desired focus value by rotating the Front jog dial (JOG1). 3. Press the OK or Shutter button to set the focus value. 4. Press the shutter button to capture an image. You can take 3 or 5 shots according to the selected focus value. ſ Number of shots Selectable focus - Samsung 120815 | User Manual - Page 39
up to a set number of shots at fixed intervals. 3. After completing the interval shooting, the camera power is turned off automatically. ƃ How to set the interval shooting 1. Press the Menu button recommend that you use a fully charged battery or AC adapter when you take the interval shots. ŝ39Ş - Samsung 120815 | User Manual - Page 40
time has elapsed and the self-timer function will be maintained. - Selecting a remote control function : An image is taken by the shutter button of the remote control instead of the shutter button of the camera. - Cancelling the self-timer : Though the self-timer function will be maintained - Samsung 120815 | User Manual - Page 41
the remote control as the direction of remote control. Rotate the cover as shown. The remote control takes a CR 2025 3V battery. INFORMATION ƃ If you operate the Mode dial and Self-timer button during the self-timer operation, the selftimer function is cancelled. ƃ Use a tripod to prevent the camera - Samsung 120815 | User Manual - Page 42
ISO button ƈ You can select the ISO sensitivity when taking pictures. The speed or specific light-sensitivity of a camera is rated by ISO numbers. ƈ ISO - AUTO ( ) : The camera's sensitivity is automatically changed by variables such as lighting value or subject brightness. - 50, 100, 200, 400 : - Samsung 120815 | User Manual - Page 43
Metering button ƈ If you cannot obtain suitable exposure conditions, you can change the metering method to take better pictures. ƈ Metering methods - Multi metering ( ) : Exposure will be calculated based on each parts of the LCD divided into several parts. This is suitable for general use. - CWA ( - Samsung 120815 | User Manual - Page 44
Zoom operation ƈ You can change the zoom rate by rotating the Zoom ring. ƃ This camera has a 15X optical zoom and a 2X and 4X digital zoom function. Using both will offer a total zoom ratio of 30X or 60X. ƃ Optical Zoom TELE Rotate the Zoom ring to the right. This will - Samsung 120815 | User Manual - Page 45
shake warning indicator ( ) will display. When you select a higher optical or digital zoom, we recommend using the Finder LCD and the tripod. ƃ Take care not to press the lens as this may cause a camera malfunction. ƃ Do not pull the lens by hand and do not rotate the zoom ring quickly. It may cause - Samsung 120815 | User Manual - Page 46
Focusing ƈ You can select the proper focus mode by switching the focus switch. ƃ AF-A : Changing the focus frame ( ) You can change the focus frame size and position according to the subject size and position by pressing the AF-A button. This function is available in the AF-S, AF-C mode. - Wide AF : - Samsung 120815 | User Manual - Page 47
is focused on the subject automatically. ƃ AF-C : Continuous Auto Focus This is suitable for taking moving subject. The camera keeps focusing the subject when the shutter button is pressed halfway down. ſ Note that using the Continuous Auto Focus uses more battery than the Single Auto Focus. ŝ47Ş - Samsung 120815 | User Manual - Page 48
manual focus. Please be careful when using the manual focus as the picture can be blurred easily. ƃ How to set Manual focus in the Program mode You can change the focus even though the camera to the left. Save Myset Flash Synchro. Flash Pop-up Direct MF Off Spot AE point On Size Quality [ Direct - Samsung 120815 | User Manual - Page 49
High speed shutter mode ƈ You can reduce camera shake without using the flash in this mode. ƃ How to set the High be cancelled. ƃ This function isn't available in the Shutter priority, Manual and Movie clip mode. ƃ If you change the camera mode, a high speed shutter mode set in the Scene mode is - Samsung 120815 | User Manual - Page 50
Exposure control ƈ Exposure compensation This camera automatically adjusts the exposure according to the ambient lighting conditions. You can also select the exposure value by using the EVC (Exposure Value Compensation) ring. - Samsung 120815 | User Manual - Page 51
Exposure control ƈ Exposure lock This camera automatically adjusts the exposure according to the ambient lighting conditions. You can change the exposure value manually by using the AE-L (Auto Exposure Lock) button in a lighting situation where there are exposure differences between a subject and - Samsung 120815 | User Manual - Page 52
. When the menu is not displayed on the LCD monitor, the Left button operates as the FLASH button. - Right button : When the menu is displayed on the LCD monitor, pressing the to display a menu for the current camera mode on the LCD. Press the button again to return to the previous state. ŝ52Ş - Samsung 120815 | User Manual - Page 53
The white balance control allows you to (JOG2). [ White balance icons ] AUTO : The camera automatically selects the appropriate white balance settings, depending on tungsten (standard light bulb) lighting. CUSTOM : Allows the user to set the white balance according to the shooting condition. - Samsung 120815 | User Manual - Page 54
the camera so that the LCD shows only white, and then press the SHUTTER button. The flash may Sunny daylight shooting - Approx. 6000 K : Electronic photo flash - Approx. 10000 K : Blue sky 3. Press colour temperature icon will display. - The user configured white balance will remain effective until - Samsung 120815 | User Manual - Page 55
Macro ƈ When the menu is not showing, you can use the MACRO/ DOWN button to take macro pictures. ƈ Types of focus modes and focus ranges Focus type Auto Wide Tele Macro Wide Tele Super macro Wide Tele Unit : cm Auto macro Wide Tele Focus range 50~ū 400~ū 10~70 3~70 150~430 (Focus range : - Samsung 120815 | User Manual - Page 56
ring to the zoom mark on the barrel of the lens, macro mode will change to Auto macro (unless it is in S. MACRO mode). ƃ When the macro mode is selected, it is possible that camera shake will occur. If this is the case, use a tripod to eliminate this. ƃ When you take a picture within - Samsung 120815 | User Manual - Page 57
Pop-up Direct MF Spot AE point Size Auto Manual Color Space Save Myset Flash Synchro. Flash Pop-up Direct MF Spot AE point Size Manual Auto ſ When you select the [Manual] menu, press the Pop-up flash button to use the flash. ſ Do not open the pop-up flash by force. It may cause breakdown of the - Samsung 120815 | User Manual - Page 58
flash will be controlled, according to the lighting conditions. 1. Press the Pop-up flash button and the flash will pop up. 2. Press the Pop-up flash of flash will display on the LCD. -2 FLASH +2 +0.7 F L ƃ Flash synchronization : You can select a flash timing to take a desired image (In case of - Samsung 120815 | User Manual - Page 59
macro and super macro mode. ƈ Flash mode indicator Icon Flash mode Auto Flash Auto & Red eye reduction Fill in flash Slow synchro Fill in & Red eye reduction Flash off External flash Description If the subject or background is dark, the camera flash will operate automatically. The Fill in - Samsung 120815 | User Manual - Page 60
will not operate. ƃ Take photographs within the flash range. ƃ The image quality is not guaranteed if the subject is too close or highly reflective. ƃ If you attach the supplied lens hood, it may block the flash. ƃ When you select the Fill-in flash, the shutter speed can be selected between 15 - Samsung 120815 | User Manual - Page 61
shooting conditions. ƈ If the external flash is mounted, you can't use the internal flash. ƈ When the external flash is mounted, it is possible that camera shake will occur. We recommend using a tripod to reduce this. ƈ Refer to the user manual of the external flash (optional) for more information - Samsung 120815 | User Manual - Page 62
Synchro. Voice Memo LCD Brightness Size Quality Effect Voice Memo Interval/Time Interval/Number Custom Color Space Save Myset Flash Synchro. Voice Memo LCD Brightness Size Quality Effect [ Program mode ] ƃ How to use the Custom button 1. After selecting a desired sub menu in the [Custom] menu - Samsung 120815 | User Manual - Page 63
LCD button ƈ You can change the display of the Rear LCD, Finder LCD and Top LCD. ƈ Refer to page 26 for more information about each LCD. ƃ How to change the display status Pressing the LCD button 25 - Rear LCD is on - Top LCD is on (Icon) - Finder LCD is off 28 Pressing the LCD button - Samsung 120815 | User Manual - Page 64
. If the lighting conditions are too bright to check the subject by using the LCD, checking the histogram will enable more precise exposure control for the shots. Pixel Distribution of brightness Dark Bright ƈ Current and last shot comparison The last captured image displays on the left side - Samsung 120815 | User Manual - Page 65
optimal settings, depending on the selected scene. ƈ If you change the camera mode, Macro (p.56), Flash (p.57), High speed shutter (p.49) and Drive mode settings (p.36) ], [Dawn] and [Firework] scene mode are selected, it is possible that camera shake will occur. In this case, take care of the - Samsung 120815 | User Manual - Page 66
Diopter ƈ You can see the Finder LCD clearly by rotating the diopter. ƈ The range is from -4 to +2 dpt. ƃ Diopter 1. Select the Finder LCD by pressing the LCD button (p.63). 2. While looking though the Finder LCD, rotate the diopter to the left or the right. 3. When you can see the Finder LCD - Samsung 120815 | User Manual - Page 67
button is being operated. - While image data is being processed. (when the Card in use lamp blinks) - When there is no battery capacity. ƈ The following functions are available, depending on the mode you have RAW TIFF Super Fine Fine Normal 25 fps 15 fps Camera working mode Page p.70 p.71 ŝ67Ş - Samsung 120815 | User Manual - Page 68
Interval/Time Interval/Number Sub menu Normal B & W Sepia Negative +2 ~ 0 ~ -2 +2 ~ 0 ~ -2 Soft Normal Vivid Off One Pic All Pics 1 ~ 60 min 2 ~ 99 pics Camera working mode LCD Brightness, Size, Quality Page p.72 p.73 p.74 p.75 p.76 p.39 Effect Custom p.62 Sharpness Voice memo sRGB Color - Samsung 120815 | User Manual - Page 69
Using the LCD monitor to adjust the camera settings Main menu Flash Synchro. Flash Pop-up Direct MF Spot AE Point Sub menu 1st Curtain 2nd Curtain Auto Manual Off On Center Focus Area Camera working mode * Menus are subject to change without prior notice. Page p.58 p.57 p.48 p.79 ŝ69Ş - Samsung 120815 | User Manual - Page 70
640X480 640X480 320X240 160X120 With Jog dial L 3:2 16:9 M1 M2 S1 S2 640 320 160 Flash Pop-up Direct MF Spot AE point Size Quality Effect Contrast 1024Ŧ768 640Ŧ480 3264Ŧ2448 3264 of available shots will be because high resolution images require more memory than lower resolution images. ŝ70Ş - Samsung 120815 | User Manual - Page 71
format, you have to use supplied software to edit it. ƃ The RAW and TIFF file format are for advanced users and provides the best quality. However, large file size reduces number of available pictures to take and increases saving time to the memory card. ƃ A [Processing!] message is displayed while - Samsung 120815 | User Manual - Page 72
Effect ƈ By using the camera's digital processor, it is possible to add special effects to your images. Spot AE point Size Quality Effect Contrast Saturation Sharpness Negative Normal B & W Sepia [ Program mode ] - Samsung 120815 | User Manual - Page 73
Contrast ƈ You can change the distinction between light and dark parts of images. ƈ You can make images with marked differences in light and shadow softer, and those with less differences more vivid. ƃ How to set the contrast in the Program mode 1. Press the Menu button and select the [P] menu tab - Samsung 120815 | User Manual - Page 74
Saturation ƈ You can change the saturation of images. ƃ How to set the saturation in the Program mode 1. Press the Menu button and select the [P] menu tab. 2. Press the Right button and select the [Saturation] menu Quality Effect by pressing the Up/ Down button. Contrast Saturation 0 - Samsung 120815 | User Manual - Page 75
function is applied only when the captured image is stored in the memory. Effect Contrast Saturation Sharpness Voice Memo Interval/Time Interval/Number Soft The edges of the image are sharp. This is suitable for printing. The edges of the image are emphasised. The edges will appear Vivid sharp, - Samsung 120815 | User Manual - Page 76
picture is stored on the memory card. 6. Voice memo will be recorded for ten seconds from the moment the picture is stored. In the middle of the sound recording, pressing the shutter button will stop the voice memo. INFORMATION ƃ A distance of 40cm between you and the camera - Samsung 120815 | User Manual - Page 77
or printer. ƈ Adobe RGB has more colour spectra than sRGB and it is suitable for printing and computer graphics. ƃ How to set the Colour space in the Program mode 1. Press Custom Color Space Save Myset Flash Synchro. Flash Pop-up Adobe RGB sRGB Interval/Time Interval/Number Custom Color Space Save - Samsung 120815 | User Manual - Page 78
confirmation window will display. Select the [Yes] menu and press the OK button [ MySET mode ] to set the setting. * The current MySET slot number is displayed in the top left of the LCD. ſ Saving is available for the following camera functions. Functions using the camera buttons - Macro, flash - Samsung 120815 | User Manual - Page 79
select the [Spot AE point] menu by pressing the Up/ Down button. Flash Synchro. 4. Press the Right button and select a desired menu by pressing the brightness is calculated based on the + marked area placed on the centre Flash Pop-up Direct MF Spot AE point Size Quality Center Focus Area of - Samsung 120815 | User Manual - Page 80
to Recording mode. ƈ You can set up the PLAY mode function by using the camera buttons and LCD. ƈ If you press the play mode button with turning on the Top LCD, the last image stored on the memory is displayed on the Rear LCD. ƃ Playing back a still image 1. Select the PLAY mode - Samsung 120815 | User Manual - Page 81
Starting play mode ƈ Playing back a movie clip Steps from 1-2 are the same as those to play back a still image. 3. Select the recorded movie clip that you want to play back by using the Left/ Right button. 4. Press the Play & Pause button ( a movie clip file. ) to play back PAUSE? - To play - Samsung 120815 | User Manual - Page 82
63 for more information about selecting an LCD. ؉ ھ ۂ ۃ [ Image & Full information ] No. Description 1 Image size 2 Metering 3 Battery status 4 Date 5 Time 6 Contrast 7 Saturation 8 Quality 9 Sharpness 10 Focal Length 11 Exposure compensation ŝ82Ş Icon - Samsung 120815 | User Manual - Page 83
number F2.2 1/30 100-0009 p.57~60 p.55~56 p.53~54 p.42 p.30~31 p.30~31 p.77 p.80 p.112 Top LCD ڹ ں No. Description 1 Play mode 2 Battery status 3 Remote control ڻ Icon ŝ83Ş - Samsung 120815 | User Manual - Page 84
Thumbnail button/ Enlargement button ƈ In Play mode, you can use the buttons and the jog dial on the camera to conveniently set up the Play mode functions. ƈ You can view multiple pictures, enlarge a selected picture, and crop and save a selected area of an image. ƃ - Samsung 120815 | User Manual - Page 85
- [Yes] : The trimmed image will save as a new file name, and display on the LCD. - [No] : The trimming menu will disappear. ſ If there is little memory space to save the trimmed image, the image can't be trimmed. ŝ85Ş - Samsung 120815 | User Manual - Page 86
Display/ Information button ( ) ƈ The shooting and playing back information will be displayed on the LCD. The last image stored in the memory is displayed on the LCD by pressing the play mode button. ƈ Pressing the Display/ Information button( ) in the PLAY mode will change the display as - Samsung 120815 | User Manual - Page 87
Album mode ƈ You can organise the captured still images into albums. ƈ This camera has 8 albums and each album can take up to 100 images. ƈ The album menu loading time depends on the memory card type. ƈ How to use the album ƃ Selecting the album 1. In the play mode, press the Album (Up) button. 2. - Samsung 120815 | User Manual - Page 88
desired sub menu and press the OK button. [Select] : Specific still images in the album can be removed. [All] : 4. Press the OK button and a confirmation window will display. Select a desired sub menu by The removed images are not deleted from the memory, but just removed from the album. Select: - Samsung 120815 | User Manual - Page 89
the MENU/ OK button. Exit:OK Move: Start Interval Repeat Effect 1 Sec Off Off Back:Ȝ Set:OK INFORMATION ƃ If an image is deleted from the memory, the image doesn't display on an album. ƃ An image can't be added twice into the same album. ƃ An image can be added into the different - Samsung 120815 | User Manual - Page 90
5-function button ƈ The 5 function button activates the following. - Up button : While the menu is showing, press the Up button to move the cursor up the menu. When the menu is not displayed on the LCD, the Up button operates as the Album button. - Down button : While the menu is showing, press the - Samsung 120815 | User Manual - Page 91
Remote control ƈ After connecting the camera with an external monitor, you can see the captured image by using the remote control. ƈ Remote control is optional in some countries. ƈ In play mode, you can use the remote control to set up the play mode functions. Enlargement button Thumbnail button - Samsung 120815 | User Manual - Page 92
Remote control - Display/ back or pause. Delete button ( ) ƈ This deletes images stored on the memory. ƃ Deleting Images in Play Mode 1. Select an image that you want to the Left/ Right button. ƃ Before deleting images from the camera, you should protect (p.98) or download images (p.145~146, 152~153 - Samsung 120815 | User Manual - Page 93
- Select All Pics Unlock/ Lock/ Cancel p.98 Select All Pics p.99 - Off p.100 On 7M - 6M - 5M - 4M - 3M - p.101 2M - 1M - 640X480 - User Image - Right 90ŭ Left 90ŭ 180ŭ - - p.102 - Select/ All Pics/ Cancel - No/ Yes - p.103~104 Select/ All Pics/ Cancel - ŝ93Ş - Samsung 120815 | User Manual - Page 94
is connected to a PictBridge supporting printer (direct connection to the camera, sold separately) with a USB cable. Menu tab Main menu Images Auto Set Custom Set ŝ94Ş Sub menu One Pic All Pics No Yes Paper Size Layout Paper Type Secondary menu - Auto Postcard Card 4X6 L 2L Letter A4 A3 Auto - Samsung 120815 | User Manual - Page 95
Setting up the play back function using the LCD monitor Menu tab Main menu Sub menu Quality Custom Set Date Print File Name Print DPOF Print Reset Standard Index No Yes No Yes ſ Menus are subject to change without prior notice. Secondary menu Auto Draft Normal Fine Auto Off On Auto - Samsung 120815 | User Manual - Page 96
Starting the slide show ƈ Images can be displayed continuously at pre-set intervals. You can view the slide show by connecting the camera to an external monitor. 1. In play mode, press the Menu button and select the [Ȟ] menu tab. 2. Press the Right button and select the [Slide Show] menu by - Samsung 120815 | User Manual - Page 97
Starting the slide show ƃ Configure slide show effects : Unique screen effects can be used for the slide show. 1. Select the [Effect] sub menu by pressing the Up/ Down button and press the Right button. 2. Use the Up/ Down button to select the type of effect. [Off] : Normal display. [Effect 1] - Samsung 120815 | User Manual - Page 98
Protecting images ƈ This is used to protect specific shots from being accidentally erased (Lock). It desired sub menu by pressing the Up/ Down button and press the Right button. [Select] : Selection window for an image to be protected/ released is displayed. - Rear jog dial (JOG2) : Select an image - Samsung 120815 | User Manual - Page 99
stored in the camera's internal memory (i.e., not on the memory card) and it will not be deleted even if you delete all files on the memory card. ƃ How again to delete [ ] marked images. [All Pics] : Displays confirmation window. Select the [Yes] menu and press the OK button to delete all - Samsung 120815 | User Manual - Page 100
menu by pressing the Up/ Down button and press the OK button. 5. The camera is now ready to record a voice memo. Slide Show Protect Delete Voice Memo image for 10 seconds. While the voice is recording, the recording status window will be displayed as shown alongside. 7. The recording can be stopped - Samsung 120815 | User Manual - Page 101
the Up/ Down button. 4. Press the OK button and a confirmation window will display. 5. Select the [Yes] menu and press OK button to [User Image] image is stored not on the memory card but on the internal memory. ƃ If the memory capacity is insufficient to store the resized image, a [Card Full - Samsung 120815 | User Manual - Page 102
Rotate DPOF/Standard DPOF/Index DPOF/Size 180Ŋ Right 90Ŋ Left 90Ŋ [ Right 90° ] [ Left 90° ] [ 180° ] 4. Press the OK button and a confirmation window will display. 5. Select the [Yes] menu and press the OK button. A rotated image will display on the LCD and the menu will disappear. There will - Samsung 120815 | User Manual - Page 103
ƈ DPOF(Digital Print Order Format) allows you to embed printing information on your memory card's MISC folder. Select the pictures to be printed and how many prints to make. ƈ The DPOF indicator will display on the LCD when an image that has DPOF information plays back. Images can then be printed on - Samsung 120815 | User Manual - Page 104
No Yes Set:OK DPOF : PRINT SIZE ƈ You can specify the print size when printing images stored on the memory card. The [DPOF/Size] menu is / Down button and press the Right button. [Select] : Selection window for an image to be changed printed size is displayed. - Rear jog dial (JOG2) : Select an image - Samsung 120815 | User Manual - Page 105
the PictBridge menu. Images : Select the pictures to be printed. Auto Set/ Custom Set Print DPOF Print Reset : Setting up printing : Printing pictures : Printing the DPOF files : Initialising the PictBridge functions ƃ Connecting the Camera to a Printer 1. Press the POWER button to turn on - Samsung 120815 | User Manual - Page 106
- Pressing the Left/ Right button: Selects a previous/ next image. Move Pic:Ȝ Ȟ Print:SHUTTER ƈ Select pictures to print 1. Connect the camera to your printer. The USB menu must be set to [Printer] before you connect the camera to the printer. (See p.105) 2. Press the Menu button and select the - Samsung 120815 | User Manual - Page 107
paper Setting the quality of the picture to be printed Setting whether to print the date Setting whether to print the file name Sub menu Auto, Postcard, Card, 4X6, L, 2L, Letter, A4, A3 Auto, Full, 1, 2, 4, 8, 9, 16 Auto, Plain, Photo, Fastphoto Auto, Draft, Normal, Fine Auto, Off, On Auto, Off - Samsung 120815 | User Manual - Page 108
a desired sub menu by pressing the Up/ Down button. Print DPOF Print Reset Images Standard Index [Standard] : Print the pictures stored in the memory card in set numbers. One picture is printed on one piece of paper. [Index] : Print multiple images on one sheet of paper. 3. The screen shown - Samsung 120815 | User Manual - Page 109
the OK button and a confirmation window will display. Press the OK button again and all print and image settings will be reset. ſ Default print setting varies depending on the printer manufacturer. For your printer's default setting, refer to the user's guide that came with your printer. ŝ109 - Samsung 120815 | User Manual - Page 110
Setup menu ƈ In this mode, you can set up basic settings. The items indicated by are default settings. Menu tab ŝ110Ş Main menu File Power Off LCD Off Language Format Date & Time Date Type World Time Sub menu Secondary menu Series - Reset - 1, 3, 5 min - Off, 10, 20, 30, 60 sec - - Samsung 120815 | User Manual - Page 111
Setup menu Menu tab Main menu World Time Imprint Sound Brightness Video Out Quick View Auto Rotating USB Reset Sub menu Secondary menu Okhotsk Denver, Phoenix Wellington, Auckland Chicago, Dallas Samoa, Midway New York, Miami Honolulu, Hawaii Caracas, La Paz Alaska Buenos Aires LA, San - Samsung 120815 | User Manual - Page 112
File name ƈ This function allows the user to select the file naming format. ƃ How to set the file names 1. Press the Menu from 100 to 999 as follows : 100SSCAM ƍ 101SSCAM ƍ ~ ƍ 999SSCAM. ƃ The files used with the memory card conform to the DCF(Design rule for Camera File systems) format. ŝ112Ş - Samsung 120815 | User Manual - Page 113
off ƈ This function switches the camera off after a set amount of time in order to prevent unnecessary battery drainage. ƃ How to set the LCD Off Language Format 1 min 3 min 5 min INFORMATION ƃ Even if the battery or AC adapter are removed and inserted again, the power off setting will be - Samsung 120815 | User Manual - Page 114
the LCD off after a set amount of time in order to prevent unnecessary battery drainage. ƃ How to set the auto turn off time 1. Press the Menu Time 30 sec 60 sec Off 10 sec 20 sec INFORMATION ƃ Even if the battery or AC adapter are removed and inserted again, the auto LCD turn off setting - Samsung 120815 | User Manual - Page 115
Language ƈ There is a choice of languages that can be displayed on the LCD. Even if the battery or AC adapter are removed and inserted again, the language setting will be preserved. ƃ How to set the language 1. Press the Menu button and select - Samsung 120815 | User Manual - Page 116
the following types of memory card. - A new memory card, or an unformatted memory card. - A memory card that has a file this camera can't recognise or one that has been taken from another camera. ƃ Always format the memory card using this camera. If you insert a memory card that has been formatted - Samsung 120815 | User Manual - Page 117
Setting up the Date & Time ƈ You can change the date and time that will be displayed on the captured images. ƃ How to set the Date & Time 1. Press the Menu button and select the [ ] menu tab. 2. Press the Right button and select the [Date & Time] menu by pressing the Up/ Down button. 3. Press the - Samsung 120815 | User Manual - Page 118
World time ƈ You can check the time of cities of various nations. ƃ How to check the time 1. Press the Menu button and select the [ ] menu tab. 2. Press the Right button and select the [World Time] menu by pressing the Up/ Down button. 3. Press the Right button and a world map will display as shown - Samsung 120815 | User Manual - Page 119
Imprinting the recording date ƈ There is an option to include Date/Time on still images. ƃ How to imprint the date & time 1. Press the Menu button and select the [ ] menu tab. 2. Press the Right button and select the [Imprint] menu by pressing the Up/ Down button. 3. Press the Right button and - Samsung 120815 | User Manual - Page 120
Sound ƈ If you set the operation sound to ON, various sounds will be activated for camera startup, when button are pressed, and if there is a card error, so that you can be aware of the camera operation status. ƃ How to set the sound 1. Press the Menu button and select the [ ] menu tab. 2. Press - Samsung 120815 | User Manual - Page 121
the camera is connected. PAL mode can support only digital noise on the external monitor, but it is not a malfunction. ƃ If the image is not in the centre of the screen, use the TV controls to centre it. ƃ When the camera is connected to an external monitor, the menu will be visible on the external - Samsung 120815 | User Manual - Page 122
Quick view ƈ If you enable Quick View before capturing an image, you can view the image you just captured on the LCD for the duration set in the [Quick View] setup. Quick view is possible only with still images. ƃ How to set the quick view 1. Press the Menu button and select the [ ] menu tab. 2. - Samsung 120815 | User Manual - Page 123
Auto rotating sensor ƈ When an image taking vertically plays back, the auto rotating sensor will rotate the image correctly. ƈ You can view the reversed image correctly without rotating the image. ƃ How to set the auto rotating sensor 1. Press the Menu button and select the [ ] menu tab. 2. Press - Samsung 120815 | User Manual - Page 124
instructions on how to connect the camera to your PC. [Printer] : Select this if you want to connect the camera to your printer. Refer to page 105 for instructions on how to connect the camera OK If [Yes] is selected : A confirmation window will display. Select the [Yes] menu by pressing the Up/ - Samsung 120815 | User Manual - Page 125
The items indicated by are default settings. Menu tab Main menu Start Image Start Sound Shutter Sound Sound Effect Sub menu Off User Image Off Sound 2 Off Shutter 2 Off Effect 2 Logo - Sound 1 Sound 3 Shutter 1 Shutter 3 Effect 1 Effect 3 * Menus are subject to change without prior notice - Samsung 120815 | User Manual - Page 126
Set:OK INFORMATION ƃ Use a saved image for the start-up image with the [User Image] in the [Resize] menu in the play mode. ƃ The start-up function. ƃ The User images will be deleted by [Reset] menu. Start up sound ƈ You can select the sound that is activated whenever the camera is turned on. - Samsung 120815 | User Manual - Page 127
Shutter sound ƈ You can select the shutter sound. ƃ How to select the shutter sound 1. Press the Menu button and select the [ ] menu tab. 2. Press the Right button and select the [Shutter Sound] menu by pressing the Up/ Down button. 3. Press the Right button and select a desired sub menu by pressing - Samsung 120815 | User Manual - Page 128
problems. - If the camera is transferred from a cold to a warm and humid environment, condensation can form on the delicate electronic circuitry. If this occurs, turn the camera off and wait for at least 1 hour until all moisture is dispersed. Moisture build up can also occur in the memory card - Samsung 120815 | User Manual - Page 129
to get fingerprints or foreign substances on the surface of the lens. ƈ If the digital camera is not used for a long period, an electric discharge can occur. It is a good idea to remove the batteries and the memory card if you do not intend using the camera for an extended period of time. ƈ If the - Samsung 120815 | User Manual - Page 130
free up some memory No Image ! ϛThere are no images stored on the memory card ƍ Take images ƍ Insert a memory card that is holding some images File Error ! ϛFile error ƍ Format the memory card ϛMemory card error ƍ Contact a camera service centre Low Battery ! ϛThere is low battery capacity ƍ Insert - Samsung 120815 | User Manual - Page 131
Select printing page within the limitation. Before contacting a service centre ƈ Please check the following The camera doesn't switch on ϛThere is low battery capacity. ƍ Insert charged battery. The camera power ceases while in use. ϛThe battery is exhausted. ƍ Insert charged battery. ϛThe Camera is - Samsung 120815 | User Manual - Page 132
image files ϛThe memory card has not been formatted ƍ Format the memory card (p.116) ϛThe memory card is exhausted ƍ Insert a new memory card ϛThe camera's power is off ƍ Turn the camera power on ϛThe batteries are exhausted ƍ Insert charged battery. The camera suddenly stops working while - Samsung 120815 | User Manual - Page 133
is excessive ƍ Reset exposure compensation No image on external monitor ϛThe external monitor has not been connected properly with the camera ƍ Check the connection cables ϛThere are incorrect files in the memory card ƍ Insert a memory card that has correct files When using the PC's explorer - Samsung 120815 | User Manual - Page 134
Specifications Image Sensor Lens Type Effective Pixel Total Pixel Focal Length F No. Digital Zoom Electronic Viewfinder Viewfinder LCD Monitor Focusing Type Modes Range Shutter Type Speed Control Exposure Compensation ISO Equivalent High Speed Mode Modes Flash Sharpness Range Recharging - Samsung 120815 | User Manual - Page 135
: 7.4V Li-ion battery(SLB-1974), Charger : SBC-L4 AC Adaptor : DC 8.4V, 1.5A (SAC-81, optional) * Included battery may vary depending on sales region. 135.5x87x78.6mm (144.6mm, including lens protrusion) 870.5g (without battery and card) 0 ~ 40°C 5 ~ 85% Storage Driver (Windows98/98SE/2000/ME - Samsung 120815 | User Manual - Page 136
ensure that you read the instruction manual carefully before use. ϛThe attached software is a camera driver and image editing software tool for Windows. ϛUnder no circumstances should all or part of either the software or the user manual be reproduced. ϛCopyrights for software are licensed only for - Samsung 120815 | User Manual - Page 137
USB Storage Driver is provided only for Windows. A USB Driver for MAC is not included with the Application CD. You can use the camera with Mac OS 10.0 or later. ƈ Digimax Master : This is the all-in-on multi media software solution You can download, view, edit and save your digital images and movie - Samsung 120815 | User Manual - Page 138
kr : Korean 1. Click the [Install] menu in the Auto run frame. The camera driver is installed automatically. 2. Installation is complete. Click the [Finish] button. [Click !] [Click !] 3. The Software License Agreement window for DirectX will be displayed. If you agree to this, select [I accept - Samsung 120815 | User Manual - Page 139
. Click the [Install] button. For information on application software, please refer to page 137. [Click !] INFORMATION ƃ If you select [Exit] at step 6, the application program installation will be cancelled. 7. The Digimax Master installation window will be displayed as shown alongside. Click the - Samsung 120815 | User Manual - Page 140
Setting up the application software INFORMATION ƃ If you select [Cancel] at step 7, a window for installing Digimax Reader will be displayed. 8. A window will open. Click the [Next >] button. [Click !] 9. A destination selection window will open. Click [Next >]. To copy the files to another folder, - Samsung 120815 | User Manual - Page 141
different from the illustration depending on the system requirements. [Click !] 13. A window will be displayed as shown alongside. Click the [INSTALL] button. - If you click the [Manual] button instructions, instructions for using Digimax reader will be displayed. - Click the [EXIT] button and the - Samsung 120815 | User Manual - Page 142
. 20. Turn the camera power on. The [Found New Hardware Wizard] will open and the computer will recognise the camera. * If your OS is Windows XP, an image viewer program will open. If the download window of Digmax Master opens after starting Digimax Master, the camera driver was setup successfully - Samsung 120815 | User Manual - Page 143
box opens and a window asking you to select a driver file may appear. In this case, specify "USB Driver" in the CD supplied. (for Windows 98 and 98 SE). ƃ Before connecting the camera to the PC, You should first install the camera driver. ƃ After installing the camera driver, you have to restart - Samsung 120815 | User Manual - Page 144
be established. In this case, disconnect the USB cable, and then follow the procedure from Step 3 and onward. ƈ Disconnecting the camera and PC : Refer to page 150 (Removing the removable disk). INFORMATION ƃ The camera driver must be installed before using PC mode. ƃ To save battery power, it is - Samsung 120815 | User Manual - Page 145
Starting PC mode ƈ Downloading stored images You can download the still images stored on the camera to your PC's hard disk and print them or use a photo editing software to edit them. 1. Connect the camera to your PC with the USB cable. 2. On your computer's desktop display, select [My computer] and - Samsung 120815 | User Manual - Page 146
mode 6. Press the right mouse button and a pop-up menu will open. Click [Paste]. 7. An image file is transferred from the camera to your PC. - By using [Digimax Master], you can see the stored images in the memory directly on the PC monitor and you can copy or move the image files. ŝ146Ş - Samsung 120815 | User Manual - Page 147
Removing the USB Driver for Windows 98SE ƈ To remove the USB driver, refer to the process shown below. 1. Click [Start ƍ Settings] and click [Control Panel]. 2. Double-click [System]. 3. Select [Device manager ƍ Hard Disk Controller ƍ Samsung Digital Camera] and click the [Remove] button. 4. Click - Samsung 120815 | User Manual - Page 148
Removing the USB Driver for Windows 98SE 5. Trace [Start ƍ Settings ƍ Control Panel] and double click [Add/Remove programs]. 6. The [Add/Remove Programs Properties] window will open. Click [Pro 815] and click the [Add/Remove] button. [Click !] 7. Uninstallation is complete. Click the [Finish] button - Samsung 120815 | User Manual - Page 149
USB Driver. 1. Before turning the camera power on, connect the camera to the PC with the USB cable. 2. Click [Removable Disk] under [My Computer] or [Windows the same as those already stored on the memory. ƃ When you upload a file that is not taken by this camera to the Removable Disk, the [File - Samsung 120815 | User Manual - Page 150
2000/ME/XP (The illustrations may be different from the real display in accordance with the Windows O/S.) 1. Check whether the camera and PC is transferring a file. If the Card in use lamp blinks, you have to wait until the lamp is turned off. 2. Double-click the [Unplug or Eject Hardware] icon - Samsung 120815 | User Manual - Page 151
or Eject Hardware] window will open. Click the [Close] button and the removable disk will be removed safely. 7. Unplug the USB cable. [Click !] Setting up the USB Driver for MAC 1. A USB Driver for MAC is not included with the software CD as MAC OS supports the camera driver. 2. Check the MAC - Samsung 120815 | User Manual - Page 152
and save your digital images and movies with this software. This software is only compatible with Windows except for the Windows 98. ƈ To start the program, click [Start ƍ Programs ƍ Samsung ƍ Digimax Master]. ƃ Downloading images 1. Connect the camera to your PC. 2. A window for downloading images - Samsung 120815 | User Manual - Page 153
Digimax Master 4. Select a destination and make a folder to save downloaded images and was made before, images will be downloaded. 5. Click [Next(N) >] button. [Click !] 6. A window will open as shown alongside. The destination of the selected folder will be displayed on the upper side of the - Samsung 120815 | User Manual - Page 154
multi media information. ڽZoom bar : You can change preview size. ھFolder display window : You can see the folder location of the selected image. ڿImage display window : Images of the selected folder are displayed. ſ Refer to the [Help] menu in Digimax Master for further information. ŝ154Ş - Samsung 120815 | User Manual - Page 155
editing an image. ڻImage display window : a selected image displays in this window. ڼPreview window : You can preview the changed image. ſ A still image edited with Digimax Master can't be played back on the camera. ſ Refer to the [Help] menu in Digimax Master for further information. ŝ155Ş - Samsung 120815 | User Manual - Page 156
Digimax Master ƃ DNG converter : You can convert a RAW (*.dng) file into a JPEG or TIFF file format. ڻ - DNG converter functions are convert the RAW (*.dng) file into a file format as you want (*.jpg, *.tiff, etc.). ſ Refer to the [Help] menu in Digimax Master for further information. ŝ156Ş - Samsung 120815 | User Manual - Page 157
(asf) and movie clip for this camera (avi, MPEG-4) file types. ںFrame display window : You can insert multi media in this window. ſ Some movie clips that was compressed with a codec that is not compatible with the Digimax Master can't play back in the Digimax Master. ſ Refer to the [Help] menu - Samsung 120815 | User Manual - Page 158
Text mode, as a text file with this program. This software is only compatible with Windows. ƈ To start the program, click [Start ƍ Programs ƍ Digimax Reader]. The following screen will appear. ƈ How to use the Digimax Reader 1. Connect the camera and the PC with a USB cable and download the images - Samsung 120815 | User Manual - Page 159
Digimax Reader 4. Select the image you want to save as a text file. * Only an image that was taken with a SAMSUNG camera can be opened. 5. Click the Area Analysis( ) icon to scan the . 8. To save the section as a text, click the Save( ) icon. A window as shown alongside will be displayed. ŝ159Ş - Samsung 120815 | User Manual - Page 160
a cable with an incorrect specification. ƍ Use a USB cable with the correct specification. [Case 4] The camera is not recognized by your PC. Sometimes, the camera may appear under [Unknown Devices] in Device Manager. ƍ Install the camera driver correctly. Turn off the camera, remove the USB cable - Samsung 120815 | User Manual - Page 161
working properly", click the "Driver" tab and then click [Update Driver] or [Reinstall Driver]. ƍ When all the conditions mentioned above are met, the computer can support the USB interface. [Case 7] When using the USB hub. ƍ There may be a problem in connecting the camera to the PC through the - Samsung 120815 | User Manual - Page 162
driver, specify "USB Driver" in the CD supplied. [Case 10] In some security programs (Norton Anti Virus, V3, etc.), the computer may not recognise the camera as a removable disk. ƍ Stop the security programs and connect the camera to the computer. Refer to the security program instructions - Samsung 120815 | User Manual - Page 163
PC may not recognise the camera. In this case, re-start the PC. ƈ If a PC connected with the camera stops responding while Windows is starting. ƍ In this case, disconnect the PC and the camera and Windows will start. If the problem happens continuously, set the Legacy USB Support to disable and re - Samsung 120815 | User Manual - Page 164
TOUR MAINE MONTPARNASSE 33, AV .DU MAINE 75755, PARIS CEDEX 15, FRANCE HOTLINE PHOTO NUMÉRIQUE : 00 800 22 26 37 27(Numéro Vert-Appel Gratuit) TEL : (33) 1-4279-2200 FAX : (33) 1-4538-6858 www.samsungphoto.fr SAMSUNG TECHWIN MOSCOW OFFICE RUSSIA, 125167, MOSCOW LENNINGRADSKY, PR-KT, 37-A, KORP14 TEL
-
 1
1 -
 2
2 -
 3
3 -
 4
4 -
 5
5 -
 6
6 -
 7
7 -
8
-
9
-
10
-
11
-
12
-
13
-
14
-
15
-
16
-
17
-
18
-
19
-
20
-
21
-
22
-
23
-
24
-
25
-
26
-
27
-
28
-
29
-
30
-
31
-
32
-
33
-
34
-
35
-
36
-
37
-
38
-
39
-
40
-
41
-
42
-
43
-
44
-
45
-
46
-
47
-
48
-
49
-
50
-
51
-
52
-
53
-
54
-
55
-
56
-
57
-
58
-
59
-
60
-
61
-
62
-
63
-
64
-
65
-
66
-
67
-
68
-
69
-
70
-
71
-
72
-
73
-
74
-
75
-
76
-
77
-
78
-
79
-
80
-
81
-
82
-
83
-
84
-
85
-
86
-
87
-
88
-
89
-
90
-
91
-
92
-
93
-
94
-
95
-
96
-
97
-
98
-
99
-
100
-
101
-
102
-
103
-
104
-
105
-
106
-
107
-
108
-
109
-
110
-
111
-
112
-
113
-
114
-
115
-
116
-
117
-
118
-
119
-
120
-
121
-
122
-
123
-
124
-
125
-
126
-
127
-
128
-
129
-
130
-
131
-
132
-
133
-
134
-
135
-
136
-
137
-
138
-
139
-
140
-
141
-
142
-
143
-
144
-
145
-
146
-
147
-
148
-
149
-
150
-
151
-
152
-
153
-
154
-
155
-
156
-
157
-
158
-
159
-
160
-
161
-
162
-
163
-
164
 |
 |

ENGLISH
User’s Manual
Thank you for buying a Samsung Camera.
This manual will guide you through using the camera, including capturing images,
downloading images and using the application software.
Please read this manual carefully before using your new camera.