Samsung 2033SN Quick Guide (ENGLISH)
Samsung 2033SN Manual
 |
View all Samsung 2033SN manuals
Add to My Manuals
Save this manual to your list of manuals |
Samsung 2033SN manual content summary:
- Samsung 2033SN | Quick Guide (ENGLISH) - Page 1
LCD MONITOR quick start guide ii - Samsung 2033SN | Quick Guide (ENGLISH) - Page 2
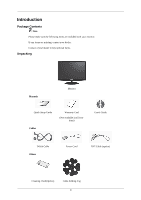
items are missing, contact your dealer. Contact a local dealer to buy optional items. Unpacking Manuals Monitor Quick Setup Guide Cables Warranty Card (Not available in all locations) User's Guide D-Sub Cable Others Power Cord DVI Cable (option) Cleaning Cloth(Option) Cable holding ring 8 - Samsung 2033SN | Quick Guide (ENGLISH) - Page 3
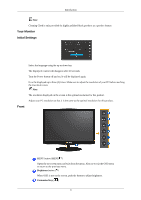
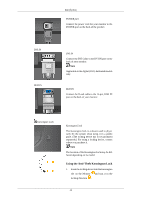
highly polished black products as a product feature. Your Monitor Initial Settings Select the language using the up or optimal resolution for this product. Front MENU button [MENU/ ] Opens the on-screen menu and exits from the menu. Also use to exit the OSD menu or return to the previous menu. - Samsung 2033SN | Quick Guide (ENGLISH) - Page 4
you to adjust items in the menu. Enter button [ ] Activates a highlighted menu item. Push the ' ', then , you must connect your monitor to the graphic card's DVI port using the DVI cable. • manual for further information regarding power saving functions. For energy conservation, turn your monitor - Samsung 2033SN | Quick Guide (ENGLISH) - Page 5
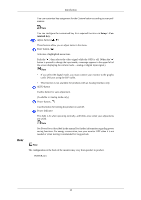
IN RGB IN Introduction POWER port Connect the power cord for your monitor to the POWER port on the back of the product. DVI IN Connect the DVI Cable to the DVI IN port on the back of your monitor. Note Applicable to the digital (DVI)-dedicated models only. RGB IN Connect the D-sub cable to the 15 - Samsung 2033SN | Quick Guide (ENGLISH) - Page 6
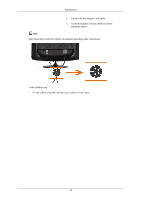
Introduction 2. Connect the Kensington Lock cable. 3. Fix the Kensington Lock to a desk or a heavy stationary object. Note See Connecting Cables for further information regarding cable connections. Cable holding ring • Fix the cables using the holding ring, as shown in the figure. 12 - Samsung 2033SN | Quick Guide (ENGLISH) - Page 7
Connections Connecting Cables Use a connection appropriate for your computer. Using the D-sub (Analog) connector on the video card. • Connect the signal cable to the 15-pin, D-sub port on the back of your monitor. Using the DVI (Digital) connector on the video card. • Connect the DVI Cable to the - Samsung 2033SN | Quick Guide (ENGLISH) - Page 8
power port on the back of the monitor. Plug the power cord for the monitor into a nearby outlet. Note If the monitor and the computer are connected, you can turn them on and use them. Using the Stand Folding the base Note You can tilt the monitor upwards at an angle of -1° to 16°. ( ±1.0°) Attaching - Samsung 2033SN | Quick Guide (ENGLISH) - Page 9
follow the product installation instructions. • To mount the monitor on a wall, you should purchase the wall mounting kit that allows you to mount the monitor at least 10 cm away from the wall surface. • Contact the nearest Samsung Service Center for more information. Samsung Electronics will not be - Samsung 2033SN | Quick Guide (ENGLISH) - Page 10
Troubleshooting Self-Test Feature Check Note Your monitor provides a self test feature that allows you to check whether your monitor is functioning properly. Self-Test Feature Check 1. Turn off both your computer and the monitor. 2. Unplug the video cable from the back of the computer. 3. Turn on - Samsung 2033SN | Quick Guide (ENGLISH) - Page 11
coloring, become noisy, and video mode not supported, etc. In this case, first check the source of the problem, and then contact the Service Center or your dealer. Judging the monitor's working condition If there is no image on the screen or a "Not Optimum Mode", "Recommended Mode **** x **** 60 Hz - Samsung 2033SN | Quick Guide (ENGLISH) - Page 12
. Connect the DVI cable and then reboot the system. I cannot see the On Screen Display. Q: Have you locked the On Screen Display (OSD) Menu to prevent changes? A: Unlock the OSD by pressing the [MENU/ ] button for at least 5 seconds. The screen shows strange colors or just black and white. Q: Is - Samsung 2033SN | Quick Guide (ENGLISH) - Page 13
you installed the monitor driver? A: Install the monitor driver according to the Driver Installation Instructions. Q: See the video card manual to see if the Plug & Play (VESA DDC) function can be supported. A: Install the monitor driver according to the Driver Installation Instructions. My computer - Samsung 2033SN | Quick Guide (ENGLISH) - Page 14
may not support your monitor. When you have a problem with the graphic card, visit our website to check the compatible graphic card list provided. http://www.samsung.com/monitor/magictune MagicTune™ doesn't work properly. Q: Have you changed your PC or video graphic card? A: Download the latest - Samsung 2033SN | Quick Guide (ENGLISH) - Page 15
Troubleshooting If you installed a new video card or if you assembled the PC, check if the installed the adapter(video) driver and the monitor driver. Check if the scanning ratio of the video screen is set to between 56 Hz ~ 75 Hz. (Do not exceed 75 Hz when using the maximum resolution.) If you have - Samsung 2033SN | Quick Guide (ENGLISH) - Page 16
Troubleshooting Note Before calling for assistance, check the information in this section to see if you can remedy any problems yourself. If you do need assistance, please call the phone number on the Information section or contact your dealer. 43
-
 1
1 -
 2
2 -
 3
3 -
 4
4 -
 5
5 -
 6
6 -
 7
7 -
8
-
9
-
10
-
11
-
12
-
13
-
14
-
15
-
16
 |
 |

±±
LCD MONITOR
quick start guide