Samsung 460UX Quick Guide (ENGLISH)
Samsung 460UX - SyncMaster - 46" LCD Flat Panel Display Manual
 |
UPC - 729507804767
View all Samsung 460UX manuals
Add to My Manuals
Save this manual to your list of manuals |
Samsung 460UX manual content summary:
- Samsung 460UX | Quick Guide (ENGLISH) - Page 1
SyncMaster 400UXn,460UXn LCD Monitor User Manual - Samsung 460UX | Quick Guide (ENGLISH) - Page 2
items are included with your LCD Display. If any items are missing, contact your dealer. Contact a local dealer to buy optional items. Note This stand is not for the Floor Standing Type. Unpacking Manuals LCD Display Quick Setup Guide Cables Warranty Card (Not available in all locations - Samsung 460UX | Quick Guide (ENGLISH) - Page 3
Remote Control Sold separately Batteries (AAA X 2) (Not available in all locations) BNC to RCA Adaptor Jack DVI Cable BNC Cable -- 400UXn -Your LCD Display Front Wall Mount KIT Semi Stand KIT Calibrater LAN Cable For more information on the use of the calibrater, see Nat- ural Color Expert - Samsung 460UX | Quick Guide (ENGLISH) - Page 4
mode. Changing the source is only allowed for external devices that are connected to the LCD Display at the time. [PC] → [BNC] → [DVI] → [AV] → [S-Video] → [Component] → [HDMI] → [MagicInfo] >> Click here to see an animation clip PIP Push the PIP button to turn the PIP screen On / Off. More than - Samsung 460UX | Quick Guide (ENGLISH) - Page 5
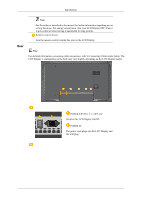
Introduction Rear Note See PowerSaver described in the manual for further information regarding power saving functions. For energy conservation, turn your LCD Display OFF when it is not needed or when leaving it unattended for long periods. Remote Control Sensor Aim the remote control towards this - Samsung 460UX | Quick Guide (ENGLISH) - Page 6
Terminal (Input)) DVI / PC / HDMI IN [HDMI] Connect the HDMI terminal at the back of your LCD Display to the HDMI terminal of your digital output device using a HDMI cable. DVI / PC / HDMI IN [RGB](PC Video Connection Terminal) Using a D-Sub Cable (15 pin D-Sub) - PC mode (Analog PC) DVI / PC / HDMI - Samsung 460UX | Quick Guide (ENGLISH) - Page 7
AV AUDIO IN [L-AUDIO-R] (LCD Display Audio Connection Terminal (Input)) AV OUT [VIDEO](VIDEO Connection Terminal) AV mode (Output) AV IN [VIDEO](VIDEO Connection Terminal) (Input) AV OUT [S-VIDEO] (S-VIDEO Connection Terminal) S-VIDEO mode (Output) AV IN [S-VIDEO](S-VIDEO Connection Terminal) (Input - Samsung 460UX | Quick Guide (ENGLISH) - Page 8
Introduction -- 400UXn -- Remote Control Note The performance of the remote control may be affected by a TV or other electronic device operating near the LCD Display , causing a malfunction due to interference with the frequency. ON / OFF MagicInfo MDC LOCK MagicInfo buttons +100 DEL VOL MUTE TTX/ - Samsung 460UX | Quick Guide (ENGLISH) - Page 9
Mute mode. TV channels provide text information services via teletext. - This fuction does not work for this LCD Display. Opens the on-screen menu and exits current picture mode is displayed on the lower center of the screen. AV / S-Video / Component : P.MODE The LCD Display has four automatic - Samsung 460UX | Quick Guide (ENGLISH) - Page 10
does not work for this LCD Display. In TV mode, selects TV channels. - This fuction does not work for this LCD Display. Changes the video source. The current picture information is displayed in the top left corner Mono Stereo SAP MTS/S_Mode Mono Mono ↔ Stereo Mono ↔ SAP Default Manual Change Mono - Samsung 460UX | Quick Guide (ENGLISH) - Page 11
26. PIP 27. SOURCE 28. SWAP 29. SIZE 30. REW 31. STOP 32. PLAY / PAUSE 33. FF -- 400UXn -Mechanical Layout Mechanical Layout NETWORK MODEL SIZE Introduction - This fuction does not work for this LCD Display. Every time you press the button, a PIP screen appears. Changes the source of the PIP window - Samsung 460UX | Quick Guide (ENGLISH) - Page 12
order. After your order is placed, installation professionals will visit you and install the bracket. • At least 2 persons are needed in order to move the LCD Display. • SAMSUNG is not responsible for any product damage or any injury caused by installation at customer's discretion. - Samsung 460UX | Quick Guide (ENGLISH) - Page 13
to 12 mm length. Wall Bracket Installation • Contact a technician for installing the wall bracket. • SAMSUNG Electronics is not responsible for any damages to the product or harm to customers when the installation is in the direction of the arrow. When done, mount the wall bracket on the wall. - Samsung 460UX | Quick Guide (ENGLISH) - Page 14
Introduction There are two hinges(left and right). Use the correct one. A - Captive Screw B - Wall Bracket C - Hinge (Left) D - Hinge (Right) 2. Before drilling into the wall, check if the length between the two locking holes at the back of the product is correct. If the length is too - Samsung 460UX | Quick Guide (ENGLISH) - Page 15
plastic hanger and the screw are the same) 1. Remove the 4 screws on the back of the product. 2. Insert the screw B into the plastic hanger. Notice • Mount the product on the wall bracket and make sure it is properly fixed to the left and right plastic hangers. • Be careful when installing the - Samsung 460UX | Quick Guide (ENGLISH) - Page 16
firmly fixed to the bracket. Make sure to re-insert and tighten the safety pin (3) to securely hold the product to the bracket. A - LCD Display B - Wall Bracket C - Wall Wall Bracket Angle Adjustment Adjust the bracket angle to -2° before installing it on the wall. 1. Fix the product to the - Samsung 460UX | Quick Guide (ENGLISH) - Page 17
the following items are included with your LCD Display. If any items are missing, contact your dealer. Contact a local dealer to buy optional items. Note This stand is not for the Floor Standing Type. Unpacking Manuals LCD Display Quick Setup Guide Warranty Card (Not available in all locations - Samsung 460UX | Quick Guide (ENGLISH) - Page 18
Introduction Power Cord Remote Control Sold separately Batteries (AAA X 2) (Not available in all locations) BNC to RCA Adaptor Jack DVI Cable BNC Cable Wall Mount KIT Semi Stand KIT Calibrater LAN Cable For more information on the use of the calibrater, see Nat- ural Color Expert Help. - Samsung 460UX | Quick Guide (ENGLISH) - Page 19
mode. Changing the source is only allowed for external devices that are connected to the LCD Display at the time. [PC] → [BNC] → [DVI] → [AV] → [S-Video] → [Component] → [HDMI] → [MagicInfo] >> Click here to see an animation clip PIP Push the PIP button to turn the PIP screen On / Off. More than - Samsung 460UX | Quick Guide (ENGLISH) - Page 20
DVI AV / S-Video / Component Mode • AV / S-Video PC / BNC / DVI Mode • Component PC / DVI Mode • HDMI PC / BNC Mode Power button [ ] Use this button for turning the LCD Display on and off. Power indicator Shows PowerSaver mode by blinking green Note See PowerSaver described in the manual for further - Samsung 460UX | Quick Guide (ENGLISH) - Page 21
Terminal (Input)) DVI / PC / HDMI IN [HDMI] Connect the HDMI terminal at the back of your LCD Display to the HDMI terminal of your digital output device using a HDMI cable. DVI / PC / HDMI IN [RGB](PC Video Connection Terminal) Using a D-Sub Cable (15 pin D-Sub) - PC mode (Analog PC) DVI / PC / HDMI - Samsung 460UX | Quick Guide (ENGLISH) - Page 22
AV AUDIO IN [L-AUDIO-R] (LCD Display Audio Connection Terminal (Input)) AV OUT [VIDEO](VIDEO Connection Terminal) AV mode (Output) AV IN [VIDEO](VIDEO Connection Terminal) (Input) AV OUT [S-VIDEO] (S-VIDEO Connection Terminal) S-VIDEO mode (Output) AV IN [S-VIDEO](S-VIDEO Connection Terminal) (Input - Samsung 460UX | Quick Guide (ENGLISH) - Page 23
may differ depending on the cables, signal source etc. With cables where there is no degradation or signal source, up to ten LCD Displays can be connected. Note See Connecting Cables for further information regarding cable connections. -- 460DXn -- Remote Control Note The performance of the remote - Samsung 460UX | Quick Guide (ENGLISH) - Page 24
EXIT Up-Down Left-Right buttons S.MODE STILL FM RADIO P.SIZE SRS DUAL/MTS PIP SOURCE SWAP SIZE REW STOP PLAY/PAUSE FF Turns the LCD Display On/Off. MagicInfo Quick Launch Button. - Samsung 460UX | Quick Guide (ENGLISH) - Page 25
Mute mode. TV channels provide text information services via teletext. - This fuction does not work for this LCD Display. Opens the on-screen menu and exits current picture mode is displayed on the lower center of the screen. AV / S-Video / Component : P.MODE The LCD Display has four automatic - Samsung 460UX | Quick Guide (ENGLISH) - Page 26
- This fuction does not work for this LCD Display. Changes the video source. The current picture information is displayed in the top left corner of the screen Mono ↔ Stereo Mono ↔ SAP Default Manual Change Mono - This fuction does not work for this LCD Display. Every time you press the button, - Samsung 460UX | Quick Guide (ENGLISH) - Page 27
29. SIZE 30. REW 31. STOP 32. PLAY / PAUSE 33. FF -- 460DXn -Mechanical Layout Mechanical Layout NETWORK MODEL SIZE Introduction Switches the PIP Picture Size. Rewind Stop Play/Pause Fast forward LCD Display Head NETWORK MODEL SIZE - Samsung 460UX | Quick Guide (ENGLISH) - Page 28
order is placed, installation professionals will visit you and install the bracket. • At least 2 persons are needed in order to move the LCD Display. • SAMSUNG is not responsible for any product damage or any injury caused by installation at customer's discretion. Dimensions Notice For securing the - Samsung 460UX | Quick Guide (ENGLISH) - Page 29
There are two hinges(left and right). Use the correct one. 1. Insert and tighten the Captive Screw in the direction of the arrow. When done, mount the wall bracket on the wall. There are two hinges(left and right). Use the correct one. A - Captive Screw B - Wall Bracket C - Hinge (Left - Samsung 460UX | Quick Guide (ENGLISH) - Page 30
in the corresponding hole. Match each of the brackets and hinge holes to the corresponding anchor holes and insert and tighten the 11 screws A. To mount the product on the wall bracket The shape of the product may vary depending on the model. (The assemblies of the plastic hanger and the - Samsung 460UX | Quick Guide (ENGLISH) - Page 31
Introduction 2. Insert the screw B into the plastic hanger. Notice • Mount the product on the wall bracket and make sure it is properly fixed to the left and right plastic hangers. • Be careful when installing the - Samsung 460UX | Quick Guide (ENGLISH) - Page 32
Introduction A - LCD Display B - Wall Bracket C - Wall Wall Bracket Angle Adjustment Adjust the bracket angle to -2° before installing it on the wall. 1. Fix the product to the wall bracket. 2. - Samsung 460UX | Quick Guide (ENGLISH) - Page 33
power switch. There are 3 ways to connect the D-sub to your LCD Display. Choose one of the following: Using the D-sub (Analog) connector on the video card. • Connect the D-sub to the 15-pin, RGB port on the back of your LCD Display and the 15 pin D-sub Port on the computer. Using the DVI - Samsung 460UX | Quick Guide (ENGLISH) - Page 34
to the audio port on the back of your computer. Note • Turn on both your computer and the LCD Display. • The DVI cable or BNC cable is optional. • Contact a local SAMSUNG Electronics Service Center to buy optional items. Connecting to Other devices Using a Power cord with Earth • In the event of - Samsung 460UX | Quick Guide (ENGLISH) - Page 35
input devices such as VCRs or Camcorders are connected via the AV IN [VIDEO] or AV IN [S-VIDEO] of the LCD Display using an S-VHS or BNC cable. Connect the Audio (L) and Audio (R) terminals of a VCR or Camcorders to the LCD Display 's AV AUDIO IN [L-AUDIO-R] using audio cables. Note • Select AV or - Samsung 460UX | Quick Guide (ENGLISH) - Page 36
player using the SOURCE button on the front of the LCD Display or on the remote control. • Then, start the DVD Player with a DVD disc inserted. • A component cable is optional. • For an explanation of Component video, consult your DVD manual. Connecting a Camcorder Locate the A/V output jacks on the - Samsung 460UX | Quick Guide (ENGLISH) - Page 37
for the connection to a DTV Set Top Box using the SOURCE button on the front of the LCD Display or on the remote control. • For an explanation of Component video, see your Set Top Box owner's manual. Connecting to an Audio System Note Connect a set of audio cables between the AUX L, R jacks on the - Samsung 460UX | Quick Guide (ENGLISH) - Page 38
the REMOTE IN terminal. • Restrictions: Available only if other devices support the wired remote control I/O terminals. Connecting Using a HDMI Cable Note • Input devices such as digital DVD are connected to the HDMI IN terminal of the LCD Display using the HDMI cable. • You cannot connect a PC to - Samsung 460UX | Quick Guide (ENGLISH) - Page 39
same colored audio output terminals of the digital output device, and connect the opposite jack to the HDMI / PC / DVI-D AUDIO IN terminal of the LCD Display. Connecting a LAN Cable Using a Power cord with Earth • In the event of failure, the earth lead may cause electric shock. Make sure to wire - Samsung 460UX | Quick Guide (ENGLISH) - Page 40
Connections Note You can connect USB devices such as a mouse or keyboard. - Samsung 460UX | Quick Guide (ENGLISH) - Page 41
Using the Software Installation MagicInfo Pro Installation 1. Insert CD into the CD-ROM drive. 2. Click the MagicInfo Pro installation file. 3. When the Install Shield Wizard window appears, click "Next." 4. Select "I agree to the terms of the license agreement" to accept the terms of use. 5. You - Samsung 460UX | Quick Guide (ENGLISH) - Page 42
Using the Software 6. Choose a folder to install the MagicInfo Pro program. 7. Click "Install." - Samsung 460UX | Quick Guide (ENGLISH) - Page 43
Using the Software 8. The "Installation Status" window appears. 9. It is recommended restarting the system for the normal operation of the MagicInfo Pro Server program. Click "Next." - Samsung 460UX | Quick Guide (ENGLISH) - Page 44
program. System Requirements CPU Minimum P1.8 Recommen- P3.0Ghz ded RAM 256M 512M Ethernet 100M/1G OS Application Windows XP WMP 9 or Windows later 2000 (Service Pack 4) - Samsung 460UX | Quick Guide (ENGLISH) - Page 45
Troubleshooting Self-Test Feature Check Note Check the following items yourself before calling for assistance. Contact a Service Center for problems that you cannot solve by yourself. Self-Test Feature Check 1. Turn off both your computer and the LCD Display. 2. Unplug the video cable from the back - Samsung 460UX | Quick Guide (ENGLISH) - Page 46
. Therefore, if there is a problem with the computer or the video card, this can cause the LCD Display to become blank, have poor coloring, become noisy, and video mode not supported, etc. In this case, first check the source of the problem, and then contact a Service Center or your dealer. 1. Check - Samsung 460UX | Quick Guide (ENGLISH) - Page 47
Troubleshooting A: Check if the signal cable between the computer and the LCD Display is securely connected. (Refer to Connecting a Computer) Problems related to the Screen Note Problems related to the LCD Display screen and their solutions are listed. Q: The screen is blank and the power indicator - Samsung 460UX | Quick Guide (ENGLISH) - Page 48
Troubleshooting A: Adjust color using Custom under OSD Color Adjustment menu. Q: button, check the cable connection between the LCD Display and the computer to ensure that the connector is properly connected. Problems related to Audio Note Problems related to audio signals and their solutions are - Samsung 460UX | Quick Guide (ENGLISH) - Page 49
card. Note that video card support can vary, depending on the version of the driver used. (Refer to the computer or the video card manual for details.) Q: How can I Adjusts the resolution? A: Windows XP: Set the resolution in the Control Panel → Appearance and Themes → Display → Settings. A: Windows - Samsung 460UX | Quick Guide (ENGLISH) - Page 50
Troubleshooting Set the resolution at the Control Panel → Display → Screen Saver. Set the function in the BIOS-SETUP of the computer. (Refer to the Windows / Computer Manual). Q: How can I clean the outer case/LCD Panel? A: Disconnect the power cord and then clean the LCD Display with a soft cloth,
-
 1
1 -
 2
2 -
 3
3 -
 4
4 -
 5
5 -
 6
6 -
 7
7 -
8
-
9
-
10
-
11
-
12
-
13
-
14
-
15
-
16
-
17
-
18
-
19
-
20
-
21
-
22
-
23
-
24
-
25
-
26
-
27
-
28
-
29
-
30
-
31
-
32
-
33
-
34
-
35
-
36
-
37
-
38
-
39
-
40
-
41
-
42
-
43
-
44
-
45
-
46
-
47
-
48
-
49
-
50
 |
 |

SyncMaster 400UXn,460UXn
LCD Monitor
User Manual