Samsung BD-D5500 User Manual (user Manual) (ver.1.0) (English) - Page 24
Samsung BD-D5500 Manual
 |
UPC - 036725608443
View all Samsung BD-D5500 manuals
Add to My Manuals
Save this manual to your list of manuals |
Page 24 highlights
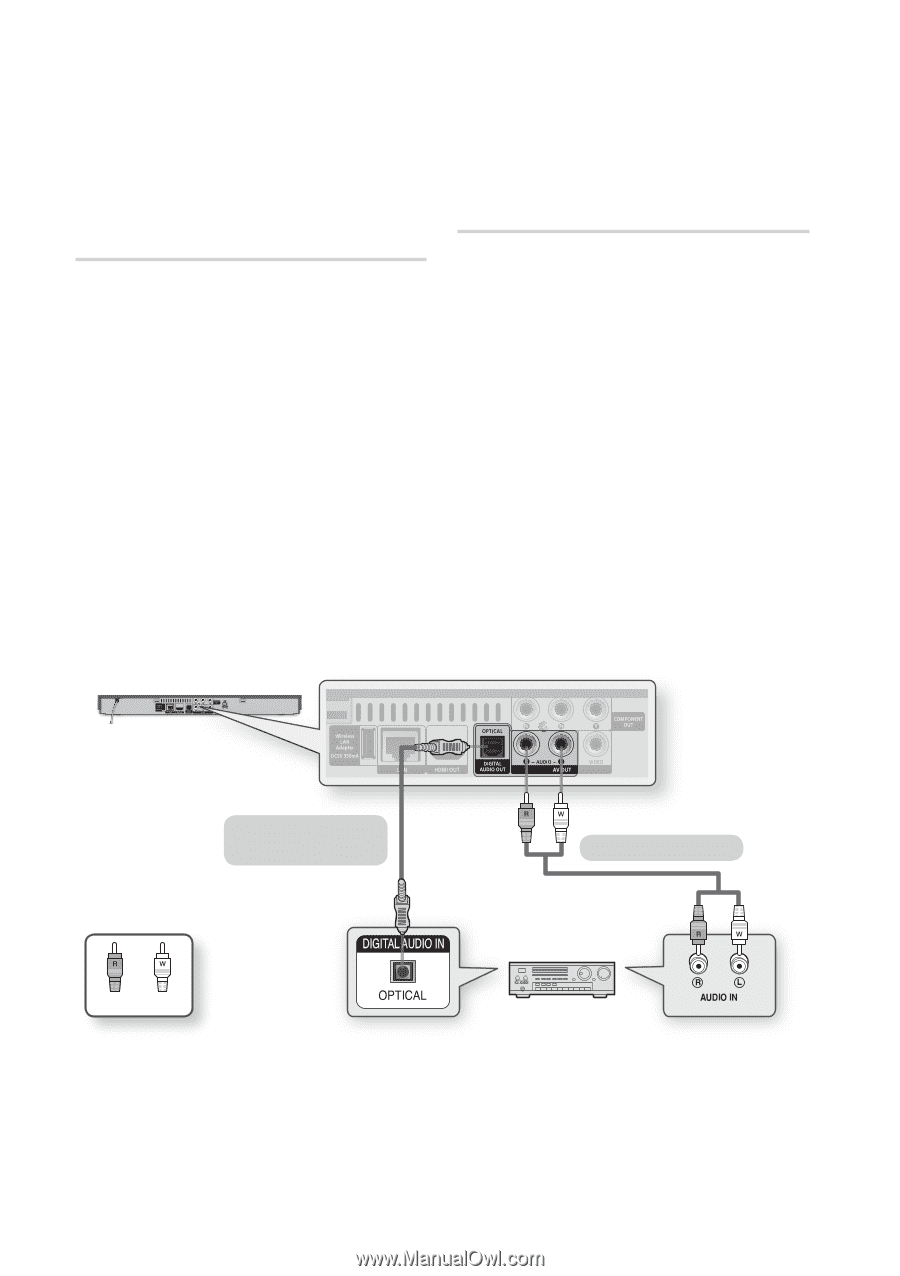
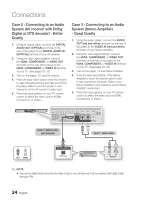
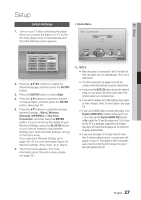
Connections Case 2 : Connecting to an Audio System (AV receiver with Dolby Digital or DTS decoder) - Better Quality 1. Using an optical cable, connect the DIGITAL AUDIO OUT (OPTICAL) terminal on the rear of the player to the DIGITAL AUDIO IN (OPTICAL) terminal of your AV receiver. 2. Using the video signal cable(s), connect the HDMI, COMPONENT, or VIDEO OUT terminals on the rear of the player to the HDMI, COMPONENT, or VIDEO IN terminal of your TV. (See pages 20~22) 3. Turn on the player, TV, and AV receiver. 4. Press the input select button of the AV receiver to select the external input and hear sound from the player. Refer to your AV receiver's user manual to set the AV receiver's audio input. 5. Press the input selector on your TV remote control to select the video source (HDMI, Component, or Video.) Case 3 : Connecting to an Audio System (Stereo Amplifier) - Good Quality 1. Using the audio cables, connect the AUDIO OUT (red and white) terminals on the rear of the player to the AUDIO IN (red and white) terminals of your Stereo Amplifier. 2. Using the video signal cable(s), connect the HDMI, COMPONENT, or VIDEO OUT terminals on the rear of the player to the HDMI, COMPONENT, or VIDEO IN terminal of your TV. (See pages 20~22) 3. Turn on the player, TV and Stereo Amplifier. 4. Press the input select button of the Stereo Amplifier to select the external input in order to hear sound from the player. Refer to your Stereo Amplifier's user manual to set the Stereo Amplifier's audio input. 5. Press the input selector on your TV remote control to select the video source (HDMI, Component, or Video.) Case 2 : Optical cable (not included) Case 3 : Audio cable Red White ✎ NOTE ▪ If you use the Digital Audio connection described in Case 2, you will hear only front two speakers with Digital Output setting as PCM. 24 English
-
 1
1 -
2
-
3
-
4
-
5
-
6
-
7
-
8
-
9
-
10
-
11
-
12
-
13
-
14
-
15
-
16
-
17
-
18
-
 19
19 -
 20
20 -
 21
21 -
 22
22 -
 23
23 -
 24
24 -
 25
25 -
 26
26 -
 27
27 -
 28
28 -
 29
29 -
30
-
31
-
32
-
33
-
34
-
35
-
36
-
37
-
38
-
39
-
40
-
41
-
42
-
43
-
44
-
45
-
46
-
47
-
48
-
49
-
50
-
51
-
52
-
53
-
54
-
55
-
56
-
57
-
58
-
59
-
60
-
61
-
62
-
63
-
64
-
65
-
66
-
67
-
68
-
69
-
70
-
71
-
72
-
73
-
74
 |
 |