Samsung BL103 User Manual (ENGLISH) - Page 18
Starting the recording mode - red
 |
UPC - 044701009856
View all Samsung BL103 manuals
Add to My Manuals
Save this manual to your list of manuals |
Page 18 highlights
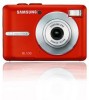
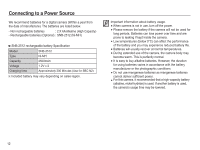
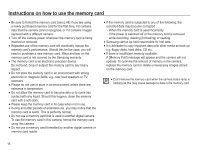
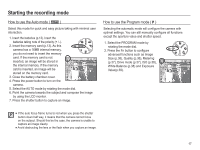
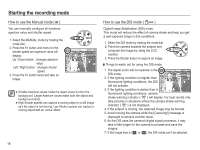
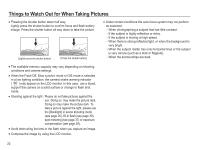
Starting the recording mode How to use the Auto mode ( μ ) Select this mode for quick and easy picture taking with minimal user interaction. 1. Insert the batteries (p.13). Insert the batteries taking note of the polarity (+ / -). 2. Insert the memory card (p.13). As this camera has a 16MB internal memory, you do not need to insert the memory card. If the memory card is not inserted, an image will be stored in the internal memory. If the memory card is inserted, an image will be stored on the memory card. 3. Close the battery chamber cover. 4. Press the power button to turn on the camera. 5. Select the AUTO mode by rotating the mode dial. 6. Point the camera towards the subject and compose the image by using the LCD monitor. 7. Press the shutter button to capture an image. How to use the Program mode ( ^ ) Selecting the automatic mode will configure the camera with optimal settings. You can still manually configure all functions except the aperture value and shutter speed. 1. Select the PROGRAM mode by rotating the mode dial. 2. Press the Fn button to configure advanced functions such as Image Size (p.36), Quality (p.36), Metering (p.37), Drive mode (p.37), ISO (p.38), White Balance (p.38) and Exposure Value(p.39). å If the auto focus frame turns to red when you press the shutter button down half way, it means that the camera cannot focus on the subject. Should this be the case, the camera is unable to capture an image clearly. å Avoid obstructing the lens or the flash when you capture an image. 17
-
 1
1 -
2
-
3
-
4
-
5
-
6
-
7
-
8
-
9
-
10
-
11
-
12
-
 13
13 -
 14
14 -
 15
15 -
 16
16 -
 17
17 -
 18
18 -
 19
19 -
 20
20 -
 21
21 -
 22
22 -
 23
23 -
24
-
25
-
26
-
27
-
28
-
29
-
30
-
31
-
32
-
33
-
34
-
35
-
36
-
37
-
38
-
39
-
40
-
41
-
42
-
43
-
44
-
45
-
46
-
47
-
48
-
49
-
50
-
51
-
52
-
53
-
54
-
55
-
56
-
57
-
58
-
59
-
60
-
61
-
62
-
63
-
64
-
65
-
66
-
67
-
68
-
69
-
70
-
71
-
72
-
73
-
74
-
75
-
76
-
77
-
78
-
79
-
80
-
81
-
82
-
83
-
84
-
85
-
86
-
87
-
88
-
89
-
90
-
91
-
92
-
93
-
94
-
95
-
96
-
97
-
98
 |
 |