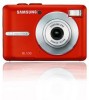
Samsung BL103 User Manual (ENGLISH) - Page 19
How to use the DIS mode, How to use the Manual mode - camera manual
 |
UPC - 044701009856
View all Samsung BL103 manuals
Add to My Manuals
Save this manual to your list of manuals |
Page 19 highlights
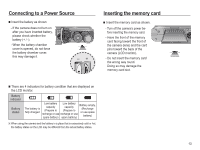
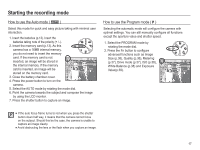
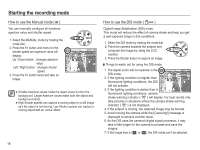
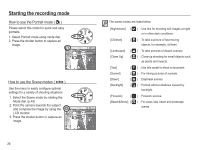
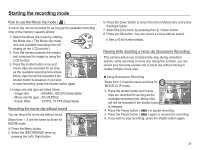
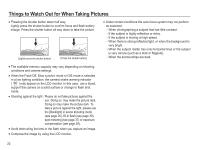
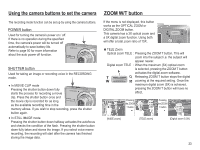
Starting the recording mode How to use the Manual mode ( ¸ ) You can manually configure all functions aperture value and shutter speed. 1. Select the MANUAL mode by rotating the mode dial. 2. Press the Fn button and menu for the shutter speed and aperture value will display. Up / Down button : changes aperture value Left / Right button : changes shutter speed. 3. Press the Fn button twice and take an image. å Smaller Aperture values make the object sharp but blur the background. Larger Aperture values make both the object and background sharp. å High Shutter speeds can capture a moving object in a still image as if the object is not moving. Low Shutter speeds can capture a moving object with an 'active' effect. How to use the DIS mode ( ˆ ) Digital Image Stabilisation (DIS) mode. This mode will reduce the effect of camera shake and help you get a well-exposed image in dim conditions. 1. Select the DIS mode by rotating the mode dial. 2. Point the camera towards the subject and compose the image by using the LCD monitor. 3. Press the Shutter button to capture an image. Ê Things to watch out for using the DIS mode 1. The digital zoom will not operate in the DIS mode. 2. If the lighting condition is brighter than fluorescent lighting conditions, the DIS will not activate. 3. If the lighting condition is darker than in fluorescent lighting conditions, camera shake warning indicator ( Ã ) will display. For best results only take pictures in situations where the camera shake warning indicator ( Ã ) is not displayed. 4. If the subject is moving, the captured image may be blurred. 5. Avoid moving the camera while the [Capturing!] message is displayed to achieve a better result. 6. As the DIS uses the camera's digital signal processor, it may take a little longer for the camera to process and save the images. 7. If the image size is (;) or (.) ,the DIS mode can't be selected. 18
-
 1
1 -
2
-
3
-
4
-
5
-
6
-
7
-
8
-
9
-
10
-
11
-
12
-
13
-
 14
14 -
 15
15 -
 16
16 -
 17
17 -
 18
18 -
 19
19 -
 20
20 -
 21
21 -
 22
22 -
 23
23 -
 24
24 -
25
-
26
-
27
-
28
-
29
-
30
-
31
-
32
-
33
-
34
-
35
-
36
-
37
-
38
-
39
-
40
-
41
-
42
-
43
-
44
-
45
-
46
-
47
-
48
-
49
-
50
-
51
-
52
-
53
-
54
-
55
-
56
-
57
-
58
-
59
-
60
-
61
-
62
-
63
-
64
-
65
-
66
-
67
-
68
-
69
-
70
-
71
-
72
-
73
-
74
-
75
-
76
-
77
-
78
-
79
-
80
-
81
-
82
-
83
-
84
-
85
-
86
-
87
-
88
-
89
-
90
-
91
-
92
-
93
-
94
-
95
-
96
-
97
-
98
 |
 |
