Samsung CLX-3185FN User Manual (user Manual) (ver.2.00) (English) - Page 107
Management tools, Introducing useful management tools, Using SyncThru™ Web Service (CLX-3185N/ - clx 3185n toner
 |
View all Samsung CLX-3185FN manuals
Add to My Manuals
Save this manual to your list of manuals |
Page 107 highlights
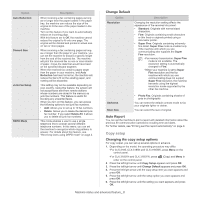
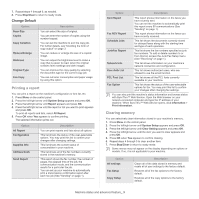
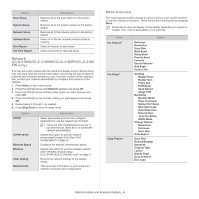
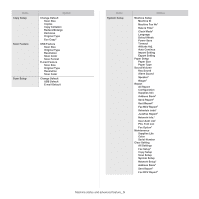
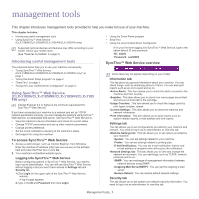
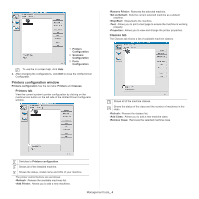
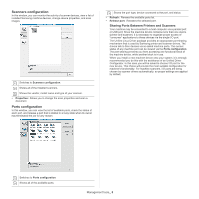
management tools 1. This chapter introduces management tools provided to help you make full use of your machine. This chapter includes: • Introducing useful management tools • Using SyncThru™ Web Service (CLX-3185N/CLX-3185WK/CLX-3185FN/CLX-3185FW only) • Using the Smart Panel program • SmarThru • Using the Linux Unified Driver Configurator Supported optional devices and features may differ according to your model. Check your model name. (See "Features by Models" on page 2). Introducing useful management tools The programs below help you to use your machine conveniently. • "Using SyncThru™ Web Service (CLX-3185N/CLX-3185WK/CLX-3185FN/CLX-3185FW only)" on page 1. • "Using the Smart Panel program" on page 2. • "SmarThru" on page 3. • "Using the Linux Unified Driver Configurator" on page 3. Using SyncThru™ Web Service (CLX-3185N/CLX-3185WK/CLX-3185FN/CLX-3185 FW only) Internet Explorer 6.0 or higher is the minimum requirement for SyncThru™ Web Service. If you have connected your machine to a network and set up TCP/IP network parameters correctly, you can manage the machine via SyncThru™ Web Service, an embedded web server. Use SyncThru™ Web Service to: • View the machine's device information and check its current status. • Change TCP/IP parameters and set up other network parameters. • Change printer preference. • Set the email notifications advising of the machine's status. • Get support for using the machine. To access SyncThru™ Web Service 1. Access a web browser, such as Internet Explorer, from Windows. Enter the machine IP address (http://xxx.xxx.xxx.xxx) in the address field and press the Enter key or click Go. 2. Your machine's embedded website opens. Logging into SyncThru™ Web Service Before configuring options in SyncThru™ Web Service, you need to log-in as an administrator. You can still use SyncThru™ Web Service without logging in but you won't have access to Settings tab and Security tab. 1.Click Login on the upper right of the SyncThru™ Web Service website. A log-in page appears. 2.Type in the ID and Password then click Login. If it's your first time logging into SyncThru™ Web Service, type in the below default ID and password. •ID: admin •Password: sec00000 SyncThru™ Web Service overview Some tabs may not appear depending on your model. Information tab This tab gives you general information about your machine. You can check things, such as remaining amount of toner. You can also print reports such as an error report and so on. •Active Alerts: This item allows you to check the alerts occurred in the machine and their severity. •Supplies: This item allows you to check how many pages are printed and amount of toner left in the cartridge. •Usage Counters: This item allows you to check the usage count by print types: simplex, duplex. •Current Settings: This item allows you to check the machine and network information. •Print information: This item allows you to print reports such as system related reports, e-mail address and font reports. Settings tab This tab allows you to set configurations provided by your machine and network. You need to log-in as an administrator to view this tab. •Machine Settings tab: This tab allows you to set options provided by your machine. -System: You can set settings related to your machine. -Printer: You can set settings related to printing jobs. -E-mail Notification: You can set e-mail notification feature and e-mail address of recipients who will receive the notification. •Network Settings tab: This tab allows you to view and change the network environment. You can set things, such as TCP/IP, network protocols and so on. -SNMP: You can exchange of management information between network devices using SNMP. -Outgoing Mail Server(SMTP): You can set the outgoing e-mail server. -Restore Default: You can restore default network settings. Security tab This tab allows you to set system and network security information. You need to log-in as an administrator to view this tab. Management tools_ 1
-
 1
1 -
2
-
3
-
4
-
5
-
6
-
7
-
8
-
9
-
10
-
11
-
12
-
13
-
14
-
15
-
16
-
17
-
18
-
19
-
20
-
21
-
22
-
23
-
24
-
25
-
26
-
27
-
28
-
29
-
30
-
31
-
32
-
33
-
34
-
35
-
36
-
37
-
38
-
39
-
40
-
41
-
42
-
43
-
44
-
45
-
46
-
47
-
48
-
49
-
50
-
51
-
52
-
53
-
54
-
55
-
56
-
57
-
58
-
59
-
60
-
61
-
62
-
63
-
64
-
65
-
66
-
67
-
68
-
69
-
70
-
71
-
72
-
73
-
74
-
75
-
76
-
77
-
78
-
79
-
80
-
81
-
82
-
83
-
84
-
85
-
86
-
87
-
88
-
89
-
90
-
91
-
92
-
93
-
94
-
95
-
96
-
97
-
98
-
99
-
100
-
101
-
 102
102 -
 103
103 -
 104
104 -
 105
105 -
 106
106 -
 107
107 -
 108
108 -
 109
109 -
 110
110 -
 111
111 -
 112
112 -
113
-
114
-
115
-
116
-
117
-
118
-
119
-
120
-
121
-
122
-
123
-
124
-
125
-
126
-
127
-
128
-
129
-
130
-
131
-
132
-
133
-
134
-
135
-
136
-
137
-
138
-
139
-
140
-
141
-
142
-
143
-
144
-
145
-
146
-
147
-
148
-
149
-
150
-
151
 |
 |