Samsung CLX-3185FN User Manual (user Manual) (ver.2.00) (English) - Page 120
Understanding display messages
 |
View all Samsung CLX-3185FN manuals
Add to My Manuals
Save this manual to your list of manuals |
Page 120 highlights
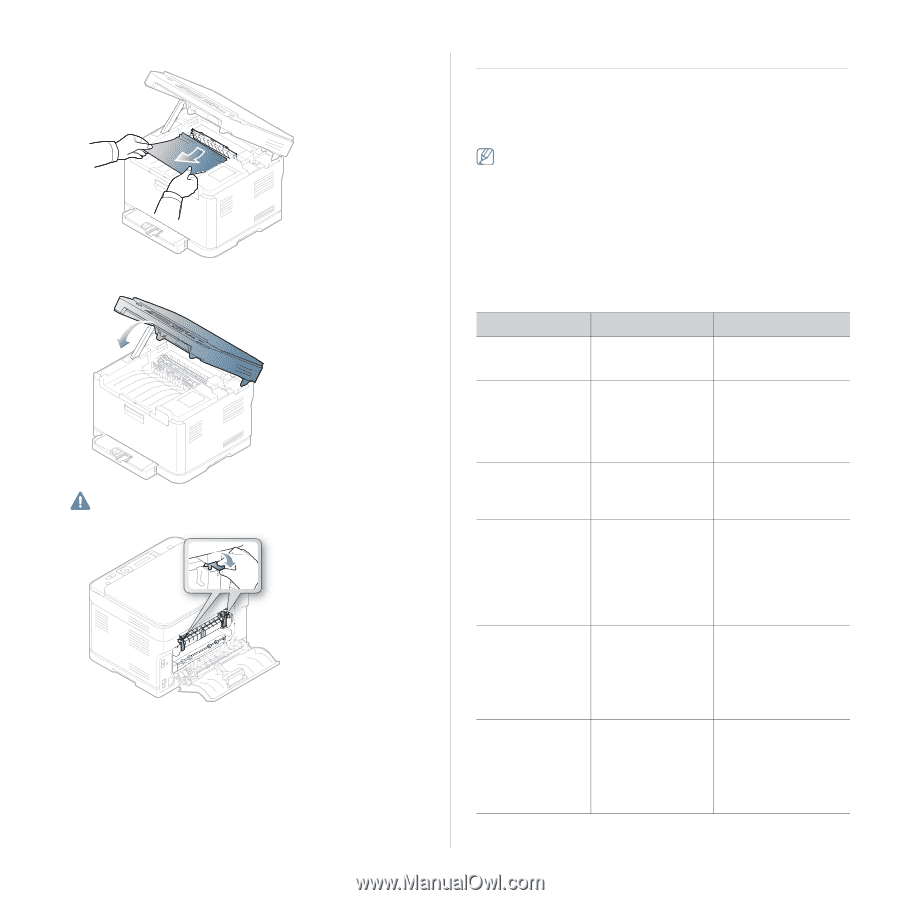
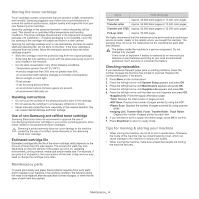
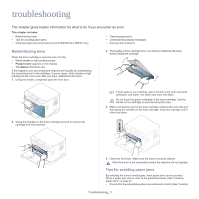
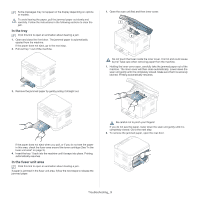
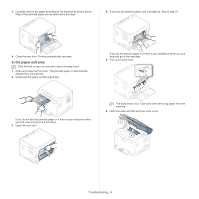
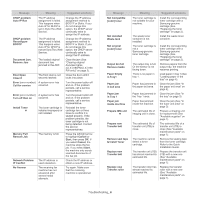
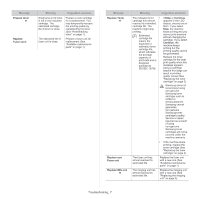
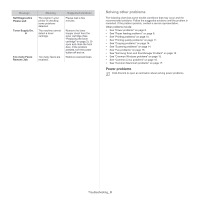
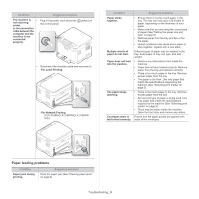
7. Carefully take the jammed paper out of the machine. 8. Lower down the scan unit gently and slowly until it completely closed. Make sure that it is securely latched. Be careful no to pinch your fingers! 9. Pull down the fuser lever. 10. Close the rear door. Printing automatically resumes. Understanding display messages Messages appear on the control panel display to indicate the machine's status or errors. Refer to the tables below to understand the messages' and their meaning, and correct the problem, if necessary. Checking display messages •If a message is not in the table, reboot the power and try the printing job again. If the problem persists, call a service representative. •When you call for service, provide the service representative with the contents of display message. •Some messages may not appear on the display depending on the options or models. •[error number] indicates the error number. •[tray type] indicates the tray number. •[media type] indicates the media type. •[media size] indicates the media size. •[color] indicates the color of toner or imaging unit. Message Meaning Suggested solutions [COMM. Error] [Incompatible] [Line Busy] [Line Error] BOOTP problem Auto IP Run BOOTP problem Reconfigure DHCP The machine has a communication problem. The machine has received a fax from which is registered as a junk fax. The receiving fax machine did not answer or the line is already engaged. Your machine cannot connect with the receiving fax machine or has lost contact because of a problem with the phone line. The IP address assignment is failed. This happens when Auto IP for BOOTP is set in SyncThru Web Service. The IP address assignment is failed. This happens when Auto IP for BOOTP is not set in SyncThru Web Service. Ask the sender to try again. The received fax data will be deleted. Reconfirm junk fax setup (See "Changing the fax setup options" on page 1). Try again after a few minutes. Try again. If the problem persists, wait an hour or so for the line to clear and try again. Or, Turn the ECM mode on (See "Fax setup (CLX-3185FN/CLX-3185 FW only)" on page 1). Change the IP address assignment method to DHCP or Static. If you do not change this option, the BOOTP server continually asks to assign the IP address. Change the IP address assignment method to DHCP or Static. If you do not change this option, the BOOTP server continually asks to assign the IP address. Troubleshooting_ 5
-
 1
1 -
2
-
3
-
4
-
5
-
6
-
7
-
8
-
9
-
10
-
11
-
12
-
13
-
14
-
15
-
16
-
17
-
18
-
19
-
20
-
21
-
22
-
23
-
24
-
25
-
26
-
27
-
28
-
29
-
30
-
31
-
32
-
33
-
34
-
35
-
36
-
37
-
38
-
39
-
40
-
41
-
42
-
43
-
44
-
45
-
46
-
47
-
48
-
49
-
50
-
51
-
52
-
53
-
54
-
55
-
56
-
57
-
58
-
59
-
60
-
61
-
62
-
63
-
64
-
65
-
66
-
67
-
68
-
69
-
70
-
71
-
72
-
73
-
74
-
75
-
76
-
77
-
78
-
79
-
80
-
81
-
82
-
83
-
84
-
85
-
86
-
87
-
88
-
89
-
90
-
91
-
92
-
93
-
94
-
95
-
96
-
97
-
98
-
99
-
100
-
101
-
102
-
103
-
104
-
105
-
106
-
107
-
108
-
109
-
110
-
111
-
112
-
113
-
114
-
 115
115 -
 116
116 -
 117
117 -
 118
118 -
 119
119 -
 120
120 -
 121
121 -
 122
122 -
 123
123 -
 124
124 -
 125
125 -
126
-
127
-
128
-
129
-
130
-
131
-
132
-
133
-
134
-
135
-
136
-
137
-
138
-
139
-
140
-
141
-
142
-
143
-
144
-
145
-
146
-
147
-
148
-
149
-
150
-
151
 |
 |