Samsung CLX-3185FN User Manual (user Manual) (ver.2.00) (English) - Page 121
& Install Toner, Prepare IMG unit - waste toner tank
 |
View all Samsung CLX-3185FN manuals
Add to My Manuals
Save this manual to your list of manuals |
Page 121 highlights
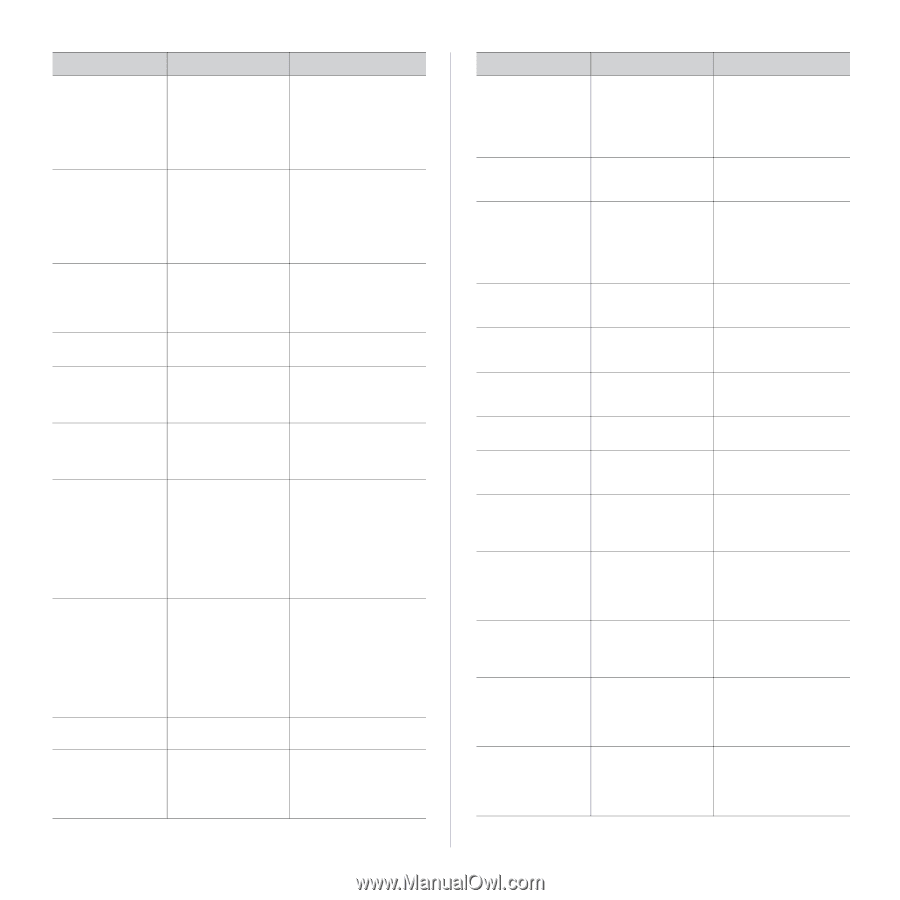
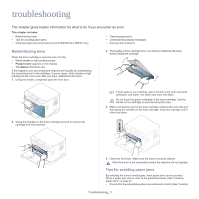
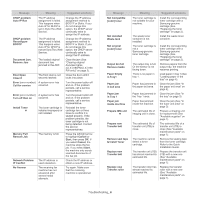
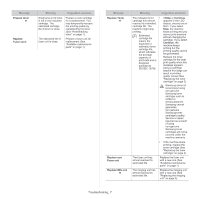
Message Meaning Suggested solutions DHCP problem: Auto IP Run DHCP problem Reconfigure BOOTP Document Jam. Remove Jam Door Open Close it Error [error number] Call for service Error [error number] Turn off then on Install Toner ▼ Memory Full Remove Job Network Problem: IP Conflict No Answer The IP address assignment is failed. This happens when Auto IP for DHCP is set in SyncThru Web Service. The IP address assignment is failed. This happens when Auto IP for DHCP is not set SyncThru Web Service. The loaded original document has jammed in the ADF. The front door is not securely latched. A system error has occurred. A system error has occurred. The toner cartridge is installed improperly or not installed. The memory is full. The IP address is used elsewhere. The receiving fax machine has not answered after several redial attempts. Change the IP address assignment method to BOOTP or Static. If you do not change this option, the DHCP server continually asks to assign the IP address. Change the IP address assignment method to BOOTP or Static. If you do not change this option, the DHCP server continually asks to assign the IP address. Clear the jam (See "Clearing original document jams (CLX-3185FN/CLX-3185 FW only)" on page 2). Close the door until it locks into place. Turn the power button off and on. If the problem persists, call a service representative. Turn the power button off and on. If the problem persists, call a service representative. Reinstall the toner cartridge two or three times to confirm it is seated properly. If the problem persists, the toner cartridge is not being detected. Contact the service representatives. Press the left/right arrow to highlight Cancel or Start, then press OK. If you select Cancel, the machine stops the fax job. If you select Start, the machine only sends scanned documents of the fax job. Check the IP address or obtain a new IP address. Try again. Make sure that the receiving machine is operational. Message Not Compatible [color] toner Not installed Waste tank Not original [color] toner Output bin full Remove media Paper Empty in Tray1 Paper jam in exit area Paper jam in Tray 1 Paper jam inside machine Prepare IMG unit ▼ Prepare new Transfer belt Remove seal tape & Install Toner Replace new Transfer belt Replace new Transfer roller Meaning Suggested solutions The toner cartridge is not suitable for your machine. The waste toner container is not installed. The toner cartridge is not a Samsung-genuine toner cartridge. The output tray is full. Or the sensor is not facing down. There is no paper in tray 1. Paper has jammed in the paper exit area. Paper has jammed in the Tray 1 area. Install the corresponding toner cartridge with a Samsung-genuine cartridge (See "Replacing the toner cartridge" on page 2). Install the waste toner container. Install the corresponding toner cartridge with a Samsung-genuine cartridge (See "Replacing the toner cartridge" on page 2). Remove papers from the output tray, the machine resumes printing. Load paper in tray 1 (See "Loading paper in the tray" on page 4). Clear the jam (See "In the paper exit area" on page 4). Clear the jam (See "In the tray" on page 3). Paper has jammed inside the machine. The estimated life of imaging unit is close. The estimated life of transfer unit (ITB) is close. The machine cannot detect a toner cartridge. The transfer unit (ITB) has almost reached its estimated life. The transfer roller has almost reached its estimated life. Clear the jam (See "In the fuser unit area" on page 3). Prepare a imaging unit for replacement (See "Available supplies" on page 1). The estimated life of a transfer unit (ITB) is close (See "Available maintenance parts" on page 1). Remove the sealing tape from the toner cartridge. Refer to the Quick Installation Guide. Prepare the transfer unit (ITB) with a new one (See "Available maintenance parts" on page 1). Replace the transfer roller with a new one (See "Available maintenance parts" on page 1). Troubleshooting_ 6
-
 1
1 -
2
-
3
-
4
-
5
-
6
-
7
-
8
-
9
-
10
-
11
-
12
-
13
-
14
-
15
-
16
-
17
-
18
-
19
-
20
-
21
-
22
-
23
-
24
-
25
-
26
-
27
-
28
-
29
-
30
-
31
-
32
-
33
-
34
-
35
-
36
-
37
-
38
-
39
-
40
-
41
-
42
-
43
-
44
-
45
-
46
-
47
-
48
-
49
-
50
-
51
-
52
-
53
-
54
-
55
-
56
-
57
-
58
-
59
-
60
-
61
-
62
-
63
-
64
-
65
-
66
-
67
-
68
-
69
-
70
-
71
-
72
-
73
-
74
-
75
-
76
-
77
-
78
-
79
-
80
-
81
-
82
-
83
-
84
-
85
-
86
-
87
-
88
-
89
-
90
-
91
-
92
-
93
-
94
-
95
-
96
-
97
-
98
-
99
-
100
-
101
-
102
-
103
-
104
-
105
-
106
-
107
-
108
-
109
-
110
-
111
-
112
-
113
-
114
-
115
-
 116
116 -
 117
117 -
 118
118 -
 119
119 -
 120
120 -
 121
121 -
 122
122 -
 123
123 -
 124
124 -
 125
125 -
 126
126 -
127
-
128
-
129
-
130
-
131
-
132
-
133
-
134
-
135
-
136
-
137
-
138
-
139
-
140
-
141
-
142
-
143
-
144
-
145
-
146
-
147
-
148
-
149
-
150
-
151
 |
 |