Samsung CLX-3185FN User Manual (user Manual) (ver.2.00) (English) - Page 82
Scanning by a network connection (Scan to Email) (CLX-3185FN/CLX-3185FW only) - scan to pc not available
 |
View all Samsung CLX-3185FN manuals
Add to My Manuals
Save this manual to your list of manuals |
Page 82 highlights
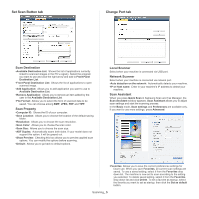
For network connected machine (CLX-3185N/CLX-3185FN/CLX-3185FW/CLX-3185WK only) Make sure the printer driver is installed on your computer using the software CD, since the printer driver includes the scan program (See "Installing wired network-connected machine's driver" on page 3). 1. Make sure that your machine and the computer are connected to a network and Samsung Scan and Fax Manager is installed on the computer. 2. Place a single document face down on the document glass, or load the documents face up into the ADF. For details about loading an original, see "Loading originals" on page 1. 3. Depending on the model, the operating procedure may differ. •For CLX-3185N and CLX-3185WK, press Scan to on the control panel. •For CLX-3185FN and CLX-3185FW, press (Scan) on the control panel. 4. Press the left/right arrow until Scan to PC appears and press OK. 5. Press the left/right arrow until Network PC appears and press OK. If you see Not Available message, check the port connection. 6. Select your registered computer ID, and enter the Password if necessary. •ID is the same ID as the registered Computer ID for Samsung Scan and Fax Manager. •Password is the 4 digit number registered Password for Samsung Scan and Fax Manager. 7. Press the left/right arrow until the application program you want appears and press OK. Default setting is My Documents. To add or delete the folder where the scanned file is saved, add or delete the application program in Samsung Scan and Fax Manager > Properties > Set Scan Button. 8. Press the left/right arrow until the setting you want appears and press OK. •Resolution: Sets the image resolution. •Scan Color: Sets the color mode. •Scan Format: Sets the file format in which the image is to be saved. •Scan Size: Sets the image size. •Scan Format appears only when you selected the Scan destination to My Documents. •If you want to scan from the default setting, press Start. 9. Scanning begins. •Scanned image is saved in computer's My Documents > My Pictures > Samsung folder. •You can use Twain driver to scan quickly in Samsung Scan and Fax Manager program. •You can also scan by pressing Window's Start > Control Panel > Samsung Scan and Fax Manager > Quick Scan. Scanning by a network connection (Scan to Email) (CLX-3185FN/CLX-3185FW only) If you have connected your machine to a network and set up network parameters correctly, you can scan and send images over the network. Setting up an e-mail account To scan and send an image as an email attachment. You need to set up network parameters using SyncThru™ Web Service. 1. Enter your machine's IP address as the URL in a browser and click Go to access the SyncThru™ Web Service website. 2. Click Login on the upper right of the website. The Login window appears. 3. Type in the ID and Password, and then click Login. If it is your first time logging into SyncThru™ Web Service, type in the below default ID and password. •ID: admin •Password: sec00000 4. Move the mouse cursor on the Settings of the top menu bar and then click Network Settings. 5. Click Outgoing Mail Server(SMTP) on the left pane of the website. 6. Enter the SMTP server domain name or the IP address(dotted decimal notation) you want to use on the SMTP Server text box. Only alphabet letters, number(0~9), period(,) and hyphen(-) are permitted in these text boxes. 7. Enter the server port number from 1 to 65535 on Port Number text box. The default port number is 25. 8. Select SMTP Requires Authentication check box in the SMTP Login Information section. 9. Enter the login ID on the Login ID text box and the password on the Password text box. 10. Enter the password one more time on the Confirm Password to confirm your choice. 11. Click Apply. If the authentication method of SMTP server is POP3 before SMTP, select the SMTP requires POP3 Before SMTP Authentication check box. a)Enter the POP3 server domain name on the POP3 Server input field and the port number from 1 to 65535 on the Port Number text boxes respectively. The default port number is 110. b)Enter the login ID on the Login ID text box and the password on the Password text box. c)Enter the password one more time on the Confirm Password to confirm your choice. Scanning to Email You can scan and send an image as an email attachment. First, you need to set up your email account in SyncThru™ Web Service (See "Setting up an e-mail account" on page 2). Before scanning, you can set the scan options for your scan job (See "Changing the settings for each scan job" on page 3). 1. Make sure that your machine is connected to a network. 2. Place a single document face down on the document glass, or load the documents face up into the ADF. For details about loading an original, see "Loading originals" on page 1. Scanning_ 2
-
 1
1 -
2
-
3
-
4
-
5
-
6
-
7
-
8
-
9
-
10
-
11
-
12
-
13
-
14
-
15
-
16
-
17
-
18
-
19
-
20
-
21
-
22
-
23
-
24
-
25
-
26
-
27
-
28
-
29
-
30
-
31
-
32
-
33
-
34
-
35
-
36
-
37
-
38
-
39
-
40
-
41
-
42
-
43
-
44
-
45
-
46
-
47
-
48
-
49
-
50
-
51
-
52
-
53
-
54
-
55
-
56
-
57
-
58
-
59
-
60
-
61
-
62
-
63
-
64
-
65
-
66
-
67
-
68
-
69
-
70
-
71
-
72
-
73
-
74
-
75
-
76
-
 77
77 -
 78
78 -
 79
79 -
 80
80 -
 81
81 -
 82
82 -
 83
83 -
 84
84 -
 85
85 -
 86
86 -
 87
87 -
88
-
89
-
90
-
91
-
92
-
93
-
94
-
95
-
96
-
97
-
98
-
99
-
100
-
101
-
102
-
103
-
104
-
105
-
106
-
107
-
108
-
109
-
110
-
111
-
112
-
113
-
114
-
115
-
116
-
117
-
118
-
119
-
120
-
121
-
122
-
123
-
124
-
125
-
126
-
127
-
128
-
129
-
130
-
131
-
132
-
133
-
134
-
135
-
136
-
137
-
138
-
139
-
140
-
141
-
142
-
143
-
144
-
145
-
146
-
147
-
148
-
149
-
150
-
151
 |
 |