Samsung Digimax-A4 User Manual
Samsung Digimax-A4 Manual
 |
View all Samsung Digimax-A4 manuals
Add to My Manuals
Save this manual to your list of manuals |
Samsung Digimax-A4 manual content summary:
- Samsung Digimax-A4 | User Manual - Page 1
ENGLISH User's Manual Thank you for buying a Samsung Camera. This manual will guide you through using the camera, including capturing images, downloading images and using the software applications. Please read this manual carefully before using your new camera. - Samsung Digimax-A4 | User Manual - Page 2
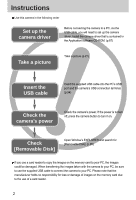
Instructions Use this camera in the following order Set up the camera driver Before connecting the camera to a PC, via the USB cable, you will need to set up the camera driver. Install the camera driver that is contained in the Application software CD-ROM. (p.87) Take a picture Take a picture - Samsung Digimax-A4 | User Manual - Page 3
Instructions on how to use the memory card 15 Maintenance of the memory card 15 Preserving the memory card data 15 Inserting the memory card 17 Removing the memory card 41 Effect 41 Sharpness 42 Save / Load a specific camera configuration (MYSET) 43 PLAY Starting play mode 44 - Samsung Digimax-A4 | User Manual - Page 4
Warning indicator 80 Before contacting a service centre 81 Specifications 84 SOFTWARE Software Notes 86 System Requirements 86 About the software 87 Setting up the application software 88 Starting PC mode 94 Removing the USB Driver for Windows 98SE 97 Removable Disk 98 Removing - Samsung Digimax-A4 | User Manual - Page 5
Getting to know your camera Thank you for buying a Samsung Digital Camera. Prior to using this camera, please read the user manual thoroughly. When you require After Sales service, please bring the camera and the cause of the camera malfunction (such as Batteries, Memory card etc.) to the A/S centre - Samsung Digimax-A4 | User Manual - Page 6
). You must contact your dealer or Samsung Camera Service Centre. Do not continue to use the camera as this may cause a fire or electric shock. Do not insert or drop metallic or inflammable foreign objects into the camera through access points e.g. the memory card slot and battery chamber. This may - Samsung Digimax-A4 | User Manual - Page 7
the correct specification for the camera. Do class B digital device under item with the instructions, it Samsung agent or a radio/TV engineer. This device complies with part 15 of the FCC Rules. Changes or modifications not expressly approved by the party responsible for compliance could void user - Samsung Digimax-A4 | User Manual - Page 8
To buy the optional equipment, contact your nearest Samsung dealer or Samsung service centre. < Included items > Pouch(Option) User manual Product warranty Camera strap Software CD (see p.87) DPOF compatible printer(see p.58) SD memory card (see p.17) CR-V3 battery Rechargeable battery (SNB - Samsung Digimax-A4 | User Manual - Page 9
94) PictBridge compatible printer(see p.62) System Requirements For Windows PC with processor better than MMX Pentium 233MHz (XP : Pentium II 300MHz) Windows 98/ 98SE/ 2000/ ME/ XP Minimum 32MB RAM (XP : 128MB) 140MB of available hard-disk space USB port CD-ROM drive 800x600 pixels, 16-bit colour - Samsung Digimax-A4 | User Manual - Page 10
button Flash Power button Speaker Self-timer lamp Lens Microphone Back & Bottom Camera status lamp LCD monitor +/-, DELETE button LCD button Play mode button Tripod socket Zoom W button (Thumbnail) Zoom T button (Digital zoom) 5-function button USB connection port DC input connection port 10 - Samsung Digimax-A4 | User Manual - Page 11
memo/ UP button Memory card slot Battery chamber FLASH/ LEFT button SELF-TIMER/ RIGHT button MENU/ OK button MACRO/ PLAY&PAUSE/ DOWN button Mode switch You can select the desired working mode by using the mode switch located on the top of the camera. This digital camera has 3 recording modes - Samsung Digimax-A4 | User Manual - Page 12
will be taken after about 10 seconds and 2 seconds later a Blinking second picture will be taken. Camera Status Lamp Status Power on After taking a picture While movie recording While voice recording When the USB cable is inserted Transmitting Data Description The lamp turns on and off when the - Samsung Digimax-A4 | User Manual - Page 13
for a digital camera (Within Samsung SBP-1303(Lithium Ion battery) INFORMATION Important information about battery usage It is easy to buy alkaline batteries. However, the duration for using batteries varies in accordance with the battery manufacturer or the photographic conditions. When the camera - Samsung Digimax-A4 | User Manual - Page 14
metallic materials. Please ensure that you use an AC adapter (3.3V 2.0A) with the correct specification for the camera. Failure to do so may affect your warranty. Using the batteries : If the camera does not turn on after you have inserted batteries, please check whether the batteries are inserted - Samsung Digimax-A4 | User Manual - Page 15
not use a memory card that is used in another digital camera. To use the memory card in this camera, format first the memory card by using this camera. Do not use a memory card formatted by another digital camera or memory card reader. Preserving the memory card data If the memory card is subjected - Samsung Digimax-A4 | User Manual - Page 16
Green) is blinking as this may cause damage to data in the memory card. The camera can use SD Memory Cards and MMC (Multi Media Card). Card pins Write protect switch Label [ SD(Secure Digital) memory card ] The SD memory card has a write protect switch that prevents image files from being deleted - Samsung Digimax-A4 | User Manual - Page 17
in the direction of the arrow to open. 2. Have the front of the memory card facing toward the front of the camera (lens) and the card pins toward the back of the camera (LCD monitor), and then push the memory card into the card slot until you hear a click. 3. To close, push the battery chamber cover - Samsung Digimax-A4 | User Manual - Page 18
selections. [ Image & Full Status ] No. Description 1 Battery Icons 2 Recording mode 3 Flash 4 Self-timer 5 Macro 6 Metering 7 Memory in use indicator 8 Auto focus frame 9 Camera shake warning 10 Date/ Time 11 Exposure compensation 12 White Balance 13 ISO 18 2004/12 - Samsung Digimax-A4 | User Manual - Page 19
00:25:43 18 Voice memo p.25 19 Optical zoom/ Digital zoom rate Starting the recording mode If the memory card is inserted in the camera, all the camera functions apply only to the memory card. If the memory card is not inserted in the camera, all the camera functions apply only to the internal - Samsung Digimax-A4 | User Manual - Page 20
Starting the recording mode Pausing while recording a movie clip (Successive Recording) This camera allows you to temporarily stop during unwanted scenes, while recording a movie clip. Using this function, you can record your favorite scenes into a movie clip without - Samsung Digimax-A4 | User Manual - Page 21
Steps from 1-4 are the same as those for recording a movie clip. 5. Select the STILL IMAGE( ) mode by sliding the mode switch. 6. Point the camera towards the subject and compose the image by using the LCD monitor. 7. Press the shutter button to capture an image. INFORMATION [ STILL IMAGE - Samsung Digimax-A4 | User Manual - Page 22
. When the Flash Off or Slow synchro mode is selected in a low lighting condition, the camera shake warning indicator ( ) may appear on the LCD monitor. In this case, use a tripod, support the camera on a solid surface or change the flash mode to flash shot mode. Backlight compensated shots : When - Samsung Digimax-A4 | User Manual - Page 23
camera buttons. POWER button Used for turning the camera's power on / off. To turn on the camera power, press the power button. If there is no operation during the specified time, the camera available recording time in the memory allows. If you wish to after the camera has finished storing the image - Samsung Digimax-A4 | User Manual - Page 24
button activates the digital zoom software. Releasing ZOOM T button stops the digital zooming at the required setting. Once the maximum digital zoom (4X) camera. Pressing the ZOOM W button Pressing the ZOOM W button [TELE zoom] [Optical zoom 2X] [WIDE zoom] Digital zoom WIDE : When the digital - Samsung Digimax-A4 | User Manual - Page 25
W/ T button INFORMATION Images taken using the digital zoom may take a little longer for the camera to process. Allow time for this to take place. The digital zoom cannot be used in movie clip shots. You may notice a decrease in image quality when using the digital zoom. If the movie clip is being - Samsung Digimax-A4 | User Manual - Page 26
shutter button and take a picture. The picture is stored on the memory. 4. Voice memo will be recorded for ten seconds from the moment button will stop the voice memo. INFORMATION A distance of 40cm between you and the camera (microphone) is the best distance to record sound. Macro( ) / Down button - Samsung Digimax-A4 | User Manual - Page 27
button halfway. When the green auto focus frame lights up, it means the camera is focused on the subject. Be careful not to press the SHUTTER button all 3. With the SHUTTER button still pressed down only halfway, move the camera to recompose your picture as desired, and then press the SHUTTER button - Samsung Digimax-A4 | User Manual - Page 28
Flash( ) / Left button When the menu is displayed on the LCD monitor, pressing the LEFT button makes the cursor shift to the left tab. When the menu is not displayed on the LCD monitor, the LEFT button operates as the FLASH( ) button. Selecting the flash mode 1. Slide the mode switch to the STILL - Samsung Digimax-A4 | User Manual - Page 29
order to obtain the correct exposure. We recommend using a tripod for this function. When you take an image in a condition with poor light, the camera shake warning indicator ( ) will display on the LCD monitor. Flash off The flash does not fire. Select this mode when capturing images in a place - Samsung Digimax-A4 | User Manual - Page 30
Self-timer( ) / Right button When the menu is displayed on the LCD monitor, pressing the Right button makes the cursor shift to the right tab. When the menu is not displayed on the LCD monitor, the RIGHT button operates as the Selftimer( ) button. This function is used when the photographer would - Samsung Digimax-A4 | User Manual - Page 31
not be displayed on the LCD monitor in the following circumstances: - When another button is being operated. - While image data is being processed. (When the camera status lamp blinks) - When there is no battery capacity. When the menu is showing on the LCD monitor, it is not possible to operate the - Samsung Digimax-A4 | User Manual - Page 32
set will be displayed on the LCD monitor. AUTO : The camera automatically selects the appropriate white balance settings, depending on the prevailing under tungsten (standard light bulb) lighting. CUSTOM : Allows the user to set the white balance according to the shooting condition. - Samsung Digimax-A4 | User Manual - Page 33
, starting with the next picture you take. - The user configured white balance will be remain effective until it is overwritten. [ White paper ] ISO: You can select the ISO sensitivity when taking pictures. The speed or specific light-sensitivity of a camera is rated by ISO numbers. Selecting an ISO - Samsung Digimax-A4 | User Manual - Page 34
+/- button Exposure compensation : This camera automatically adjusts the exposure according to the ambient lighting conditions. You can also select the exposure value by using the +/- button. Compensating Exposure 1. Press the +/- - Samsung Digimax-A4 | User Manual - Page 35
LCD button You can check the recording status in the LCD monitor. Pressing the LCD button in the RECORDING (STILL IMAGE, MOVIE CLIP) mode will change the display as shown below. Pressing the LCD button [ Image & full information ] [ Image & basic information ] Pressing the LCD button 35 - Samsung Digimax-A4 | User Manual - Page 36
Using the LCD monitor to adjust the camera settings You can use the menu on the LCD monitor to set up E LANDSCAPE N E TEXT 2272X1704(P) 2048X1536 1600X1200(M) 1024X768 640X480(E) 640X480 320X240 160X120 S.FINE FINE NORMAL 15FPS 24FPS Camera working mode Page p.38 p.39 p.40 36 - Samsung Digimax-A4 | User Manual - Page 37
Page p.41 p.41 p.42 p.43 * Menus are subject to change without prior notice. How to use the menu 1. Turn on the camera and press the MENU button. A menu for each camera mode appears. However, there is no menu for Voice Recording mode ( ). 2. Use the LEFT and RIGHT buttons to navigate through the - Samsung Digimax-A4 | User Manual - Page 38
mode. AUTO PROGRAM SCENE : Use this for shooting basic still images. : Selecting the automatic mode will configure the camera with optimal settings. You can still manually configure all functions except the aperture value and shutter speed. : Use the menu to easily configure optimal settings for - Samsung Digimax-A4 | User Manual - Page 39
CLIP mode ] INFORMATION The higher the resolution, the lower the number of available shots will be because high resolution images require more memory than lower resolution images. The selectable image sizes in the AUTO mode are listed below. - P (2272X1704) : For printing the image - M (1600X1200 - Samsung Digimax-A4 | User Manual - Page 40
appropriate for your needs. This file format complies with the DCF(Design rule for Camera File system). JPEG (Joint Photographic Experts Group) : JPEG is the image compression be varied by subject matter and memory card type. If you select 640X480 size and 24FPS frame rate, we recommend using an - Samsung Digimax-A4 | User Manual - Page 41
do not use the spot metering as this may result in an exposure error. In this circumstance, rather use exposure compensation. Effect By using the camera's digital processor, it is possible to add special effects to your images. 2048 EFFECT NORMAL NOR B & W SEPIA 640 2048 EFFECT NORMAL NOR - Samsung Digimax-A4 | User Manual - Page 42
sharpness effect on the LCD monitor before you take a picture, because this function is applied only when the captured image is stored on the memory. N20O4R8 SHARPNESS SOFT NORMAL VIVID [PROGRAM mode] Sub menu Icon Description SOFT The edges of the image are softened. This effect is suitable - Samsung Digimax-A4 | User Manual - Page 43
MYSET LOAD CANCEL 3. Press the UP/DOWN buttons to select desired MYSET SAVE MYSET1 slot number to load. 4. Press the OK button to set the camera configuration as MOVE : CHANGE : saved in the MYSET slot. [PROGRAM mode] * The current MYSET slot number is displayed in the top left of the - Samsung Digimax-A4 | User Manual - Page 44
Starting play mode If the memory card is inserted in the camera, all the camera functions apply only to the memory card. If the memory card is not inserted in the camera, all the camera functions apply only to the internal memory. If you have turned on the camera by pressing the POWER button, you - Samsung Digimax-A4 | User Manual - Page 45
Starting play mode Playing back a movie clip Steps from 1-2 are the same as those to play back a still image. 3. Select the recorded movie clip that you want to play back by using the LEFT/RIGHT button. If you select a movie clip, the movie clip indicator ( ) will be displayed on the LCD - Samsung Digimax-A4 | User Manual - Page 46
LCD monitor indicator The LCD monitor displays information about the shooting conditions. No. Description 1 Battery 2 Play mode 3 File Type 4 Voice memo 5 Protect indicator 6 DPOF indicator 7 Stored image number Icon Page p.14 p.48 p.57 p.58 9 If you press the LCD button, you - Samsung Digimax-A4 | User Manual - Page 47
In Play mode, you can use the buttons on the camera to conveniently set up the Play mode functions. Thumbnail( ) / Enlargement( ) button You can view multiple pictures, enlarge a selected picture, and crop and save a selected area - Samsung Digimax-A4 | User Manual - Page 48
images are saved in their last file names. CANCEL : cancels trimming. - If there is little memory space to save the trimmed image, the image can t be trimmed. Voice( ) memo / Up button and the voice memo indicator will display. The camera is now ready to record a voice memo. START:SHUTTER 48 - Samsung Digimax-A4 | User Manual - Page 49
for 10 seconds. While the voice is recording, the recording status window will be displayed as shown alongside. 4. The recording can be stopped recorded onto movie clip files. - A distance of 40cm between you and the camera (microphone) is the best distance to record sound. - The voice memo will - Samsung Digimax-A4 | User Manual - Page 50
is changed by using the 5 function button. LCD( ) button The shooting information will be displayed on the LCD monitor. The last image stored in the memory is displayed on the LCD monitor by pressing the play mode button. Pressing the LCD( ) button in the PLAY mode will change the display as - Samsung Digimax-A4 | User Manual - Page 51
Delete( ) button This deletes images stored on the memory card. Deleting Images in Play Mode 1. Select an image that you want to is selected : cancels "Delete Image". INFORMATION Before deleting images from the camera, you should protect or download images to your computer that you wish to keep. 51 - Samsung Digimax-A4 | User Manual - Page 52
capture an image after setting up the play menu, press the PLAY button. Menu tab Main menu SLIDE RESIZE PROTECT DELETE ALL DPOF COPY TO CARD Sub menu INTERVAL REPEAT START 2048X1536 1600X1200 1024X768 640X480 LOGO ONE PIC ALL PICS NO YES STANDARD INDEX SIZE CANCEL NO YES Secondary menu - Samsung Digimax-A4 | User Manual - Page 53
printer (direct connection to the camera, sold separately) with a USB cable. Menu tab Main menu IMAGES PRINT DPOF PRINT AUTO SET CUSTOM SET Sub menu ONE PIC ALL PICS STANDARD INDEX NO YES NO YES SIZE LAYOUT Secondary menu - AUTO POSTCARD 4X6 8.5X11 A6 A4 B5 AUTO INDEX FULL 1 2 4 6 8 Page - Samsung Digimax-A4 | User Manual - Page 54
Setting up the play back function using the LCD monitor Menu tab Main menu Sub menu TYPE CUSTOM SET QUALITY DATE FILE NAME NO RESET YES Menus are subject to change without prior notice. Secondary menu AUTO PLAIN PHOTO FAST PHO. AUTO DRAFT NORMAL FINE AUTO OFF ON AUTO OFF ON - Page p.65 p.66 - Samsung Digimax-A4 | User Manual - Page 55
Starting the slide show Images can be displayed continuously at pre-set intervals. 1. Press the play mode button and press the menu button. 2. Press the LEFT/ RIGHT button and select the [SLIDE] menu tab. Setting play interval : Set the slide show play interval. 1. Use the Up/Down buttons to select - Samsung Digimax-A4 | User Manual - Page 56
only those files compressed in the JPEG 4:2:2 format. The resized image will have a new file name. The [LOGO] image is stored not on the memory card but on the internal memory. Only one [LOGO] image can be saved. If you save a new [LOGO] image, the existing startup image will be deleted. If the - Samsung Digimax-A4 | User Manual - Page 57
Protecting images This is used to protect specific shots from being accidentally erased (LOCK). It also unprotects images that have been previously protected (UNLOCK). Protecting Images 1. Press the play mode button and press - Samsung Digimax-A4 | User Manual - Page 58
the camera's internal memory (i.e., not on the memory card) and it will not be deleted even if you delete all files on the memory card. images are not deleted. DPOF DPOF(Digital Print Order Format) allows you to embed printing information on your memory card's MISC folder. Select the pictures - Samsung Digimax-A4 | User Manual - Page 59
button and press the RIGHT button. 4. Use the UP and DOWN buttons to select [ONE PIC] or [ALL PICS], and then press the OK button. A window for selecting number of copies. [ONE PIC] : Set the number of copies to print for the current picture only. [ALL PICS] : Set the number of - Samsung Digimax-A4 | User Manual - Page 60
specify the print size when printing images stored on the memory card. The [SIZE] menu is available only for DPOF 1.1 on the printer manufacturer. For your printer's default value, please refer to the user's guide that came with your printer. DPOF : CANCEL You can cancel the [STANDARD], - Samsung Digimax-A4 | User Manual - Page 61
in the internal memory (16MB), the [COPY TO CARD] command will copy only some of the images and display [CARD FULL!] message. Then the system will return to the playback mode. Please be sure to delete any unnecessary images to free up space before inserting the memory card into the camera. 61 - Samsung Digimax-A4 | User Manual - Page 62
button and press the OK button. 6. Press the menu button twice and the menu will disappear. 7. Use the supplied USB cable to connect the camera to the printer as shown below. 8. Turn on the printer to connect the camera to the printer. If you selected [COMPUTER] in Step 5, when you connect the - Samsung Digimax-A4 | User Manual - Page 63
PictBridge : Picture Selection Select pictures to print 1. Connect the camera to your printer. The USB menu must be set to [PRINTER] before you connect the camera to the printer. (See p.62) 2. The [IMAGES] menu will appear. IMAGES ONE PIC 3. Use the UP and DOWN buttons to select the desired - Samsung Digimax-A4 | User Manual - Page 64
camera to the printer. (See p.62) PRINT 2. Use the LEFT and RIGHT buttons to select the [PRINT] menu tab. STANDARD INDEX 3. Use the UP and DOWN buttons to select the desired submenu value, and then press the OK button. MOVE : SET : OK [STANDARD] : Print the pictures stored in the memory card - Samsung Digimax-A4 | User Manual - Page 65
camera to your printer. The [USB] menu must be set to [PRINTER] before you connect the camera to name Sub menu AUTO, POSTCARD, 4x6, 8.5x11, A6, A4, B5 AUTO, INDEX, FULL, 1, 2, 4, 6, 8 AUTO, supported in all manufacturer and printer models. If the setting values are not changed in the automatic/manual - Samsung Digimax-A4 | User Manual - Page 66
PictBridge : RESET Initialises user-changed configurations. 1. Connect the camera to your printer. The [USB] menu must be set to [PRINTER] before you connect the camera to the printer. (See p.62) 2. Use For your printer's default setting, refer to the user's guide that came with your printer. 66 - Samsung Digimax-A4 | User Manual - Page 67
set up basic settings. You can use the setup menu in all camera modes, except Voice Recording mode. The items indicated by are default settings. Menu tab Main menu FILE PWR SAVE LANGUAGE Sub menu RESET SERIES OFF, 1, 3, 5, 10MIN ENGLISH FRANÇAIS DEUTSCH ESPAÑOL ITALIANO Secondary menu - P"CCK - Samsung Digimax-A4 | User Manual - Page 68
file name will be set from 0001 even after formatting, deleting all or inserting a new memory card. [SERIES] : New files are named using numbers that follow the previous sequence, even when a new memory card is used, or after formatting, or after deleting all pictures 5. Press the menu button - Samsung Digimax-A4 | User Manual - Page 69
are assigned sequentially from STA40001 → STA40002 → ~ → STA49999. The files used with the memory card conform to the DCF(Design rule for Camera File systems) format. Auto power off This function switches the camera off after a set amount of time in order to prevent unnecessary battery drainage - Samsung Digimax-A4 | User Manual - Page 70
Select a desired sub menu by pressing the UP/ DOWN FILE PWR SAVE LANGUAGE BACK : ENGLISH FRANÇAIS SET : OK button and press the OK button. LANGUAGE sub menu : English, Korean, French, German, Spanish, Italian, S. Chinese, T. Chinese, Russian, Portuguese, Dutch, Danish, Swedish, Thai, Malaysian - Samsung Digimax-A4 | User Manual - Page 71
on the following types of memory card. - A new memory card, or an unformatted memory card. - A memory card that has a file this camera can t recognise or one that has been taken from another camera. Always format the memory card using this camera. If you insert a memory card that has been formatted - Samsung Digimax-A4 | User Manual - Page 72
Setting up the Date/ Time You can change the date and time that will be displayed on the captured images. Setting Date/Time 1. In any mode with the exception of Voice Recording mode, press the MENU button. 2. Press the LEFT/ RIGHT button and select the [SETUP] P 2272 SETUP menu tab. 3. Select - Samsung Digimax-A4 | User Manual - Page 73
. Sound If you set the operation sound to ON, various sounds will be activated for camera startup, when button are pressed, and if there is a card error, so that you can be aware of the camera operation status. Setting Operation Sounds 1. In any mode with the exception of Voice Recording mode - Samsung Digimax-A4 | User Manual - Page 74
sub menu by pressing the UP/ DOWN IMPRINT SOUND USB BACK : COMPUTER PRINTER SET : OK button and press the OK button. [COMPUTER] : Select this if you want to connect the camera to your PC. Refer to page 94 for instructions on how to connect the camera to your PC. [PRINTER] : Select this if you - Samsung Digimax-A4 | User Manual - Page 75
and press the RIGHT button. 4. Select a desired sub menu by pressing the UP/ DOWN USB LCD Q.VIEW BACK : 0.5 SEC SET : OK button and press the OK button. [OFF for DATE/TIME and LANGUAGE will not be changed. Initialising the Camera 1. In any mode with the exception of Voice Recording mode, - Samsung Digimax-A4 | User Manual - Page 76
tab Main menu S.IMAGE SH.SOUND S.SOUND Sub menu OFF IMAGE1 IMAGE2 USER IMAGE OFF SH.SOUND1 SH.SOUND2 SH.SOUND3 OFF SOUND1 SOUND2 SOUND3 select the image that is first displayed on the LCD monitor whenever the camera is turned on. Setting a Startup Image 1. In any mode with the - Samsung Digimax-A4 | User Manual - Page 77
S.IMAGE SH.SOUND S.SOUND OFF SH.SOUND1 SH.SOUND2 BACK : SET : OK Start up sound You can select the sound that is activated whenever the camera is turned on. Setting the Startup Sound 1. In any mode with the exception of Voice Recording mode, press the MENU button. 2. Press the LEFT/ RIGHT - Samsung Digimax-A4 | User Manual - Page 78
the unit unusable. Extremes in temperature may cause problems. - If the camera is transferred from a cold to a warm and digital camera is not used for a long period, an electric discharge can occur. It is a good idea to remove the batteries and the memory card if you do not intend using the camera - Samsung Digimax-A4 | User Manual - Page 79
interference, it will turn itself off to protect the memory card. Camera Maintenance - Use a soft brush (available from camera and is not a malfunction. When images are uploaded or downloaded, the data transfer may be affected by static electricity. In this case, disconnect and re-connect the USB - Samsung Digimax-A4 | User Manual - Page 80
NO IMAGE ! - There are no images stored on the memory card - Take images - Insert a memory card that is holding some images FILE ERROR ! - File error - Memory card error - Format the memory card - Contact a camera service centre LOW BATTERY ! - There is low battery capacity - Insert fresh - Samsung Digimax-A4 | User Manual - Page 81
Before contacting a service centre Please check the following Symptom Causes Remedy The camera doesn t switch on - There is low memory capacity - The memory card has not been formatted - The memory card is exhausted - The camera's power is off - The batteries are exhausted - The memory card - Samsung Digimax-A4 | User Manual - Page 82
Before contacting a service centre Symptom The images are unclear Causes Remedy - A picture was re-insert batteries and switch the camera on A card error has occurred while the memory card is in the camera. - Incorrect memory card format - Re-format the memory card (p.71) The images don't play - Samsung Digimax-A4 | User Manual - Page 83
Before contacting a service centre Symptom Causes Colour of image is different to the operating system is not Windows 98, 98SE, 2000, ME, XP/ Mac OS 9.0~10.2. Alternatively the PC does not support USB - The camera driver is not installed - Check the connection - Turn the camera on - Insert new - Samsung Digimax-A4 | User Manual - Page 84
Specifications Image Sensor Type Effective Pixel Total Pixel Focal Length Lens F No. Digital Zoom LCD : memory capacity dependent) Size : 640x480, 320x240, 160x120(user selectable) Frame rate : 24 fps, 15 fps Pause Function in Movie Clip Internal : 16MB External Memory Slot : SD card / MMC - Samsung Digimax-A4 | User Manual - Page 85
~ 85% Storage Driver (Windows98/98SE) Arcsoft PhotoImpression, Digimax Viewer Power Movie Clip(Pause Function in Movie Clip & VGA 24fps), 10cm Macro, Various Scene Modes, Voice Recording, Samsung High Definition(SHD) Lens, Pictbridge Printing, 16MB Internal Memory * Specifications are subject - Samsung Digimax-A4 | User Manual - Page 86
ensure that you read the instruction manual carefully before use. The attached software is a camera driver and image editing software tool for Windows. Under no circumstances should all or part of either the software or the user manual be reproduced. Copyrights for software are licensed only for use - Samsung Digimax-A4 | User Manual - Page 87
used in this manual are based on the Samsung Digimax A4. Camera driver : This enables images to transfer between the camera and PC. This camera uses the USB Storage Driver as the camera driver. You can use the camera as a USB card reader. After installing the driver and connecting this camera to the - Samsung Digimax-A4 | User Manual - Page 88
software, disconnect the USB connection. You can visit the Samsung web-site through the internet. http://www.samsungcamera.com : English http://www.samsungcamera.co.kr : Korean 1. Click the [Install] menu in the Autorun frame. The camera driver is installed automatically. [Click!] 2. Camera driver - Samsung Digimax-A4 | User Manual - Page 89
application program installation will be cancelled. 4. Install Digimax Viewer. Click [Next >] button. [Click!] INFORMATION If you select [Cancel] at step 4, a window for installing PhotoImpression will be displayed. 5. The Software License Agreement window will be displayed. If you agree to this - Samsung Digimax-A4 | User Manual - Page 90
up the application software 7. A window will open, asking you to choose a folder to which program icons will be added. Click [Next >] button. If you want to add the program icons to a different folder, choose another folder, and then click [Next >] button. [Click!] 8. Digimax Viewer installation - Samsung Digimax-A4 | User Manual - Page 91
up the application software 11. The Software License Agreement window will be displayed. If you agree to this, click [Yes], the window will then move to the next step. If you disagree, click [No] and the installation program will be cancelled. [Click!] 12. A destination selection window will open - Samsung Digimax-A4 | User Manual - Page 92
is Windows XP, an image viewer program will open. If the image viewer program opens, the camera driver was setup successfully. 18. If you can see [Removable Disk] under [My computer], the camera driver installation was successful. Now you can transfer image files from the camera to PC via the USB - Samsung Digimax-A4 | User Manual - Page 93
. 1. Delete the camera driver (p.97), and re-install the driver. 2. Refer to FAQ (p.103) to check for a possible solution to the problem. 3. If your PC's central processing unit is VIA chip (This is shown in the USB Host Controller), download the patch file from the Samsung Camera web page. (http - Samsung Digimax-A4 | User Manual - Page 94
on your PC and then turn on the power, the camera will automatically switch to "computer connection mode". In this mode, you can download stored images to your PC through the USB cable. The LCD monitor is always turned off in PC mode. The camera status lamp will blink when the files are transferring - Samsung Digimax-A4 | User Manual - Page 95
Starting PC Mode Downloading stored images You can download the still images stored on the camera to your PC's hard disk and print them or use a photo editing software to edit them. 1. Connect the camera to your PC with the USB cable. 2. On your computer's desktop display, select [My computer] and - Samsung Digimax-A4 | User Manual - Page 96
Starting PC Mode 6. Press the right mouse button and a pop-up menu will open. Click [Paste]. 7. An image file is transferred from the camera to your PC. - By using [Digimax Viewer], you can see the stored images in the memory directly on the PC monitor and you can copy or move the image files. 96 - Samsung Digimax-A4 | User Manual - Page 97
Removing the USB Driver for Windows 98SE To remove the USB driver, refer to the process shown below. 1. Trace [Start → Settings] and click [Control Panel]. 2. Double-click [Add/Remove programs]. 3. The [Add/Remove Programs Properties] window will open. Click [Digimax A4] and click the [Add/Remove] - Samsung Digimax-A4 | User Manual - Page 98
camera as a Removable Disk, install (p.88) the USB Driver. 1. Before turning the camera power on, connect the camera to the PC with the USB cable. 2. Click [Removable Disk] under [My computer] or [Windows stored on the memory. When you upload a file that is not taken by this camera to Removable Disk - Samsung Digimax-A4 | User Manual - Page 99
to wait until the lamp illuminates. 2. Unplug the USB cable. Windows 2000/ME/XP (The illustrations may be different from the real display in accordance with the Windows O/S.) 1. Check whether the camera and PC are transferring a file. If the camera status lamp blinks, you have to wait until the - Samsung Digimax-A4 | User Manual - Page 100
or Eject Hardware] window will open. Click the [Close] button and the removable disk will be removed safely. 7. Unplug the USB cable. [Click!] Setting up the USB Driver for MAC 1. A USB Driver for MAC is not included with the software CD as MAC OS supports the camera driver. 2. Check the MAC - Samsung Digimax-A4 | User Manual - Page 101
software is only compatible with Windows. 1. To open Digimax Viewer, click the [Start → Programs → Samsung → Digimax Viewer 2.1 → Digimax Viewer 2.1 ] and Digimax from the camera, you should protect or download images to your computer that you wish to keep. Refer to the [Help] menu in Digimax viewer - Samsung Digimax-A4 | User Manual - Page 102
downloaded from the camera. This software is only available in Windows version. To start the program, click [Start → Programs → ArcSoft PhotoImpression → PhotoImpression]. The following screen will appear. [ Help , Insert Greeting Cards, Insert Template, or Connect with Other Software. 102 Saves - Samsung Digimax-A4 | User Manual - Page 103
detailed instructions on how to use PhotoImpression, please refer to the program's Help. FAQ Please check the following if the USB connection malfunctions. [Case 1] The camera power is off. → Turn the camera power on. We recommend using an AC power adapter in PC mode. [Case 2] USB Driver is - Samsung Digimax-A4 | User Manual - Page 104
" tab and then click [Update Driver] or [Reinstall Driver]. → When all the conditions mentioned above are met, the computer can support the USB interface. [Case 7] When using the USB hub. → There may be a problem in connecting the camera to the PC through the USB hub if the PC and the hub are - Samsung Digimax-A4 | User Manual - Page 105
the question(?) or exclamation (!) mark and select "Remove". Restart the PC and connect the camera the again. For Windows 98 PC, remove the camera driver also, restart the PC, and then reinstall the camera driver. → Double-click on the entry with the question (?) or exclamation (!) mark, click the - Samsung Digimax-A4 | User Manual - Page 106
Decoder as following order. Click [Start → Run] and a window will open. Type "regsvr32 /u m3jpgdec.ax" and press problems will be solved with those remedies. If the movie clip doesn't play back continuously, install the JPEGCODE provided with the camera again. For more information, visit the samsung - Samsung Digimax-A4 | User Manual - Page 107
MEMO 107 - Samsung Digimax-A4 | User Manual - Page 108
DIGITAL IMAGING DIVISION 145-3, SANGDAEWON 1-DONG, JUNGWONGU, SUNGNAM-CITY, KYUNGKI-DO, KOREA 462-121 TEL : (82) 31-740-8086,8088, 8090, 8092, 8099 FAX : (82) 31-740-8398, 8111 www.samsungcamera.com SAMSUNG only) UK Service Hotline : 01932455320 www.samsungcamera.co.uk SAMSUNG OPTO-ELECTRONICS GMBH
-
 1
1 -
 2
2 -
 3
3 -
 4
4 -
 5
5 -
 6
6 -
 7
7 -
8
-
9
-
10
-
11
-
12
-
13
-
14
-
15
-
16
-
17
-
18
-
19
-
20
-
21
-
22
-
23
-
24
-
25
-
26
-
27
-
28
-
29
-
30
-
31
-
32
-
33
-
34
-
35
-
36
-
37
-
38
-
39
-
40
-
41
-
42
-
43
-
44
-
45
-
46
-
47
-
48
-
49
-
50
-
51
-
52
-
53
-
54
-
55
-
56
-
57
-
58
-
59
-
60
-
61
-
62
-
63
-
64
-
65
-
66
-
67
-
68
-
69
-
70
-
71
-
72
-
73
-
74
-
75
-
76
-
77
-
78
-
79
-
80
-
81
-
82
-
83
-
84
-
85
-
86
-
87
-
88
-
89
-
90
-
91
-
92
-
93
-
94
-
95
-
96
-
97
-
98
-
99
-
100
-
101
-
102
-
103
-
104
-
105
-
106
-
107
-
108
 |
 |

Thank you for buying a Samsung Camera.
This manual will guide you through using the camera, including capturing images, downloading images and
using the software applications. Please read this manual carefully before using your new camera.
ENGLISH
User
'
s Manual