Samsung GT-P3113TSYXAR User Manual - Page 47
Managing Contact Entries
 |
View all Samsung GT-P3113TSYXAR manuals
Add to My Manuals
Save this manual to your list of manuals |
Page 47 highlights
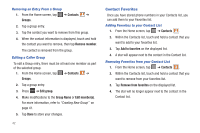
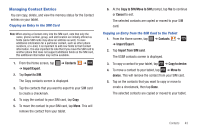
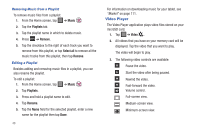
Managing Contact Entries You can copy, delete, and view the memory status for the Contact entries on your tablet. Copying an Entry to the SIM Card Note: When storing a Contact entry into the SIM card, note that only the name, phone number, group, and slot location are initially offered as fields (some SIM cards may allow an address as well). To save additional information for a particular contact, such as other phone numbers, or e-mail, it is important to add new fields to that Contact information. It is also important to note that if you move the SIM card to another phone that does not support additional fields on the SIM card, this additional information may not be available. 1. From the Home screen, tap ➔ Contacts ➔ ➔ Import/Export. 2. Tap Export to SIM. The Copy contacts screen is displayed. 3. Tap the contacts that you want to export to your SIM card to create a checkmark. 4. To copy the contact to your SIM card, tap Copy. 5. To move the contact to your SIM card, tap Move. This will remove the contact from your tablet. 6. At the Copy to SIM/Move to SIM prompt, tap Yes to continue or Cancel to exit. The selected contacts are copied or moved to your SIM card. Copying an Entry from the SIM Card to the Tablet 1. From the Home screen, tap ➔ Contacts ➔ ➔ Import/Export. 2. Tap Import from SIM card. The USIM contacts screen is displayed. 3. To copy a contact to your tablet, tap ➔ Copy to device. 4. To move a contact to your tablet, tap ➔ Move to device. This will remove the contact from your SIM card. 5. Tap on the contacts that you want to copy or move to create a checkmark, then tap Done. The selected contacts are copied or moved to your tablet. Contacts 43
-
 1
1 -
2
-
3
-
4
-
5
-
6
-
7
-
8
-
9
-
10
-
11
-
12
-
13
-
14
-
15
-
16
-
17
-
18
-
19
-
20
-
21
-
22
-
23
-
24
-
25
-
26
-
27
-
28
-
29
-
30
-
31
-
32
-
33
-
34
-
35
-
36
-
37
-
38
-
39
-
40
-
41
-
 42
42 -
 43
43 -
 44
44 -
 45
45 -
 46
46 -
 47
47 -
 48
48 -
 49
49 -
 50
50 -
 51
51 -
 52
52 -
53
-
54
-
55
-
56
-
57
-
58
-
59
-
60
-
61
-
62
-
63
-
64
-
65
-
66
-
67
-
68
-
69
-
70
-
71
-
72
-
73
-
74
-
75
-
76
-
77
-
78
-
79
-
80
-
81
-
82
-
83
-
84
-
85
-
86
-
87
-
88
-
89
-
90
-
91
-
92
-
93
-
94
-
95
-
96
-
97
-
98
-
99
-
100
-
101
-
102
-
103
-
104
-
105
-
106
-
107
-
108
-
109
-
110
-
111
-
112
-
113
-
114
-
115
-
116
-
117
-
118
-
119
-
120
-
121
-
122
-
123
-
124
-
125
-
126
-
127
-
128
-
129
-
130
-
131
-
132
-
133
-
134
-
135
-
136
-
137
-
138
-
139
-
140
-
141
-
142
-
143
-
144
-
145
-
146
-
147
-
148
-
149
 |
 |